 Home
Home PC Game Trailers
 News
News Menu
Menu[Top 10] Guild Wars 2 Best PvE Healer Builds
Updated: 01 Feb 2024 5:06 am

Got your butt kicked in the last raid battle in Guild Wars 2? You should have brought a healer with you.
 BY: Don Robinson Tan
Back when Guild Wars 2 didn’t have Raids, Strike Missions, Legendary Bounties, let alone expansion packs, the content of the game didn’t find it necessary to have the ye olde MMO trinity of the DPS, Tank, and Healer as every profession can deal damage, act as a tank, and heal itself. With the rise of the expansion packs, harder overworld and instanced PvE content however, it soon began to dawn on players that they would need to adapt to the changes and at least bring one of the trinity to prominence once again. Healers come in all shapes and sizes and offer a range of skills that aren’t just strictly for healing, so let us take a gander at the best PvE Healers to date that can make your time fighting in PvE much safer.
10. Catalyst - Boon Support Healer Catalyst

The Boon Support Healer Catalyst is an interesting choice as it is one of the newer builds that have risen thanks to the Weaponmastery Training from Secrets of the Obscure. Normally, the Catalyst will not have access to the Tempest-exclusive weapon, the warhorn, and is usually seen wielding the hammer, but it dons the scepter and warhorn to protect its allies. With the Jade Spheres of the Catalyst providing tons of buffs for the user and its allies, it is no wonder this build is slowly gaining traction.
Why the Boon Support Healer Catalyst is great
- The Catalyst by itself is able to use its Jade Sphere skill to imbue it with the elements, dropping down a useful combo field with one of the four elements that grants the user, as well as allies that step in it, some useful buffs.
- The buffs the Catalyst is dependent on whether or not the team can stay within the range of the Jade Sphere you will be deploying, but if you can consistently drop it in the right spots, there should be little to no problem at all.
- The build can opt into a tank variation by switching the equipment from Harrier stats to Minstrel if a tank is needed by the team and no one has the equipment available to them.
Choose this build if:
- You are capable of thinking on the fly and can position your Jade Sphere based on where the action will most likely take place.
- You can maneuver across the battlefield and provide your buffs and healing for your teammates as a Catalyst-main.
- You have Secrets of the Obscure and the Weaponmaster Training unlocked to be able to pull off this build and know how good the warhorn is as a support weapon.
Full Build Details:
Major Perks and Traits
- Arcane - Renewing Stamina, Arcane Resurrection, Evasive Arcana
- Water - Piercing Shards, Cleansing Wave, Soothing Power
- Catalyst - Energized Elements, Spectacular Sphere, Sphere Specialist
Equipment
- Armor - Harrier’s stats (power, healing, concentration)
- Infusion - Mystical Agony Infusion (increases concentration and agony resistance in Fractals of the Mists)
- Runes - Rune of the Monk (increases healing and boon duration)
- Relics - Relic of the Monk (upon granting a boon to your allies, increase outgoing healing)
- Trinkets - Harrier’s trinkets
- Weapon set - Harrier’s stat main hand dagger and off hand warhorn with Sigils of Transference (increases outgoing healing) and Water (upon landing a critical hit, heal allies around you)
Consumables
- Food - Bowl of Mint Salad with Mint Garnish (increases outgoing healing, concentration, healing power, Karma, Magic and Gold find, and experience gained from all sources)
- Utility - Bountiful Maintenance Oil (increases outgoing healing based on both your healing power and concentration, and experience gained from kills)
Utility Skills
- Heal skill - Arcane Brilliance - A core Elementalist healing Arcane skill that inflicts critical damage onto an enemy, heals the user, and functions as a Blast finisher. Arcane Brilliance can also increase the effectiveness of Healing based on the number of enemies hit by the skill.
- Skill 1 - Glyph of Storms - A core Elementalist Glyph skill that summons an area-of-effect storm to inflict damage onto enemies and inflicts conditions based on the current elemental attunement.
- Skill 2 - Conjure Frost Bow - A core Elementalist Conjure skill that summons forth a Frost Bow on the target area, replaces your weapon skills for a limited time with the Frost Bow bundle, and increases your condition duration and healing.
- Skill 3 - Signet of Water - A core Elementalist Signet skill that passively reduces incoming condition duration and when activated inflicts damage onto enemies while also delivering Chill debuffs, and revives downed allies.
- Elite Skill - Glyph of Elementals - The core Elementalist elite Glyph skill that summons an Elemental ally to fight by your side and is based on your current elemental attunement.
For more build details, check this link: Metabattle.com
9. Specter - Heal Alacrity Specter
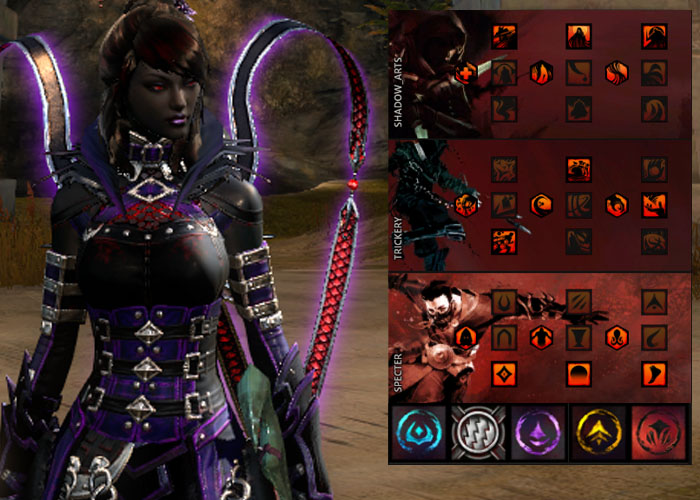
The Specter is a surprising elite specialization for a profession that is more known to be combat-oriented, as the Thief class is notable for being one of the best single-target DPS units. Unlike its elite specialization brethren, the Specter focuses more on channeling dark energies from the Shadows to support its allies, tethering themselves to them and providing them with buffs. In combat, they can tether themselves to their enemies to provide the direct opposite and cause debilitating status effects, making them ripe for the picking.
Why Heal Alacrity Specter is great
- The Heal Alacrity Specter boasts the ability to provide tons of supportive buffs while including the all-important Alacrity buff to hasten the cooldowns of the team.
- While the tether mechanic may take some getting used to, it becomes simple to do so after enough practice, making the build one of the more unique healer builds out there.
- In order for the user to get the most out of the build, they need to have more stacks of Consume Shadows before leaving the Shadow Shroud to heal their allies or provide them with Barriers through overheals.
Choose this build if:
- You are a Specter-main and can switch back and forth tethering between allies with ease.
- You know when to time the exit of your Shadow Shroud to gain the maximum amount of extra healing to give for your allies at just the right moment or to provide them with Barriers.
- You have another healer or support partner with Water combo fields for you to use your Finishers on.
Full Build Details:
Major Perks and Traits
- Shadow Arts - Shielding Restoration, Shadow Savior, Cover of Shadow
- Trickery - Thrill of the Crime, Bountiful Theft, Sleight of Hand
- Specter - Consuming Shadows, Traversing Dusk, Shadestep
Equipment
- Armor - Plaguedoctor’s stats (vitality, condition damage, healing, concentration)
- Infusion - Healing Agony Infusion (increases healing and agony resistance in Fractals of the Mists)
- Runes - Rune of the Monk (increases healing and boon duration)
- Relics - Relic of the Monk (upon granting a boon to your allies, increase outgoing healing)
- Trinkets - Plaguedoctor’s trinkets
- Weapon set 1 - Plaguedoctor’s stat main hand scepter and off hand pistol with Sigils of Concentration (increases boon duration) and Paralyzation (increases outgoing Stun debuff duration)
- Weapon set 2 - Plaguedoctor’s stat main hand sword with Sigil of Concentration
Consumables
- Food - Bowl of Mint Salad with Mint Garnish (increases outgoing healing, concentration, healing power, Karma, Magic and Gold find, and experience gained from all sources)
- Utility - Bountiful Maintenance Oil (increases outgoing healing based on both your healing power and concentration, and experience gained from kills)
Utility Skills
- Heal skill - Well of Gloom - A Specter healing Well skill that teleports the user to a target area and drops an area-of-effect heal for you and your allies while inflicting Crippled debuffs on your enemies.
- Skill 1 - Signet of Agility - A core Thief Signet skill that passively increases precision and when activated refill your Endurance bar while also cleansing conditions from the user.
- Skill 2 - Well of Silence - A Specter Well skill that teleports the user to a target area and drops an area-of-effect condition cleanse with several intervals for you and your allies that increases Shadow Force, and at the same time inflicts Daze debuff on your enemies for the first impact.
- Skill 3 - Well of Bounty - A Specter Well skill that launches an area-of-effect that grants various boons to you and allies while blinking to the targeted area. The field the skill generates is considered a Dark combo field.
- Elite Skill - Shadowfall - The Specter elite Well skill that blinks the player to the target location to drop an area-of-effect that draws enemies into it as it inflicts pulsing damage onto them.
For more build details, check this link: Hardstuck.gg
8. Scrapper - Quickness Support Healer Scrapper
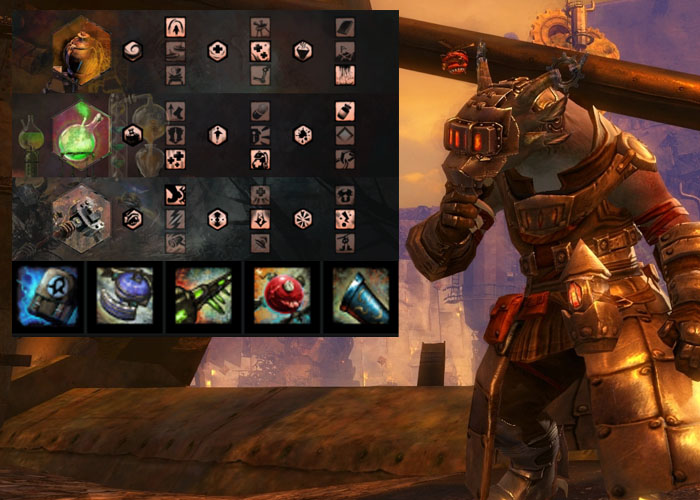
What can be said about the Engineer class that hasn’t already been said by other players, content creators, and article writers in regards to just how great they are at being any role they put their minds into? Whether they are DPS, tank, crowd control, healer, if they want to go and do that role, the Engineer and its elite specializations have an answer for them. The Quickness Support Healer Scrapper is simply the next healer evolution of the growing number of builds the profession can take.
Why Quickness Support Healer Scrapper is great
- The Quickness Support Healer Scrapper was made with the intention of being a support for a healer and it does it exceptionally well thanks to its ability to rescue its downed teammates with the Function Gyro. Just find your fallen teammate, activate the toolbelt skill, and the Gyro goes off to revive them automatically while you still have your utility slots available.
- The build also provides access to the Bulwark Gyro, a defensive gyro that protects the user with a Barrier, as well as redirecting the majority of the damage received by its allies to you, making you function as a pseudo-tank as well.
- The build is capable of providing Protection and Might buffs in case the team is lacking in the application of said buffs.
Choose this build if:
- Your team’s support is lacking heals and you just so happen to have this build ready to assist.
- You can carry the burden of the team and are ready to play defense if things start going south.
- You don’t mind pulling double duty whenever it is needed and can easily heal any potential damage dealt onto you.
Full Build Details:
Major Perks and Traits
- Inventions - Over Shield, Soothing Detonation, Medical Dispersion Field
- Alchemy - Health Insurance, Backpack Regenerator, HGH
- Scrapper - Gyroscopic Acceleration, Expert Examination, Kinetic Accelerators
Equipment
- Armor - 5 pieces of Harrier’s stats (power, healing, concentration) and 1 Minstrel’s chest piece (toughness, healing, vitality, concentration)
- Infusion - Healing Agony Infusion (increases healing and agony resistance in Fractals of the Mists)
- Runes - Rune of the Monk (increases healing and boon duration)
- Relics - Relic of the Monk (upon granting a boon to your allies, increase outgoing healing)
- Trinkets - 4 Minstrel trinkets and 2 Cleric trinkets (healing, power, toughness)
- Weapon set - Harrier’s stat main hand mace and off hand shield with Sigils of Concentration (increases boon duration) and Transference (increases outgoing healing)
Consumables
- Food - Delicious Rice Ball (increases healing, outgoing healing, and magic find during the Lunar New Year Festival)
- Utility - Bountiful Maintenance Oil (increases outgoing healing based on both your healing power and concentration, and experience gained from kills)
Utility Skills
- Heal skill - Med Kit - A core Engineer healing Engineering Kit skill that replaces your weapons with the Med Kit bundle.
- Skill 1 - Bulwark Gyro - A Scrapper Gyro skill that summons the Bulwark Gyro to your side to provide a barrier to you that scales on the number of allies on the field while also sending your allies’ damage onto you.
- Skill 2 - Elixir Gun - A core Engineer Engineering Kit skill that replaces your weapons with the Elixir Gun bundle.
- Skill 3 - Blast Gyro - A Scrapper Gyro skill that, after a short countdown, will explode, causing an unblockable attack that functions as a Blast finisher and drops a Fire combo field.
- Elite Skill - Elite Mortar Kit - The core Engineer elite Engineering Kit skill that replaces your weapons with the Elite Mortar Kit bundle.
For more build details, check this link: Metabattle.com
7. Untamed - Heal Untamed
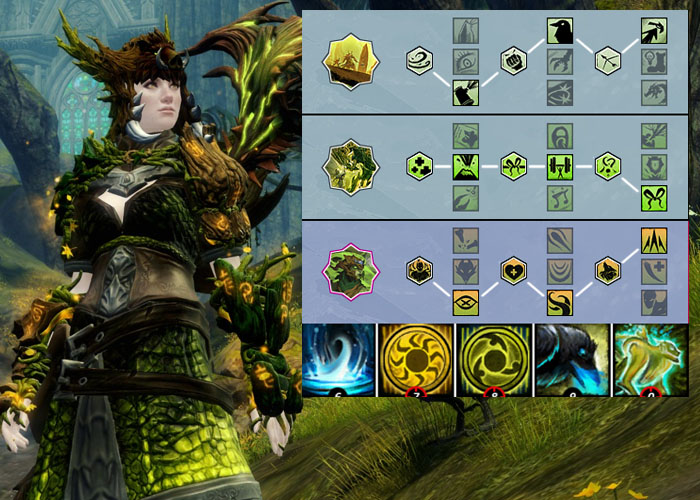
Of all the professions that would make the list, a Heal Untamed is a build that, at the surface seams incredibly weird as this elite specialization of the Ranger is more known to be more of a brawler than a healer, and yet somehow, in the words of Todd Howard, “it just works.” The Heal Untamed makes the case to not judge a book by its cover and showcases just how this Nature Brawler has the right skills at its disposal to provide allies with great buffs with their Spirit and Unleash Ambush skills.
Why Heal Untamed is great
- The Heal Untamed is still new to the scene but it already is showing great promise with its use of the Ranger’s often unused Spirit skills to great use, as well as using their Unleash Ambush skills to convert their enemies boons into debuffs, acting as both a support and a boon corrupter.
- The build focuses on the proper placement of the Spirits to give great boon coverage for the team and constant use of Unleash skills, making it a swiss army knife of support.
- While not much is known of its full potential as of yet, the sky is the ceiling and there will be more updates to follow. Knowing the build crafters out there, it is only a matter of time until the Untamed gets a surprising upgrade for this already unique and powerful healer.
Choose this build if:
- You want to surprise your teammates with an Untamed build that is fit to play the support role and are confident you can pull it off.
- You are ready for any emergency that may come up and can think on the fly.
- You know how to properly place the spirits to give the best amount of coverage for everyone.
- You reign in your pet because you know just how notorious the pet A.I. can be at times.
Full Build Details:
Major Perks and Traits
- Skirmishing - Trapper’s Expertise, Spotter, Quick Draw
- Nature Magic - Wellspring, Spirited Arrival, Invigorating Bond
- Untamed - Blinding Outburst, Corrupting Vines, Let Loose
Equipment
- Armor - Harrier’s stats (power, healing, concentration)
- Infusion - Healing Agony Infusion (increases healing and agony resistance in Fractals of the Mists)
- Runes - Rune of the Monk (increases healing and boon duration)
- Relics - Relic of the Monk (upon granting a boon to your allies, increase outgoing healing)
- Trinkets - Harrier’s trinkets
- Weapon set 1 - Harrier’s stat two handed staff with Sigils of Transference (increases outgoing healing) and Water (upon landing a critical hit, heal allies around you)
- Weapon set 2 - Harrier’s stat main hand axe and off hand warhorn with Sigils of Transference and Water
Consumables
- Food - Bowl of Mint Salad with Mint Garnish (increases outgoing healing, concentration, healing power, Karma, Magic and Gold find, and experience gained from all sources)
- Utility - Bountiful Maintenance Oil (increases outgoing healing based on both your healing power and concentration, and experience gained from kills)
Utility Skills
- Heal skill - Healing Spring - A core Ranger healing Trap skill that drops an area-of-effect that, when triggered, grants healing for you and your allies, provides Regeneration buffs, and cleanses conditions.
- Skill 1 - Sun Spirit - A core Ranger Spirit skill that summons a Sun Spirit to inflict Blind and Burning damage onto foes while granting useful buffs to you, your pet, and your allies.
- Skill 2 - Stone Spirit - A core Ranger Spirit skill that summons a Stone Spirit to grant Aegis buffs for you, your pet, and allies, while also inflicting Crippled and Weakness debuffs on your enemies.
- Skill 3 - “Search and Rescue!” - A core Ranger Shout skill that commands your pet to teleport to a downed ally to revive them and provides Rejuvenation to you and nearby allies.
- Elite Skill - Spirit of Nature - The core Ranger elite Spirit skill that summons a Spirit to convert debuffs on you and your allies into boons, as well as granting buffs for the team.
For more build details, check this link: GW2Skills.net
For the video of the Heal Untamed, check this link: YouTube.com
6. Tempest - Heal Alacrity Tempest
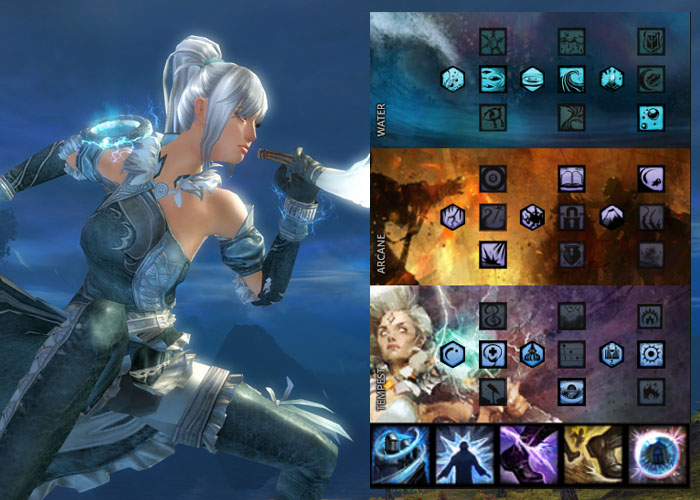
The Tempest has played many roles over the course of its time in Guild Wars 2. Since its initial debut in Heart of Thorns, it has functioned as either a DPS unit, a controller, and even a support. We take a look at how the Tempest can be one powerful healer as it delves into its deeper support roots and see what makes it tick.
Why Heal Alacrity Tempest is great
- At its core, the Heal Alacrity Tempest is not just a great healer, but it is also one of the best at granting Auras; special effects that grant unique effects from mitigating damage while inflicting Chill debuffs, reflecting projectiles, applies contact damage when enemies are near, or burning foes that are near the user.
- The build is capable of providing other buffs as well like Protection, Regeneration, Vigor, and other defensive buffs that players will need to mitigate damage.
- In case the team is in danger of being one-shotted by the enemy, the Tempest has access to the powerful “Rebound!” elite skill to save itself and four other players from a fatal hit as long as they time it just right.
Choose this build if:
- You are an Elementalist/Tempest-main who knows their profession inside and out, and can switch their role on the fly whenever needed.
- You can get to your allies quickly and provide the necessary buffs and healing quickly.
- You have the mentality of “no one gets left behind” and will drop everything to get to your teammates in trouble.
Full Build Details:
Major Perks and Traits
- Water - Piercing Shards, Cleansing Wave, Soothing Power
- Arcane - Arcane Restoration, Arcane Resurrection, Evasive Arcana
- Tempest - Latent Stamina, Invigorating Torrents, Lucid Singularity
Equipment
- Armor - Harrier’s stats (power, healing, concentration)
- Infusion - Healing Agony Infusion (increases healing and agony resistance in Fractals of the Mists)
- Runes - Rune of the Monk (increases healing and boon duration)
- Relics - Relic of the Monk (upon granting a boon to your allies, increase outgoing healing)
- Trinkets - Harrier’s trinkets
- Weapon set 1 - Harrier’s stat two handed staff with Sigils of Transference (increases outgoing healing) and Concentration (increases boon duration)
- Weapon set 2 - Harrier’s stat main hand dagger and off hand warhorn with Sigils of Transference and Concentration
Consumables
- Food - Bowl of Mint Salad with Mint Garnish (increases outgoing healing, concentration, healing power, Karma, Magic and Gold find, and experience gained from all sources)
- Utility - Bountiful Maintenance Oil (increases outgoing healing based on both your healing power and concentration, and experience gained from kills)
Utility Skills
- Heal skill - “Wash the Pain Away!” - A Tempest healing Shout skill that provides healing pulses for you and your allies that also cleanses a condition on the final pulse.
- Skill 1 - “Flash-Freeze!” - A Tempest Shout skill that grants the user and its allies with a Frost Aura to mitigate incoming damage and inflict Chill debuff on nearby enemies that attack the user, as well as inflicting damage and Chill debuff.
- Skill 2 - “Eye of the Storm!” - A Tempest Shout skill that grants the user and its allies Swiftness buffs and acts as a stun break.
- Skill 3 - “Aftershock!” - A Tempest Shout skill that grants the user and its allies with a Magnetic Aura that reflects enemy projectiles while also inflicting both Crippled and Immobilized debuffs and acts as a Blast combo finisher.
- Elite Skill - “ Rebound!” - The Tempest elite Shout skill that protects you and your allies from a fatal attack and instead grants healing, as well as provides an Aura based on your current elemental attunement.
For more build details, check this link: Hardstuck.gg
5. Firebrand - Heal Quickness Firebrand
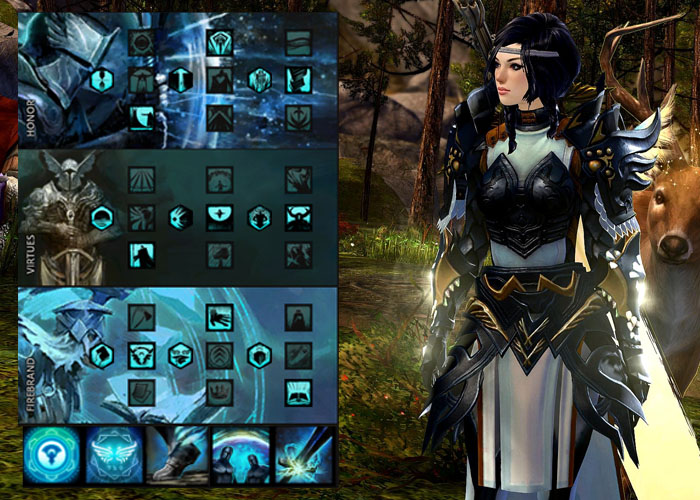
The Firebrand has always been one of the favorite support units ever since it debuted in Path of Fire. Being one of the Guardian’s elite specializations, it is no wonder why the Firebrand gets more love and attention in over world and instanced content since Guardians are one of the most solid support professions that can also double as great tanks. The Heal Quickness Firebrand brings its signature build to blaze a path for their teammates while providing not just healing but its near permanent uptime of Quickness to blitz the enemies to dust.
Why the Heal Quickness FIrebrand is great
- The Heal Quickness Firebrand is one of the more well known builds for the elite specialization that focuses on the permanent uptime of Quickness buffs and several other offensive buffs on the table, as well as providing superior healing.
- It has been known to do well in Raids and Strike Missions so it has more than proved its mettle and can even be used in open world PvE with less tweaking.
- The build relies on positioning because its Mantra skills are all provided in a cone-shape in front of the Firebrand, so players need to stick in front of the user, not just to protect them, but to also receive buffs and healing as needed.
Choose this build if:
- You are a Firebrand-main who knows the reputation that Guardians hold and will uphold their status as one of the leaders of support.
- You show no fear and are willing to lead your group to victory while you provide your troops with morale support.
- You can easily reposition yourself whenever the team needs your supportive buffs and heals.
Full Build Details:
Major Perks and Traits
- Honor - Protector’s Restoration, Honorable Staff, Writ of Persistence
- Virtues - Master of Consecrations, Absolute Resolve, Battle Presence
- Firebrand - Liberator’s Vow, Lengthy Terms, Loremaster
Equipment
- Armor - Harrier’s stats (power, healing, concentration)
- Infusion - Healing Agony Infusion (increases healing and agony resistance in Fractals of the Mists)
- Runes - Rune of the Monk (increases healing and boon duration)
- Relics - Relic of the Monk (upon granting a boon to your allies, increase outgoing healing)
- Trinkets - Harrier’s trinkets
- Weapon set 1 - Harrier’s stat main hand mace and off hand shield with Sigils of Transference (increases outgoing healing) and Concentration (increases boon duration)
- Weapon set 2 - Harrier’s stat two handed staff with Sigils of Transference and Concentration
Consumables
- Food - Bowl of Mint Salad with Mint Garnish (increases outgoing healing, concentration, healing power, Karma, Magic and Gold find, and experience gained from all sources)
- Utility - Bountiful Maintenance Oil (increases outgoing healing based on both your healing power and concentration, and experience gained from kills)
Utility Skills
- Heal skill - Mantra of Solace - A Firebrand healing Mantra skill that channels healing to you and your allies in a cone pattern.
- Skill 1 - Mantra of Potence - A Firebrand Mantra skill that channels Quickness and Might buffs to you and your allies in a cone pattern.
- Skill 2 - “Advance!” - A core Guardian Shout skill that grants you and your allies with Swiftness and Aegis buffs.
- Skill 3 - Sanctuary - A core Guardian Consecration skill that drops an area-of-effect that shields you and your allies from incoming damage, and acts as a Light combo field.
- Elite Skill - “Feel My Wrath!” - The core Guardian Shout skill that provides you and your allies with Fury and Quickness buffs, as well as acting as a stun break.
For more build details, check this link: Hardstuck.gg
4. Herald - Ventari Herald
The Revenant is one of the more unique professions in the game where their utility skills are tied to the Legends they channel, giving them different skill sets that change whenever you are switching between the two at a time. With the Ventari Herald, it opens the build to a pure support role that excels in providing immense healing and an active source of several buffs on command while the user masterfully juggles resource management. It is not a build for the faint of heart and should only be done by players with mastery of the profession.
Why the Ventari Herald is great
- The Ventari Herald boasts immense healing, projectile deflection, and offensive boosts at the cost of utility.
- Despite the lack of utility, it makes up for it with one of the best crowd control attacks with the Revenant’s staff 5 skill to assist in destroying the enemy break bars when it is called upon.
- Whenever the utility skills are used apart from the Legendary Dragon Stance elite, there are no animation locks that will force your character on the spot, making its skills quick and easy to use.
Choose this build if:
- Your team is sorely lacking a support or if no one wants to be one for whatever reason and you can pull double duty.
- You can easily kite from range while providing ranged healing for your allies.
- You are not afraid to get into melee combat when needed but can just as easily back away to not endanger yourself and cause an accidental wipe.
Full Build Details:
Major Perks and Traits
- Devastation - Battle Scarred, Notoriety, Dance of Death
- Salvation - Invoking Harmony, Fortified Blessing, Generous Abundance
- Herald - Elder’s Respite, Shared Empowerment, Elevated Compassion
Equipment
- Armor - Harrier’s stats (power, healing, concentration)
- Infusion - Healing Agony Infusion (increases healing and agony resistance in Fractals of the Mists)
- Runes - Rune of the Monk (increases healing and boon duration)
- Relics - Relic of Dwayna (increases Regeneration effectiveness)
- Trinkets - Harrier’s trinkets
- Weapon set 1 - Harrier’s stat main hand sword and off hand shield with Sigils of Concentration (increases boon duration) and Transference (increases outgoing healing)
- Weapon set 2 - Harrier’s stat two handed staff with Sigils of Concentration and Transference
Consumables
- Food - Delicious Rice Ball (increases healing, outgoing healing, and magic find during the Lunar New Year Festival)
- Utility - Bountiful Maintenance Oil (increases outgoing healing based on both your healing power and concentration, and experience gained from kills)
Utility Skills
- Because Revenants and their elite specializations rely on their Legendary Stances to get unique sets of utility skills, we will only describe the stances used.
- Legendary Dragon Stance (Glint) - The Facet skills act like Signets that need to be activated first in order to use up a portion of your energy to maintain certain buffs. When activated again, it will release the secondary effect of the skills. The elite is a massive knockdown skill when activated twice which is useful for knocking away players trying to stick with groups.
- Legendary Centaur Stance (Ventari) - The utility skills revolve around the healing skill to summon the Ventari Tablet onto the field and to move it across the field, providing the source of healing and reflects the team will be needing.
For more build details, check this link: GuildJen.com
3. Mechanist - Alacrity Support Healer Mechanist
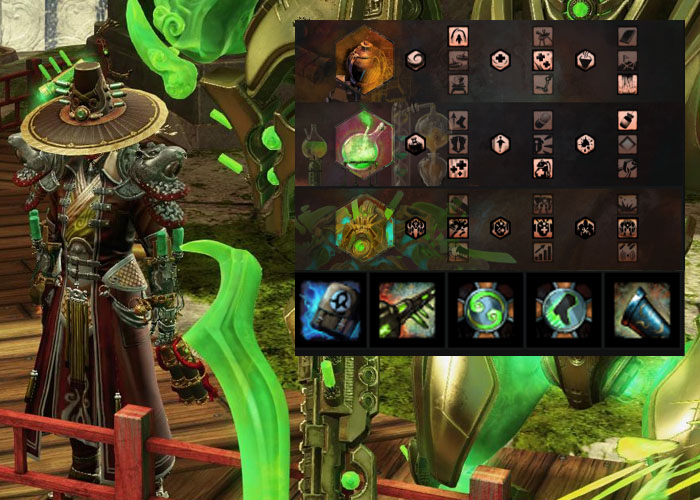
The Mechanist is not just one of the more fun elite specializations of the Engineer thanks to its new Jade Mech buddy, but it is one of the easiest healers to play as, as long as you can reign in said mech. The profession as a healer has always been viable, although it may need to watch out for any damage that targets itself as it may have a bit of trouble with that. Even so, the build still packs a punch to those that think it can get away with it.
Why the Alacrity Support Healer Mechanist is great
- The Alacrity Support Healer Mechanist is a great healer to support your main in case your team is lacking in that role.
- The build boasts being able to provide near permanent Alacrity, Fury, and Might buffs which are powerful offensive boosts for players looking to demolish anything in their sights and to melt Champions, Legendaries, and Raid encounters.
- The Jade Mech handles providing the majority of the offensive buffs for the team so players need to be within its range while the Mechanist provides its support buffs from long range.
Choose this build if:
- You know how finicky the Ranger’s Pet A.I. is but know how to properly position them and can use that knowledge to do the same exact thing for your Jade Mech as a Mechanist.
- You actually know how to dodge attacks and stay far away from damage as your self-healing is sacrificed for more team support.
- Despite the statement above, you will go above and beyond to rescue your teammates when needed and can use your support skills immediately.
Full Build Details:
Major Perks and Traits
- Inventions - Over Shield, Soothing Detonation, Medical Dispersion Field
- Alchemy - Health Insurance, Backpack Regenerator, HGH
- Mechanist - Mech Arms: High-Impact Drivers, Mech Frame: Channeling Conduits, Mech Core: Barrier Engine
Equipment
- Armor - Harrier’s stats (power, healing, concentration)
- Infusion - Healing Agony Infusion (increases healing and agony resistance in Fractals of the Mists)
- Runes - Rune of the Monk (increases healing and boon duration)
- Relics - Relic of the Monk (upon granting a boon to your allies, increase outgoing healing)
- Trinkets - Harrier’s trinkets
- Weapon set - Harrier’s stat main hand mace and off hand shield with Sigils of Concentration (increases boon duration) and Transference (increases outgoing healing)
Consumables
- Food - Bowl of Mint Salad with Mint Garnish (increases outgoing healing, concentration, healing power, Karma, Magic and Gold find, and experience gained from all sources)
- Utility - Bountiful Maintenance Oil (increases outgoing healing based on both your healing power and concentration, and experience gained from kills)
Utility Skills
- Heal skill - Med Kit - A core Engineer healing Engineering Kit skill that replaces your weapons with the Med Kit bundle.
- Skill 1 - Elixir Gun - A core Engineer Engineering Kit skill that replaces your weapons with the Elixir Gun bundle.
- Skill 2 - Barrier Signet - A Mechanist Signet skill that passively reduces incoming strike and condition damage, and when activated, creates a dome that provides Barrier to you and your team while also reflecting projectiles.
- Skill 3 - Shift Signet - A Mechanist Signet skill that passively increases your movement speed and when activated acts as both a stun break and teleport to a target location.
- Elite Skill - Elite Mortar Kit - The core Engineer elite Engineering Kit skill that replaces your weapons with the Elite Mortar Kit bundle.
For more build details, check this link: Metabattle.com
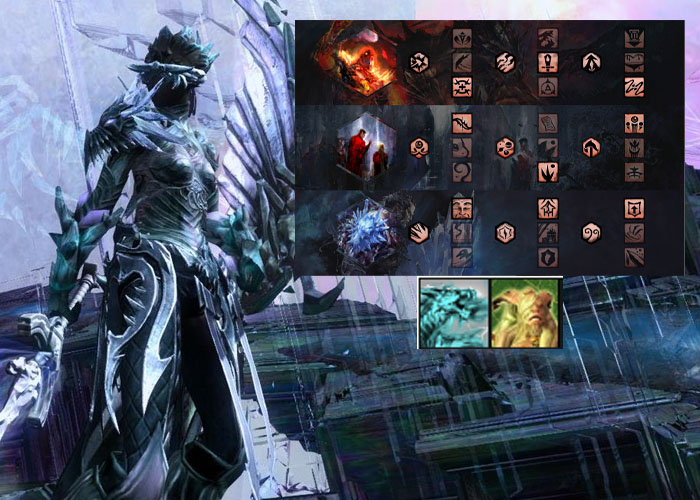
2. Scourge - Alacrity Support Healer Scourge

You heard that right, ladies and gentlemen: one of the best healers in the game happens to be a magic user that delves around the powers of death and decay, the Necromancer’s elite specialization, the Scourge. With its trusty Sand Shades, it not only can grant powerful healing for its allies but it can make the team extra tanky with its abundant methods of providing Barriers that mitigate damage.
Why Alacrity Support Healer Scourge is great
- As previously mentioned, not only is the Alacrity Support Healer Scourge good at providing healing for its party/squad members, it makes them tankier thanks to its ability to provide Barriers using their Manifest Sand Shade skills.
- Despite the numerous nerfs to this build (the healing skill Well of Blood was seen as too strong), it has still seen tons of usage in the raiding scene, making it a top contender for best healer.
- The build provides near permanent Fury, Protection, and Might buffs, giving its teammates a huge supportive bonus on top of the already powerful healing and revives it brings to the table.
Choose this build if:
- You want one of the most powerful healer-support professions that can quite as easily tank if it has to.
- You don’t fear any challenge because you know you can outheal the incoming damage and revive your fallen comrades when need be.
- You are a Scourge-main who knows the proper placement of your Manifest Sand Shades.
Full Build Details:
Major Perks and Traits
- Blood Magic - Ritual of Life, Life from Death, Transfusion
- Soul Reaping - Unyielding Blast, Fear of Death, Eternal Life
- Scourge - Abrasive Grit, Sandstorm Shroud, Desert Empowerment
Equipment
- Armor - Harrier’s stats (power, healing, concentration)
- Infusion - Healing Agony Infusion (increases healing and agony resistance in Fractals of the Mists) and Mystical Agony Infusion (increases concentration and agony resistance in Fractals of the Mists)
- Runes - Rune of the Monk (increases healing and boon duration)
- Relics - Relic of the Monk (upon granting a boon to your allies, increase outgoing healing)
- Trinkets - Harrier’s trinkets
- Weapon set 1 - Harrier’s stat main hand dagger with off hand warhorn with Sigils of Transference (increases outgoing healing) and Water (upon landing a critical hit, heal allies around you)
- Weapon set 2 - Harrier’s stat off hand torch with Sigil of Water
Consumables
- Food - Delicious Rice Ball (increases healing, outgoing healing, and magic find during the Lunar New Year Festival)
- Utility - Bountiful Maintenance Oil (increases outgoing healing based on both your healing power and concentration, and experience gained from kills)
Utility Skills
- Heal skill - Well of Blood - A core Necromancer Well skill that drops an area-of-effect heal that also acts as a Light combo field.
- Skill 1 - Desiccate - A Scourge Punishment skill that inflicts damage onto your surrounding enemies to provide the user with Life Force for their Sand Shroud, grants buffs to yourself and your allies, and converts the enemies’ buffs into Torment debuffs.
- Skill 2 - Serpent Siphon - A Scourge Punishment skill that grants Barrier to allies and inflicts debuffs on your enemies, as well as turning their buffs into Torment debuffs.
- Skill 3 - Optional Skill - Pick a skill that fits the needs of the party, the situation, or whatever is currently lacking.
- Elite Skill - Summon Flesh Golem - The core Necromancer elite Minion skill that summons a Flesh Golem to your side that can provide a knockdown attack upon command.
For more build details, check this link: Metabattle.com
1. Druid - Heal Alacrity Druid

At the top of the mountain is the Ranger’s first elite specialization that paved the way for the majority of healers to come, the Druid. These powerful forest guardians use the arcane arts of the forest to provide their allies with support through the use of their newfound healing magic and the utilization of the Celestial Avatar form. From normal overworld PvE to the realms of sPvP and WvW, and even the endgames of Raids, Strike Missions, and Fractals of the Mists, the Druid comes prepared to save their teammates from even the most perilous of damage.
Why Heal Alacrity Druid is great
- The Heal Alacrity Druid has been a long-standing build of the Druid that has seen tons of action ranging from instanced content, open world PvE, and even World vs World with much success.
- The build provides tons of useful buffs alongside the vast amounts of healing and condition cleanses it brings to the table.
- The Heal Alacrity Druid may be a pure support build but it doesn’t mean it doesn’t stand a chance against enemies as it has good amounts of crowd control at its disposal.
Choose this build if:
- Your team is in need of a superior healer that can provide other types of buffs that are sorely lacking currently.
- You are a support-centric team player who doesn’t mind letting the others do the dirty work while you patch them up.
- You can keep the Protection buffs up and running constantly to mitigate the damage taken by you and your teammates so that you don’t have to keep healing everyone constantly.
Full Build Details:
Major Perks and Traits
- Marksman - Clarion Bond, Moment of Clarity, Predator’s Onslaught
- Nature Magic - Wellspring, Windborne Notes, Invigorating Bond
- Druid - Cultivated Synergy, Verdant Etching, Grace of the Land
Equipment
- Armor - Harrier’s stats (power, healing, concentration)
- Infusion - Healing WvW Infusion (increases healing)
- Runes - Rune of the Monk (increases healing and boon duration)
- Relics - Relic of the Monk (upon granting a boon to your allies, increase outgoing healing)
- Trinkets - Harrier’s trinkets
- Weapon set 1 - Harrier’s stat two handed staff with Sigils of Transference (increases outgoing healing) and Paralyzation (increases outgoing Stun debuff duration)
- Weapon set 2 - Harrier’s stat main hand axe and off hand warhorn with Sigils of Transference and Water (upon landing a critical hit, heal allies around you)
Consumables
- Food - Bowl of Mint Salad with Mint Garnish (increases outgoing healing, concentration, healing power, Karma, Magic and Gold find, and experience gained from all sources)
- Utility - Bountiful Maintenance Oil (increases outgoing healing based on both your healing power and concentration, and experience gained from kills)
Utility Skills
- Heal skill - Glyph of Rejuvenation - A Druid healing Glyph skill that greatly heals you and your pet, while also healing your allies.
- Skill 1 - Sun Spirit - A core Ranger Spirit skill that summons a Sun Spirit to inflict Blind and Burning damage onto foes while granting useful buffs to you, your pet, and your allies.
- Skill 2 - Stone Spirit - A core Ranger Spirit skill that summons a Stone Spirit to grant Aegis buffs for you, your pet, and allies, while also inflicting Crippled and Weakness debuffs on your enemies.
- Skill 3 - Glyph of Equality - A Druid Glyph skill that inflicts Daze debuff on enemies while out of Celestial Avatar form and breaks you and your allies out of stun while in it.
- Elite Skill - Glyph of the Stars - The Druid elite Glyph skill that heals allies, cleanses debuffs, and grants Stability buffs while out of Celestial Avatar form and prevents health drained while being downed, revives downed players, and grants them boons while within Celestial Avatar form.
For more build details, check this link: Hardstuck.gg
Closing Thoughts
While it is still true that every profession in Guild Wars 2 has the means to heal itself, it doesn’t mean that it may be enough, especially when they already used their healing skill and another big hit from the enemy boss effectively takes a chunk of HP from them. Healers may not have been necessary in the past, but they have proven that as the game continues to evolve and more challenging adventures continue to rise in difficulty, players need to cooperate and take up the healer role if they want to make it to the end and claim their prizes. If your favorite healer build didn’t make it, who knows, it could have some significant upgrades in the future that will make it top tier; just take a look at the Heal Untamed as a surprise entrant after all…
You may also be interested in:
Share this Article:

- Log in or register to post comments


")


")


")


")


")


")

")


")


")


