Deciding how fun a killer is in Dead by Daylight is largely due to personal preference, every person has their own form of a tier list in which they rank each of the available killers based on their personal experiences, and their preferred playstyle, as well as how the Killer’s abilities work.
10.) The Wraith
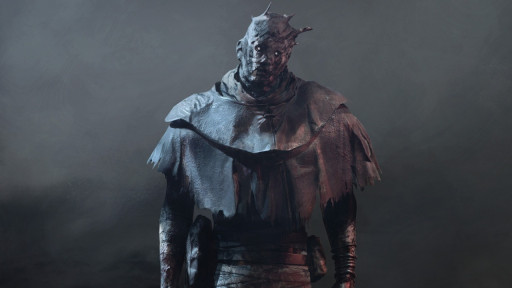
The Wraith is one of the starter killers in the game. Wraith is unlocked by completing the second Killer Tutorial in the tutorials or is unlocked by default just by playing enough of the game. Wraith is both easy to play and easy to access, which is often why many people gravitate towards him. During Dead by Daylight’s 5th Anniversary, some statistics were revealed in a press release which showed that Wraith was the number one most picked killer alongside The Huntress and The Doctor.
The Wraith’s special ability is a fairly simple one, his power is called the Wailing Bell. By using the active ability button, Wraith can ring his Wailing Bell and become almost completely invisible while moving, and fully invisible when standing still. The sound of the Wailing Bell without any add-ons will be heard within a 24-meter radius. While cloaked, Wraith receives the Undetectable status effect and a small boost to his movement speed, increasing it from 4.6 m/s to 6 m/s. The Undetectable status effect disables the terror radius, removes the killer’s red stain which shows where they are looking, and their auras cannot be seen by Survivors. However, Wraith’s actions while cloaked are limited, he can interact with environmental objects and damage generators, but he cannot attack Survivors. Wraith will have to uncloak, which will slow him down temporarily but he will receive a small lunge or boost for 1 second which will help reach the fleeing Survivor. But Wraith can also be forcefully uncloaked by Survivors through the use of flashlights or flashbangs/firecrackers.
The Wraith’s perks are quite simple and are not used particularly often in high MMR (Matchmaking Rank) games. Wraith’s perks are suited to beginners as they will help the player with finding and tracking Survivors. His 3 perks are Shadowborn, Predator, and Bloodhound.
- Shadowborn increases Wraith’s FOV (Field of Vision) by 9/12/15%
- Predator spawns the scratch marks left by Survivors closer together, therefore allowing you to track them easier.
- Bloodhound makes the bloodstains left by Survivors more visible, and they take an additional 2/3/4 seconds longer than normal to disappear, helping you track injured Survivors much easier.
What Makes The Wraith Great?
- Wraith is easy to pick up for beginners and a fun Killer to master.
- When paired with the right perks, Wraith becomes an incredible threat.
- Being a stealth killer means that Wraith can catch Survivors off guard, trapping them in tight areas leaving them with very little room to maneuver, and additionally cause a bit of mischief
- Has some pretty good cosmetics
9.) The Doctor
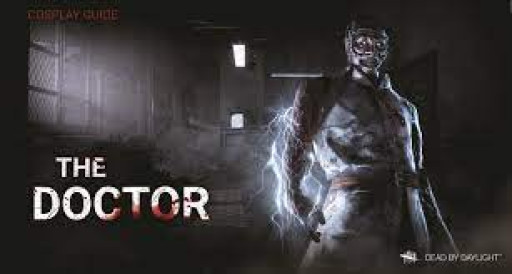
The Doctor is the sadistic, madness-inducing Killer featured in the Spark of Madness DLC. The Doctor is quite easy to play, making him a good choice for beginners. From a visual standpoint, The Doctor is one of the most disturbing and even intimidating. His mouth and glowing eyes are pried open, twisted into something of a manic and menacing smile. Wires are protruding from his body, and he wields a spiked metal club. And with every hit, he laughs with mad glee and evil delight at the suffering he is inflicting upon the Survivors.
The Doctor’s power is called Carter’s Spark. This power has two abilities, Shock Therapy, and Static Blast, both of which introduced a new and exclusive status effect called Madness. Shock Therapy works by pressing and holding one of the active ability buttons, The Doctor will charge up an electrical ranged attack that fires in a 10-meter line and through objects, increasing their Madness. Static Blast can only be used when the meter around Carter’s Spark is full. Static Blast takes longer to charge, but fires in a circular shape with a range equivalent to his terror radius (32 meters without any perks). Any Survivors caught in the blast will scream, revealing their location, and have their Madness increase by a full level. If a Survivor is hit by Shock Therapy or Static Shock, any action they are performing is immediately canceled and they will have a 2.5-second cooldown before being able to perform actions again.
When the Survivors are afflicted with Madness, it will continue to upgrade in tiers or levels with more potent effects upon every successful hit from either Shock Therapy or Static Blast.
Madness I: At Madness level 1, Survivors will have a 33% chance of triggering a Madness Skill Check, which is a Skill Check that moves in the opposite direction than normal
Madness II: At Madness level 2, Survivors will begin to see apparitions or hallucinations in the form of Illusionary Doctors, the auras of which can be seen by The Doctor. Fake red stains will appear at random and will be placed behind the Survivor. Additionally, the chance of triggering a Madness Skill check increases to a 66% chance.
Madness III: At Madness level 3, Survivors will continuously scream at random intervals which will reveal their location to The Doctor. This will prevent survivors from actions such as repairing generators, healing, vaulting, cleansing totems, sabotaging hooks, and searching chests. For Survivors to reduce their Madness level, they need to perform the Snap out of It action, but at level 3 they have a 100% chance of triggering a Madness Skill Check while performing this action. If the Survivor fails the skill check, they will scream and will reveal the location to The Doctor, but if they manage to successfully finish the action they will reset to Madness level 1.
The Doctor comes with 3 perks. Overwhelming Presence, Monitor & Abuse, and Overcharge. These perks encourage chases, hinder the Survivors’ ability to repair generators effectively, and make him harder to detect when he is not chasing a Survivor.
- Overwhelming Presence causes the items used by Survivors to deplete at a faster rate of 80/90/100% when they are within The Doctor’s terror radius.
- Monitor & Abuse increases the Killer’s base terror radius by 8 meters. When not in a chase, the terror radius is reduced by 16 meters, and FOV is increased by 3/5/10o
- Overcharge activates whenever the Killer damages a generator. The next Survivor to interact with the generator will be faced with a difficult Skill Check, and failing the Skill Check will result in an additional 3/4/5% loss of overall progression on the generator.
What Makes The Doctor Great?
- The Doctor is a great option for newer players
- Though his power is simple, there is still complexity in its simplicity. You will learn to utilize it in different scenarios, and as a result, you will learn the best ways to use it as effectively as possible.
- The Doctor’s power helps find and inhibit Survivors. It can be used to prevent Survivors from vaulting and dropping pallets, therefore allowing you to catch up to them. At tier 3 Madness, Survivors cannot perform most actions due to the continuous screaming, which will allow you to hinder healing and generator repairs.
8.) The Plague
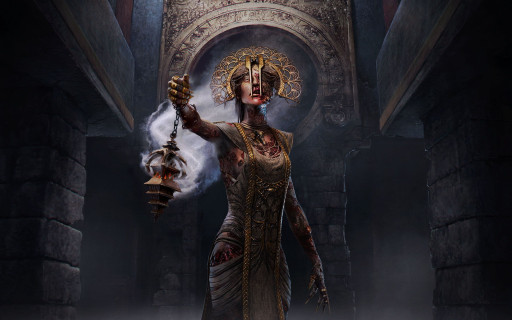
The Plague is a devout ancient Babylonian Priestess, added to Dead by Daylight as the Killer of the Demise of the Faithful DLC. As the name implies, The Plague is a carrier of an infectious disease that she can use against the survivors by contaminating objects in the environment, making her a killer with a very fun and interesting playstyle.
The Plague’s Power is called Vile Purge. By pressing and holding the power button, Vile Purge will charge up until you release the button, and then projectile infectious vomit which can be used to contaminate generators, pallets, and vault locations which will last for 40 seconds. Any Survivor that interacts with another infected Survivor or object will become infected too. Once a Survivor has become infected, they will spread the infection to other survivors and objects. A meter determining their level of sickness will appear on the HUD, their sickness meter will fill over time but will also increase with every successful hit from Vile Purge. Once a Survivor is fully infected, they are put into the injured state, will continuously vomit every 5 to 15 seconds, and suffer from the Broken status effect, which means that they cannot be healed past the injured state. For Survivors to cure themselves of the infection, they must interact with a Pool of Devotion. The Pools of Devotion will spawn in random locations around the map, but they will be highlighted with a white aura to the Survivors when they are infected. Once a Pool of Devotion has been used, the Survivor will be cured and restored to full health, a loud audio cue will trigger and the pool will become corrupted. Corrupted Pools will appear in a white aura to The Plague, which she can then approach and use her secondary ability: Ingest Corruption. Plague can consume the corruption, which will be indicated by a loud audio cue and will restore the Pool of Devotion to normal, but it will empower Plague by transforming Vile Purge into Corrupt Purge for 60 seconds. Corrupt Purge now deals damage instead of infection, putting Survivors into either the injured or dying state. While Corrupt Purge is active, The Plague will start whispering chants and have embers flying from her back and shoulders. At least 1 Corrupted Pool of Devotion will spawn at the beginning of every game as Plague, but it can be increased with Add-Ons.
The Plague comes with 3 perks: Corrupt Intervention, Infectious Fright, and Dark Devotion. These perks allow her to limit the Survivors’ objectives, locate nearby Survivors, and confuse her prey.
- Corrupt Intervention will start the match with 3 generators the furthest away from you being blocked off for 80/100/120 seconds, narrowing down the number of generators to patrol, and limiting the Survivor’s options for objectives.
- Infectious Fright will cause any Survivors within the Killer’s Terror Radius to scream, revealing their location for 4/5/6 seconds whenever another Survivor is put into the Dying state by any means.
- Dark Devotion will transfer the Killer’s Terror Radius to the Obsession whenever they are hit with a basic attack. Doing this will grant the Killer the Undetectable Status effect, and The Obsession will have a Terror Radius of 32 meters for the next 20/25/30 seconds. In addition, the Obsession will hear their own Terror Radius.
What Makes The Plague Great?
- The Plague’s power encourages creativity within the playstyle and is just generally fun to use.
- Plague has some great add-ons, some even consider them to be some of the best in the game, making her a dangerous and powerful Killer.
- When using Corrupt Purge, it acts as a powerful long-range attack that can down multiple survivors with a single stream if used correctly.
- Plague has some great perks which can be unlocked for other Killers in the Bloodweb
7.) The Ghost Face
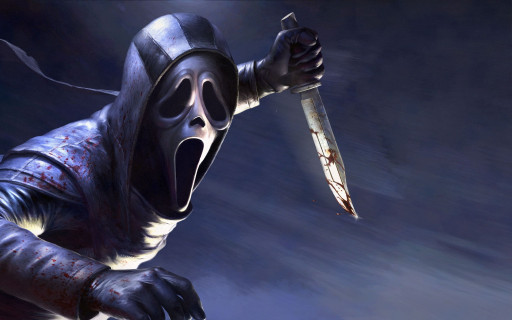
A momentary shape in the distance, an ominous feeling in the air, the unnerving feeling of anticipation, the glimmer of a blade in moonlight, the sound of flesh meeting steel, and a single scream. The Ghost Face is an original spin on a classic horror icon. One of Dead by Daylight’s many licensed killers added as DLC in 2019. A cunning, meticulous, and elusive killer, Ghost Face can move around undetected and efficiently take down Survivors before they even know he’s there.
The Ghost Face’s power is called Night Shroud. By pressing the power button when the power gauge is full, Ghost Face will activate Night Shroud which unlocks the ability to Stalk Survivors, and he will be granted the Undetectable status effect. Holding down the power button while Night Shroud is active will allow Ghost Face to Stalk Survivors, Stalking while behind environmental objects will let Ghost Face lean and Stalk Survivors at double the normal speed. Fully stalking a Survivor will mark them and apply the Exposed status effect for 60 seconds, meaning that the Killer will be able to instantly put Survivors into the Dying state when hit. However, Survivors can reveal Ghost Face while Night Shroud is active by looking at him for 1.5 seconds. Doing so will completely deplete the power gauge and force him out of Night Shroud for 24 seconds, but the Survivor who revealed Ghost Face will have their location revealed to Ghost Face by Killer Instinct for 2 seconds without add-ons.
Ghost Face has one more ability, he can crouch. While crouched, Ghost Face’s movement speed is reduced by 25% (3.6 m/s) from his standard 4.6 m/s, but there are some add-ons to slightly increase his crouched movement speed. And unlike The Pig’s crouch, Ghost Face can crouch and stand as fast as he likes which means he can get up to some antics with the Survivors.
The Ghost Face comes with 3 perks: I’m All Ears, Thrilling Tremors, and Furtive Chase. These perks enable Killers to locate Survivors, defend generators, and create unpredictability during chases.
- I’m All Ears activates whenever a Survivor performs a rushed action within 48 meters of the killer and will have their Aura revealed to the Killer for 6 seconds before incurring a cooldown of 60/50/40 seconds.
- Thrilling Tremors activates when you pick up a Survivor, it will block all generators that are not being repaired by Survivors for the next 16 seconds. Thrilling Tremors can only be activated every 100/80/60 seconds
- Furtive Chase reduces the Killer’s Terror Radius by 4 meters per token gained from hooking the Obsession, and whenever a Survivor rescues the Obsession they become the new Obsession.
What Makes The Ghost Face Great?
- Ghost Face’s teachable perks I’m All Ears and Thrilling Tremors are great for chases, tracking where Survivors are working on generators, and locking down the ones that they aren’t.
- Ghost Face’s crouch ability means that you can have a bit of fun with the Survivors.
- Ghost Face is just fun to play once you’ve learned how to use him properly.
- Has one of the best Memento Moris in the game.
6.) The Hag
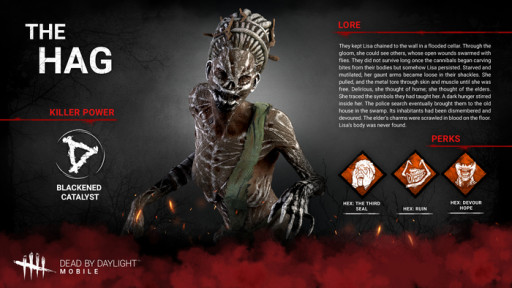
The Hag is a savage witch that dwells within Backwater Swamp, born of flesh and mud. Using the charms taught to her by the elders of her former home, The Hag can set up a web of magical traps to catch Survivors off guard and confuse or terrify them. The Hag was added to Dead by Daylight as the Killer for the Of Flesh and Mud DLC
The Hag’s Power is called Blackened Catalyst. By pressing and holding the power button, The Hag will crouch down and etch a muddy symbol on the ground, this is called a Phantasm Trap. The Hag can maintain up to 10 traps without add-ons. Whenever a Survivor walks or runs within the trap's trigger range (3 meters), a Mud Phantasm will spawn which will forcefully turn the Survivor’s camera towards it, in addition, the Mud Phantasm emits a fake small Terror Radius and its sights will lock on to the Survivor until the trap despawns or the Survivor is out of sight. The Hag will receive a notification of the trap being triggered and can use her special ability to teleport to the triggered trap within a base range of 40 meters without add-ons. Survivors do have ways of dealing with the traps, they can crouch over them to avoid triggering them or destroy them with flashlights or firecrackers/flashbangs. If a flashlight is used, the auras of the traps will be revealed to the Survivor. Once a trap has been destroyed, The Hag will receive a loud noise notification.
The Hag introduced a new type of perk to Dead by Daylight upon her release: Hex Perks. Essentially, the perk is stored within a Hex Totem located somewhere on the map and can be cleansed by Survivors to disable them. The Hags 3 perks are all Hex Perks, which are used to cripple the Survivors until the respective Totem is cleansed.
The Hag comes with Hex: The Third Seal, Hex: Ruin, and Hex: Devour Hope
- Hex: The Third Seal applies the Blindness status effect up to 2/3/4 Survivor when hit with a basic or special attack and the effect persists as long as the Hex Totem remains standing. The Blindness status effect disables the Survivors’ ability to read auras, therefore hindering their information.
- Hex: Ruin will cause any generator currently not being worked on to automatically start regressing at 100/150/200% of its normal speed as long as its Hex Totem remains uncleansed
- Hex: Devour Hope gains a token whenever a Survivor is rescued from a hook when the Killer is at least 24 meters away. The Killer receives certain buffs based on the number of tokens they have obtained. At 2 tokens: 10 seconds after hooking a Survivor, the Killer gains a 3/4/5% haste effect for the next 10 seconds. At 3 tokens: Survivors permanently suffer from the Exposed Status Effect. At 5 tokens: The Killer can kill Survivors by their own hand instead of hooking them.
What Makes The Hag Great?
- The Hag is difficult to master, particularly with how and where you place traps to get the most out of them. People usually place the traps by vault locations, near pallets, and other objectives like Hex Totems, hooked survivors, and generators. This makes Hag one of the best killers in terms of map control and high mobility.
- Due to The Hag’s smaller build in comparison to other Killers, she can manage to perform certain Mind Games better than other Killers. Hiding the red stain by turning away and walking backward (or moonwalking) near tall structures can trick the Survivors into running straight into you.
5.) The Executioner / Pyramid Head

A mysterious, unsettling, sadistic, and merciless being, The Executioner serves one purpose: dispensing judgment and punishment through pain and suffering. Pyramid Head is another one of the licensed killers featured in Dead by Daylight, originating from one of the most iconic and classic horror games, Silent Hill 2 (2001). Pyramid Head was added to Dead by Daylight alongside Cheryl Mason in the Silent Hill DLC.
The Executioner’s power is called Rites of Judgement. By pressing and holding the power button, Pyramid Head plunges his blade into the ground and leaves Trails of Torment behind him. This power makes Pyramid Head a Killer with great map control. The Trails of Torment will cause any Survivors who walk or run over them to be revealed by Killer Instinct for a few seconds and they will be afflicted with the Torment Status Effect. While Survivors are Tormented, they leave trails of barbed wire behind them which helps with tracking them down. In addition, Pyramid Head can choose to send Tormented Survivors to a Cage of Atonement by pressing the active ability button when they are in the Dying state rather than carrying them to a Hook, and Survivors will have to do Skill Checks while they are in the Cage of Atonement. Survivors can remove Torment by being rescued or by rescuing someone else from a Cage of Atonement. Cages of Atonement will spawn at random locations on the map and will move if the Killer spends too much time near them.
The Executioner also has a special attack, by pressing the attack button while using Rites of Judgement, Pyramid Head will activate Punishment of the Damned which unleashes a ranged attack in a straight line and damages any survivor caught in its path. This attack can also travel through objects and walls. The Executioner’s final ability is called Final Judgement where he can kill Survivors by his own hand, essentially a miniature Mori. When a Survivor is afflicted with Torment and is on their second hook stage, either on a hook or in a Cage of Atonement, by pressing the active ability button Pyramid Head will enact his judgment and swing his great knife over his head and into the Survivor’s shoulder before ripping it back. Simple but wonderfully violent and in character.
The Executioner comes with 3 perks: Forced Penance, Trail of Torment, and Deathbound. These perks assist in punishing Survivors who take protection hits, deceive them into thinking they’re safe while moving undetected, and track them.
- Forced Penance activates when a Survivor takes a protection hit, that Survivor will then suffer from the Broken Status Effect for the next 60/70/80 seconds.
- Trail of Torment activates when you damage a generator, you’ll receive the Undetectable Status Effect until the generator stops regressing or you damage a Survivor. The generator is also highlighted in a yellow aura to the Survivors. This perk also has a cooldown of 80/70/60 seconds
- Deathbound triggers when a Survivor performs a healing action on another Survivor. After healing a full health state at least 32 meters away from the Killer, the Survivor that performed the healing action will scream which will reveal their location and they will suffer from the Oblivious status effect for the next 60 seconds when more than 16/12/8 meters away from the other Survivor they healed.
What Makes The Executioner Great?
- Pyramid Head is difficult to learn but is one of the strongest Killers in the game. His power allows him to manipulate the map and shut down Looping Tiles, rendering most vault locations and pallets dangerous for Survivors
- Sending Survivors to a Cage of Atonement is a lot more convenient than hooking them if there are no hooks nearby, or if they might be carrying Decisive Strike.
- Punishment of The Damned is hard to land a successful hit but is really powerful if you can learn to predict Survivors’ movements effectively. You can also use it to injure groups of Survivors on generators or damage Survivors during rescues. Which is very satisfying
4.) The Huntress

The Huntress is a ruthless and efficient Killer, maddened by the brutality of nature and hardened by the harsh wilderness. Huntress is ranked by many as one of the most popular and powerful Killers in the game. She can be difficult to use, as she is a ranged Killer that requires timing and precision, but mastering this Killer is rewarding and so very satisfying. The Huntress was added as a Killer in the Lullaby for the Dark DLC but has since become one of the base Killers of the game. Upon entering the Trial, should you hear a soothing and yet haunting lullaby somewhere off in the fog veiled environment, may you have the best of luck. And let the hunt begin.
The Huntress’ Power is called Hunting Hatchets. Given the name and some previously stated information, you can probably guess that this is a ranged ability. By pressing and holding the power button, Huntress will prepare to throw a hatchet, and once you release she will throw it. The time it takes to charge a full throw is 3 seconds, but you can also do a quicker partial charge with less range which takes 1.25 seconds. The throw can be canceled in order to conserve the number of hatchets you have, and also so you don’t waste any on shots that you can’t hit. In addition, canceling a throw can also act as a mind game technique to scare Survivors away from pallets or other loops. The Huntress starts every trial with 5 hatchets without add-ons, but should her supply of hatchets be depleted, she can open any locker and restock which will take 4 seconds to complete.
The Huntress comes with 3 perks: Beast of Prey, Territorial Imperative, and Hex: Huntress Lullaby. These perks allow Huntress to apply pressure with enhanced situational awareness and improved chasing abilities.
- Beast of Prey activates when the Killer gains the Bloodlust Status Effect during chases (Bloodlust increases movement speed over time during a long chase). Beast of Prey gives the Killer the Undetectable Status Effect for the duration of Bloodlust and also gives the Killer 30/40/50% bonus Bloodpoints for actions in the Hunter category (Finding and Chasing Survivors).
- Territorial Imperative reveals the aura of a Survivor for 3 seconds whenever they enter the basement when the Killer is at least 32 meters away.
- Hex: Huntress Lullaby causes Survivors to receive a 2/4/6% regression penalty to repairing and healing actions. Whenever a Survivor gets hooked, Hex: Huntress Lullaby gains a token, each token will affect skill checks. 1 Token: Decreases the time between the audio cue and the Skill Check by 14%. 2 Tokens: Decreases the time between the audio cue and the Skill Check by 28%. 3 Tokens: Decreases the time between the audio cue and the Skill Check by 42%. 4 Tokens: Decreases the time between the audio cue and the Skill Check by 56%. 5 Tokens: Completely disables the Skill Checks’ audio cue.
What Makes The Huntress Great?
- Huntress performs insanely well with information perks
- By baiting Survivors into locking themselves into animations, you can score free hits with the hatchets
- Immense satisfaction from landing successful hits with hatchets
- Has some really good cosmetics
- Has some very powerful add-ons, such as the Irridescent Heads which instantly put Survivors into the dying state upon a successful hit, but this may cause Survivors to disconnect or other things.
- Easy to access as she’s one of the base Killers
- Is considered by many to be the best ranged Killer and overall one of the most powerful Killers in the game
- Has a Pick Rate of 8.01% and a Kill Rate of 54.15%
3.) The Oni
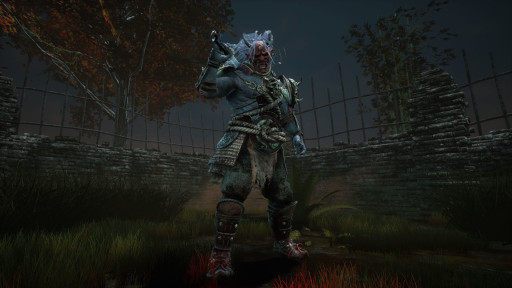
The Oni is a wrathful, violent, and brutal warrior. One that uses the blood of his enemies to satiate his rage and turn his vengeance onto his prey. The Oni is a powerful and highly mobile Killer, introduced in the Cursed Legacy DLC. Should you face The Oni, hear the blood-curdling roar of his fury, the thundering sound as the ground shakes with his every step, you’ll likely be dead by daylight.
The Oni’s Power is called Yamaoka’s Wrath. This power has 2 main parts to it. The first part is called Absorption Mode, in this state using The Oni’s power button will cause him to collect Blood Orbs dropped from injured survivors and start filling up the Power Gauge, and landing a hit on a healthy Survivor will fill up a large portion of the Power Gauge. Once The Oni has filled the Power Gauge by collecting enough Blood Orbs, Blood Fury will be available. By pressing the Active Ability Button, The Oni will enter Blood Fury for 45 seconds where he will switch from his Katana to a deadly club called a Kanabō. While in Blood Fury, The Oni has access to 2 new abilities: Demon Dash and Demon Strike. Pressing and holding The Power Button will charge up Demon Dash and cause The Oni to run at a much faster speed, enabling him to cover large distances quickly and close in on Survivors. By pressing and holding the Attack Button, The Oni will charge up a heavy hit which can instantly put Survivors into the Dying state, but it is also still possible to perform a faster basic attack that only damages the equivalent of 1 health state.
The Oni comes with 3 perks: Zanshin Tactics, Blood Echo, and Nemesis. These perks give him navigational information, punish injured Survivors, and gain an advantage over interfering Survivors.
- Zanshin Tactics is an aura reading perk that highlights breakable walls, pallets, and vault locations to the Killer within a range of 24/28/32. This helps with predicting where a Survivor might go, and provides information for navigating.
- Blood Echo activates when a Survivor is hooked, causing all other injured Survivors to suffer from the Haemmorage and Exhausted status effects for 45 seconds before incurring a cooldown of 80/70/60 seconds.
- Nemesis activates when a Survivor stuns or blinds The Killer, causing them to become the new Obsession. When a Survivor becomes the new Obsession by any means, they suffer from the Oblivious status effect for 40/50/60 seconds and their aura is revealed to the Killer for 4 seconds
What Makes The Oni Great?
- The Oni is a high mobility Killer who can cover great distances in a short amount of time, and unlike other Killers such as The Demogorgon and The Hillbilly, The Oni won’t be stunned by slamming into walls, making it much easier for him to maneuver.
- The Oni is very powerful but is ranked as a hard difficulty Killer and therefore is a challenge to master and refine techniques, but the payoff is huge.
- Is considerably intimidating (but looks very cool)
2.) The Nurse

The Nurse is a haunting Killer that wields the ability to warp through objects and over certain distances. The Nurse was added as the first-ever DLC Killer in Dead by Daylight, she was part of the Last Breath DLC, but has since become one of the starting Killers. Her floating frail figure in the distance is unnerving, the shrill shriek as she vanishes and re-appears, and the anxiety brought by anticipation as you wait and hold your last breath.
The Nurse’s Power is called Spencer’s Last Breath. As mentioned before The Nurse is a Killer capable of teleportation or warping, in this case, it’s called a “Blink”. By pressing and holding the power button, The Nurse will charge a blink which will allow her to warp up to 20 meters. Additionally, there is a small window after the first blink where The Nurse can warp again up to another 12 meters before suffering from fatigue that lasts for 2 seconds.
However, The Nurse’s blink can be stopped altogether, Survivors can shine flashlights at her to stop her from charging the blink or use flashbangs and firecrackers stunning her and forcing her to blink and immediately enter fatigue.
The Nurse comes with 3 perks: Stridor, Thanatophobia, and A Nurse’s Calling. These perks help her find Survivors, debilitate them, and track them when they are injured.
- Stridor increases the volume of injured Survivors’ grunts of pain by 25/50/50% and their regular breathing by 0/0/10%
- Thanatophobia hinders the Survivors by applying a stackable 4/4.5/5% penalty to repair, sabotaging, cleansing, and healing speeds for every injured, dying, or hooked Survivor up to a maximum of 16/18/20%
- A Nurse’s Calling is an aura reading perk. Whenever Survivors are healing another Survivor or self-healing, their aura(s) are revealed to the Killer within a range of 20/24/28 meters.
What Makes The Nurse Great?
- The Nurse is considered to have some of the best perks in the game, so playing her and leveling her up to unlock her teachable perks is a very good idea.
- Nurse’s Blink ability will be hard to get used to, but it allows for great map coverage and chaining hits on Survivors together.
- The Nurse is largely considered one of the strongest Killers, with a pick rate of 5.27% making her one of the more popular options of the Killers
1.) The Spirit

The Spirit is a vengeful spirit, a horrific and dismembered reincarnation empowered by the fury of her ancestors and the lust for revenge. The Spirit was added to Dead by Daylight as the Killer of the Shattered Bloodline DLC. The Spirit is related to The Oni, and therefore carries the same rage in her veins, and may the Entity help you if you get caught in her path.
The Spirit’s Power is called Yamaoka’s Haunting. This power allows her to traverse the Ethereal plane and re-appear in a new location. By pressing and holding the power button, Spirit will enter the Ethereal Plane and leave a “husk” behind. While Yamaoka’s Haunting is active, Spirit moves at an increased speed but can no longer see Survivors, but she can still see their scratchmarks and hear the sounds that they make. Upon ending her Phase Walking, she retains a momentary speed boost which can be used to close the gap between her and Survivors. The Spirit also has “Passive Phasing”, where she will continue to phase in and out of view at random, and this can only be seen by the Survivors.
The Spirit comes with 3 perks: Spirit Fury, Hex: Haunted Ground, and Rancor. These perks give her information, deal with obstacles, and bait survivors.
- Spirit Fury activates after you break 4/3/2 pallets, then the next time you are stunned by a pallet it is instantly broken.
- Hex: Haunted Ground spawns 2 trapped Hex Totems on the map, and once one of them is cleansed by a Survivor all of the Survivors suffer from the Exposed status effect for the next 40/50/60 seconds. The remaining trapped totem becomes a dull totem.
- Rancor is a perk that centers around The Obsession. Rancor reveals the locations of Survivors after a generator is completed, and the Obsession can see the Killer’s aura for 5/4/3 seconds. Once all generators are completed, the Obsession suffers from the Exposed status effect and the Killer is granted the ability to kill the Obsession by their own hand.
What Makes The Spirit Great?
- The Spirit is considered one of if not the strongest Killer in Dead by Daylight. Her power is extremely good as it helps you traverse the map unseen, allowing her to catch Survivors off guard.
- Spirit arguably has no counters and is a great threat to Survivors.
- There is a simple but effective mind game where you just stand still and the Survivor might think Spirit is phasing and as a result, they could run straight into you, giving you a free hit.
With enough time and effort, with the right knowledge and skill, every Killer can be very powerful in their own right. Who you play and how you go about playing as them will vary from person to person, and therefore is always based on opinion or preference. But the most important thing is to have fun.
