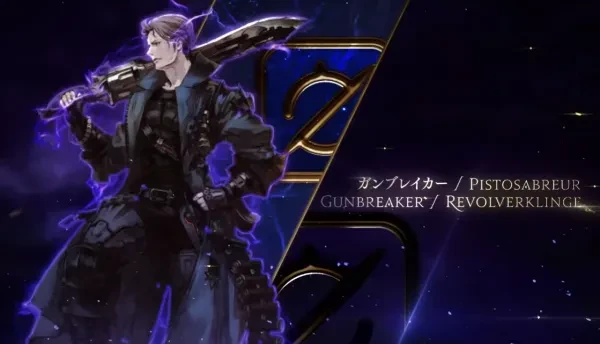
Final Fantasy XIV’s new expansion Shadowbringers brought a new tank job called Gunbreaker. But the Gunbreaker is more just a flashy boomstick. For example, you still do have to tank, manage cooldowns, enmity, and cleaves. Worry not though, this guide is here to help you understand the tank’s offensive and defensive capabilities and rotation.
Getting the Job
In order to obtain the job, first head over to the God’s Quiver in New Gridania (X:11.5 / Y:11.9) and complete the quest The Makings of a Gunbreaker. You’ll need to have another combat job at level 60 (not including Blue Mage).
Level 60 Guide
So there is a lot here. Getting the job at 60 can seem a little overwhelming so I’ll break down the base offensive rotation, cartridges, and defensive cooldowns. I’ll also discuss the role actions so if this is your first time tanking you know what to do.
Offensive
Before anything else, put on Royal Guard if you are in combat. Royal Guard is your tank stance and generates additional enmity with your attacks so you won’t have to worry about DPS or healers drawing aggro. Remember to check if it is on before dungeons because level syncing turns off-tank stance.

Lightning Shot and Rough Divide are also used to grab enemies aggro. I’d recommend using Lightning Shot as a way to pull mobs and Rough divide as an opener for bosses.
The Single Target rotation is as follows
Keen edge-> Brutal Shell-> Solid Barrel
This is the bread and butter single target rotation. Brutal Shell also heals you and gives slight damage mitigation. You also gain a single cartridge.
This is what it looks like fully loaded with two cartridges

- Gnashing fang -> Savage Claw -> Wicked Talon
- Burst Strike
Gnashing fang is on a 30-second cooldown however so you’ll want to use burst strike to expend cartridge to keep the damage up. You can only hold two cartridges so you’ll want to keep using those.
- Danger Zone-does a straight 300 potency attack.
You’ll want to use this skill in-between combos or after a cartridge combo. It is on a 30s cooldown but if you’re in a boss encounter I’d recommend using it as much as possible.
- Sonic Break-Delivers an attack with a potency of 300. Additional Effect: Damage over time for 30s
You’ll want to weave it in between combos. It’s on a 60s cooldown but you want to make sure you’re using it on enemies with more health or bosses.
The AOE rotation is
- Demon Slice-> Demon Slaughter
You gain a cartridge from this combo but you can’t use it on an AOE attack yet so you’ll have to use one of the single-target attacks.

Defensive
Here I’ll break down the different defensive cooldowns, what they do and when to use them.
- No Mercy-Increases damage dealt by 20% for 20s
No Mercy is on a 60s cooldown. I’d recommend using it in boss fights, I personally like to use it right before using the cartridge combo and Danger Zone to maximize damage.
- Camouflage-Increases parry rate by 50% while reducing damage taken by 10%
Camouflage is on a 90s cooldown but that doesn't mean you should never use it. It’s a solid cooldown to open a boss encounter with.
- Nebula- Reduces damage taken by 30%
Nebula is on a longer cooldown of 120s but it is very useful. It’s great for mitigating tank busters so anytime there’s a boss about to use one, use Nebula if you have it up.
- Aurora-Grants Regen to target
Aurora grants a little bit of healing to a single target which can help in a pinch when you take a little bit more damage than you thought. It has a cooldown of 60s. It isn’t anything special but it helps on occasion. If you’re the secondary tank (Off tanking or OT)throw this on to your main tank or yourself if you’re getting a bit low.
- Superbolide-Reduces HP to 1 and renders you impervious to most attacks
This is the emergency “everything has gone horribly wrong and I’m about to die,” button. I would highly recommend that you keep hotkey this to a separate Hotbar away from the rotation to avoid fat fingering it. It has a cooldown of 360s and the invulnerability lasts about 8s . This particular ability is very situational and unless you are fond of giving your healer a heart attack I’d use it only in emergencies. If you do need to use it warn your healer that it’s cowabunga time. It does have its use in higher-level play but you'd need to speak with your healer about that beforehand
Role Actions
These are abilities that every tank has. If you already are a tank and are reading this, great you know what to do! If the Gunbreaker is your first tank, I’d recommend you read on.
- Rampart-Reduces damage taken by 20%. For 20s
This is a good general damage mitigation ability. I’d recommend using it for tank busters in rotation with Nebula. It has a 90s cooldown timer so you can use it more often.
- Low Blow-Stuns Target for 5s
This is good for mob pulls since it doesn’t work on bosses or larger enemies. Just simply pick one and fire the skill off. It’s great to give both your healers and yourself a quick reprieve. It’s on a cooldown of 20s so it comes up fairly quick. I’d recommend placing this if you need to use it in between combos.
- Provoke-Gesture threateningly, placing yourself at the top of a target's enmity list while gaining additional enmity.
Even if you have Royal Guard on, mistakes will happen. This a way to pull an enemy’s enmity back if the DPS or healer is being targeted. This does have a cooldown of 25s so you can use it fairly often
- Interject-Interrupts the use of a target's action.
This skill only really works on mobs or smaller enemies. I’d recommend using it there if you notice one is about to throw out an AOE. This has a cooldown of 30s so if you do want to use it, it is up fairly often
- Reprisal-Reduces damage dealt by nearby enemies by 10%. For 10s
This is one of the most important and underrated damage mitigation tools. Not only does it work on mobs, but it also works on bosses. It helps your party overall as well so I’d recommend using it fairly regularly. It has a longer cooldown of 60s but I would use it more regularly especially on bosses.
- Arms Length-Creates a barrier nullifying most knockback and draw-in effects for 6s. Creates a barrier nullifying most knockback and draw-in effects for 15s
This role action is fantastic because it can apply slow to a group of enemies. It can provide the entire party with some much-needed breathing room. I would highly recommend using this on mob pulls as the slow effect doesn’t happen with most bosses. It has a cooldown of 120s so I’d use as much as possible on mob pulls. The knockback prevention can help if you’re unsure of your positioning or are just feeling a little lazy.
- Shirk-Diverts 25% of enmity to target party member.
This is only really useful when you’re off tanking and accidentally draw too much enmity. It’s on a 120s cooldown but it’s really mostly situational. In Savage raids, people use it to tank swap for certain phases or attacks but it’s mostly situational in normal play.
Changes at 70
So there are some changes that happen by level 70 and I’d like to discuss those. You gain some new skills that are fairly important.
- Bow Shock-Delivers an attack with a potency of 200 to all nearby enemies.Additional Effect: Damage over time for 15s (Gained at 62)
This weaponskill enhances your AOE capabilities. It’s great to use after your AOE combo. It’s also great as you can apply additional damage over time to bosses. It’s on a 60s cooldown but feel free to use it when it’s up since it can be used in a variety of situations.
- Heart of Light- Reduces magic damage taken by self and nearby party members by 10% for 15s (Gained at 64)
This ability is great to use when a boss is about to throw party-wide damage or a massive AOE. It’s on a 90s cooldown so I’d recommend using it when you notice the above situation. It can also be used in some mob pulls when multiple enemies are throwing out AOEs.
- Heart of Stone-Reduces damage taken by a party member or self by 15%. for 7s. (Gained at 68). Additional Effect: When targeting a party member while under the effect of Brutal Shell, that effect is also granted to the target for 10s
This is one of the main and most flexible abilities. It's on a 15s cooldown. I’d recommend using this regularly as it mitigates a decent amount of damage and you can use it as on off-tank to help out your main tank. It can also apply the Brutal Shell healing to the other person on completion of that combo. It also can apply Aurora as well for a nice quick heal as well.
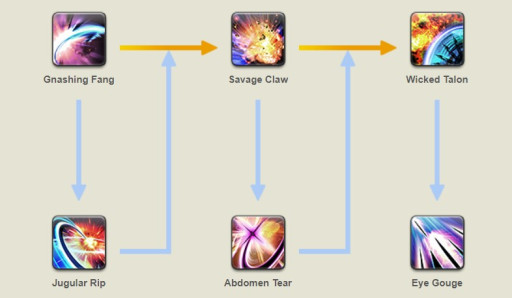
- Continuation-Allows the firing of successive rounds with your gunblade. Gnashing Fang may be followed by Jugular Rip. Savage Claw may be followed by Abdomen Tear. Wicked Talon may be followed by Eye Gouge.
First, do the job quest at level 70 in order to unlock this weaponskill. So this skill allows you to follow up each cartridge move with an instant attack. So the existing combo goes from
- Gnashing fang -> Savage Claw -> Wicked Talon
- Gnashing fang -> Jugular Rip ->Savage Claw-> Abdomen Tear-> Wicked Talon-> Eye Gouge

It might seem a little overwhelming but it’s all fixed to one hotkey that automatically shifts depending on the last attack you’ve hit in the rotation you’ve used so you don’t have to shift your entire Hotbar.
Changes at 80
Even more, skills learned by 80 yay!
- Fated Circle- Delivers an attack with a potency of 320 to all nearby enemies. Cartridge Cost: 1 (Gained at Level 72)
Finally the last step in your AOE combo. Your existing rotation goes from
- Demon Slice-> Demon Slaughter
- Demon Slice-> Demon Slaughter-> Fated Circle
Simple!
- Bloodfest-Draws aetheric energy from target, adding 2 Cartridges to your Powder Gauge. (Gained at 76)
This is a great way to open a boss fight in my opinion. Open with Bloodfest and No Mercy then immediately go into your cartridge combo. Finish with Burst strike and Danger Zone. This way you can effectively maximize your No Mercy and instant cartridge gain. This skill is on a 90s cooldown so you can’t use it too much
- Blasting Zone-Delivers an attack with a potency of 800.
This skill is just an upgrade to Danger zone (no more Kenny Loggins). So the above still applies to this version.
General tips
Trust in your healer and try to make their life easier.Don’t be afraid to use your cooldowns that’s what they’re for!
When in doubt keep Royal Guard on. In 8-man content, chances are you’re going to be an off-tank at some point. I’d recommend waiting a bit then turning it on. Wait for around 15-30 seconds to make sure the other tank has full enmity. Remember to make sure that it is on before starting a dungeon as level syncing removes it.
Mind your footing. Sometimes when you’re tanking a boss, you get tunnel vision. Stay aware of your surroundings at all times for AOEs. You won’t need to mitigate them if you don’t get hit in the first place (Points to forehead). Take a look to make sure everyone is still up every once in a while.
Go with a pace you’re comfortable with. Don’t pull wall to wall if you aren’t comfortable with it yet. If you’re first starting out, pull smaller groups at first. Let your party know that you are learning the ropes of tanking and almost everyone will be okay with it. It’s better to go at a slower pace and finish than to get stuck because you’re pulling too much. Also, it’s okay to go slower if your healer asks you to. They could also be new and just learning as well.
So that was a lot to cover but Gunbreaker is a fun class that I would recommend checking out if you are interested in tanking. It’s flashy, fun and satisfying. You can also get some sweet coats and fashion is the true endgame after all
You may also be interested in:

