Your role may be green, but you cannot hide the gushing red coming out from it. Are you ready for the Lilies?
White Mage also known as Glare Mage is an advanced class of Conjurer. The art of Conjury hails from Gridania where they are led by Padjal, chosen of the elementals. Padjal looks like a human with horns, the Elder Seedseer Kan-E-Senna is one of them. Conjurers have drawn their power from the elemental, such as earth and wind, to attack as well as to protect. The White Mages are known as a pure healer that focuses on regens. But their abilities to attack are not to be underestimated! How can one provide succors, and be deadly at the same time? This guide will help you to master the powers of elementals!
Healing Abilities
White Mage, for now, has the most potent healing abilities, more than any other healers. However, compared to the other healers, the Whites have the least non-GCD abilities. Before jumping to that let us begin with knowing their healing skills. First, let’s start with single target healing abilities.
- Cure: Restores target’s HP with a cure potency of 450. There is also a 15% chance next Cure II will cost no MP. Requires casting time.
- Cure II: Restores target’s HP with a cure potency of 700. Requires casting time.
- Regen: Grants healing over time to a target with a cure potency of 200, for 18s.
- Benediction: Instantly restores all of a target’s HP. Recast after 180s.
- Tetragrammaton: Instantly restores target’s HP with a cure potency of 700. Recast after 60s.
- Afflatus Solace: Instantly restores target’s HP with a cure potency of 700. Requires a Lily, and nourishes the Blood Lily.
What is a Lily, and Blood Lily? The explanation is for later in the Gauge section! Now let us move to the area’s heals:
- Cure III: Restores HP of target and all nearby party members (6 yalms), with a cure potency of 550. Requires casting time.
- Medica: Restores own HP and the HP of all nearby party members (15 yalms), with a cure potency of 300. Requires casting time.
- Medica II: Restores own HP and the HP of all nearby party members (15 yalms), with a cure potency of 200, giving regen for 15s, with a cure potency of 100. Requires casting time.
- Asylum: Instantly envelops a designated area in a veil of succor, granting healing over time to self and any party members who enter with a cure potency of 100 for 24s. Additional Effect: Increases HP recovery via healing actions on party members in the designated area by 10%. Recast after 90s.
- Assize: Instantly restores own HP and the HP of nearby party members (15 yalms), with a cure potency of 400, and restores 5% of maximum MP. Also deals damage with a potency of 400 to all nearby enemies. Recast in 45s.
- Afflatus Rapture: Instantly restores own HP and the HP of all nearby party members (20 yalms), with a cure potency of 300. Requires a Lily, and nourishes Blood Lily.
Cure III allows you to heal more HP than Medica but smaller in area of effect. Cure III will also let you pick your target, while Medica heals covers your surroundings. While it is still debatable if Cure III is useful, some people believe that there are cases when Cute III can be used. Whilst in most cases, Medica II is more often used than Medica.
Attack Abilities
All healers do have some attack abilities, that includes AoE (Area of Effect), DoT (Damage over time) and Single Target, these are White Mage attack abilities:
- Glare: Deals unaspected damage with a potency of 300. Requires casting time.
- Dia: Instantly deals unaspected damage with a potency of 120. Additional Effect: Unaspected damage over time with a potency of 60 for 30s.
- Holy: Deals unaspected damage with a potency of 140 to all nearby enemies.
- Additional Effect: Stun for 4s, requires casting time.
- Afflatus Misery: Instantly deals unaspected damage to a target and all enemies nearby it with a potency of 900 for the first enemy, and 25% less for all remaining enemies. Can only be executed when the Blood Lily is in full bloom.
Glare and Dia is an upgraded version of Stone and Aero, if you don’t have it now, it’s okay, you will eventually get it. The sequence starts with Glare, followed by Dia on a single target, Holy for multiple targets, and Afflatus Misery when available. Simple and you don’t have many options on this one. Now that we have learned the abilities, we move on to the Gauge.
Gauge


White Mage’s gauge is called Healing Gauge, when you are engaged in combat, it will nourish some Lilies. You can have up to 3 Lilies. And each time you execute an action; either Afflatus Solace or Afflatus Rapture, you will nourish a Blood Lily. Consuming 3 Lilies will make the Blood Lily bloom, allowing you to finally launch your powerful attack Afflatus Misery.
Other Skills
Other than Healing Abilities and Attack Abilities, White Mage has other skills too:
- Raise: Resurrects target to a weakened state.
- Fluid Aura: Binds target.
- Presence of Mind: Reduces spell cast time and recast time and auto-attack delay by 20% for 15s. Recast in 150s.
- Thin Air: Reduces MP cost of all actions by 100% for 12s. Recast in 120s.
- Divine Benison: Creates a barrier around self or target party member that absorbs damage equivalent to a heal of 500 potency for 15s. Recast in 30s.
- Plenary Indulgence: Grants Confession to self and nearby party members. Upon receiving HP recovery via Medica, Medica II, Cure III, or Afflatus Rapture cast by self, Confession triggers an additional healing effect. Cure Potency: 200 for 10s. Recast in 60s.
- Temperance: Increases healing magic potency by 20% while reducing damage taken by self and all party members within a radius of 30 yalms by 10% for 20s. Recast in 120s.
You can remove Fluid Aura from your Hotbar, so far it has yet proven useful. Thin Air and Presence of Mind are the two that you need to constantly get in check of for cooldowns. The other abilities you may also need is Plenary indulgence and Temperance. Now that we know, let us proceed to Role Actions.
Role Actions
These are the Role Actions of healers:
- Esuna: Removes a single detrimental effect from a target. Required casting time.
- Swiftcast: Cast the next spell immediately between the next 10s. Recast in 60s.
- Lucid Dreaming: Gradually restores own MP with a potency 50 for 21s. Recast in 60s.
- Surecast: Spells can be cast without interruption, nullifies most knockback and draw-in effects for 6s. Recast in 120s.
- Rescue: Instantly draws target party member to your side. Cannot be used outside of combat or when a target is suffering from certain enfeeblements. Recast in 120s.
- Repose: Afflicts the target with Sleep for 30s. Cancels auto-attack upon execution. Required casting time.
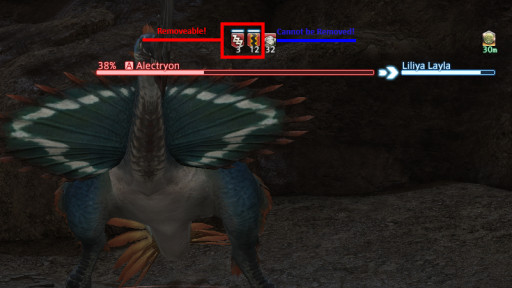
Every healer has these actions, some are shared with magical ranged DPS. Esuna is necessary to remove any ailments you or your party members have. However, not every debuff can be removed with Esuna. The ailments/debuff you can remove are marked with a line above the icon, else it cannot be removed. Keep track of Lucid Dreaming's cooldown for it is necessary to make sure you always have enough MP.
Ace Your Healing

Being a healer is very situational, you should take a closer look at your party member health bar, and your own HP and MP bars! Choose your healing ability that the situation requires you to! Now we put it to practice.
- For starters, cast regen on your tank, and if you are feeling magnificent, you can also cast Divine Benison right after the pull.
- On a single target or boss, start with casting your Glare/Stone, followed by Dia/Aero, continue with Presence of Mind, then spam Glare/Stone until you need to heal. Remember to execute Assize and keep track of its cooldown. Recast Dia/Aero every 30s. Repeat. If you are on Aero, then 18s is your rotation.
- On dungeons, when the tank pulls the mobs, spam Holy as well as Assize, until you need to heal of course.
- Remember to utilize the Lilies, do not let it max out. Use it before it reaches the 3rd Lily. Always have a room for new Lily to bloom. This is also required for optimal DPS-ing.
- Whenever Afflatus Misery is ready, use it immediately or in some cases, you may save it if you are near the boss fight in the dungeon and the mobs HP is not worth using it.
- Your panic button is Benediction, use it wisely when your tank HP is especially low, but remember, it has a cooldown time. Other than Benediction, you have Tetragrammaton and Afflatus Solace with the same cure potency, use it when your tank HP is low.
- Activate Plenary Indulgence along with Thin Air when you need that extra heal, Thin Air helps you cut off the excessive usage of MP. Bear in mind that Thin Air combined with the Presence of Mind is also good for dealing damage.
- Use Temperance when still in need of extra heal, with a bonus of damage reduction.
There you have it the rotation of healer, and you thought healer is about healing? WRONG! Healers are DPS in green. Get good by practising, White Mage is a pretty straightforward job!
Tips & Tricks:
Deal Damage. Remember to always-on cast! It is often a misconception that a healer’s job is only to heal, just because it says HEALer, duh. But that was not the case, as a wise man said, when you help your team in dealing damage, you are mitigating future damage! ABC is your motto (Always Be Casting). Blood for Blood Lily!
It's okay to drop the HP below 100%. As a healer, you don’t have to keep all your party members in full health all the time. As long as they still have enough HP for the next attack, you should help on dealing damage!
Do not hard-cast Revive Spells! Many don’t realize that you can Swiftcast Revive spells.
Have the Limit Break on Hotbar. Keep in mind that the only time you need to cast the Limit Break as a healer is when most of your team is down, and the Limit Break 3 is on! Limit Break 3 allows the healer to revive all the fallen party members to full health.
If you are new to the dungeon, prioritize healing yourself first, then help the others. You can’t help your team when you are dead, do yourself and your party a favour.
If you are in an alliance raid or trials, do macro your revival spell. This is to let the other healers know if you were to revive a target, and also let the target know they are about to be revived. This way conflict of reviving the same target can be avoided.
Rescues are used to save your party member from dying of the same mechanics too many times. After the fight, you may give that person an earful.
Now you know how to deal damage with your healer, and mitigate unnecessary damage for the future of your party. That is overall how you play Glare Mage. Be sure to optimize that damage outputs but don’t forget to keep your party members alive!
You May Also Be Interested In:
- Top Five Best FF14 Solo Classes
- FF14 Best Class - What's the Best Job to Play?
- FF14 Top Three Tanks
- FF14 Best Healer - What's the Best Job For Healing?
- [Top 15] FF14 Best Addons Everyone Should Use
- FF14 Best Ways To Make Gil (Top 10 Methods)
- FF14 Best PvP Class That Are OP
- FF14 Best Potions And How To Get Them
- FF14 Best Ways To Level Up Fast
- [Top 3] FF14 Best DPS Class
- [Top 3] FF14 Best Starting Classes for Beginners
- FF14 Most Fun Classes (Top 3)
- [Top 3] FF14 Best Crafting Class And Why They're Great
- FF14 Best Dungeons [Top 10]
- FF14 Best Tanks (All Tanks Ranked Good To Best)
- [Top 10] FF14 Best Armor Sets
- [Top 10] FF14 Best Food And How To Get Them
- Top 10 Best FF14 Mounts And How To Get Them
- [Top 5] Final Fantasy 14 Best Solo Classes

