Don't stand in the stupid! Don't stand in the red!
Healing is hard. The tanks sometimes don’t hold aggro, the DPS stands in the red stuff, and the boss applies crazy debuffs. What’s more, Star Wars: The Old Republic recently got massive changes to class abilities and balancing for 7.0 and 7.1, which has been a slew of balance changes to each healing class. Every patch shifts the subtle and fickle balance of whether Combat Medic Commando / Bodyguard Mercenary or Sawbones Scoundrel / Medicine Operative is parsing the best healing until the next patch (Sage / Sorcerer relies on preventing damage using bubbles).
Thankfully the core of each healing class hasn’t fundamentally shifted through these balance changes.
We’re going to look at the healing priority systems for each class, while not mentioning the usage of defensive abilities and DPS abilities for each. You should use defensive abilities as needed and available, and DPS abilities whenever all healing is taken care of.
#3 - Seer Sage / Corruption Sorcerer (Jedi / Sith)

For the following chart, white borders denote what’s more universally accepted as optimal picks, green are situational. See https://parsely.io/parser/combat-styles/corruption/OTcxMzI3Nzc= for more details.
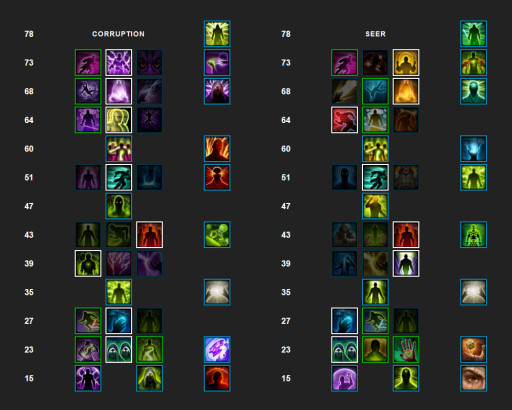
Sage / Sorcerer healer discipline is the most flexible healing class in terms of whether to do single target or AOE, burst or healing over time; this also means it’s the most imprecise healing class to write a guide about. There are a couple of things to note:
- Preserved Force Armor / Static Barrier is your first line of “healing” and should be kept up and refreshed as often as possible, especially on tanks. It also has a secondary heal effect that activates when the shield is expended, which weakens with each direct heal you do—don’t worry about juggling this part, just keep the bubbles up early and often.
- Rejuvenate / Resurgence makes most of your healing abilities better as it gives you a buff listed on the right-hand side of the combat style skill tree. Use it right before healing, use it as often as possible.
- Force management basically boils down to using Vindicate / Consuming Darkness only when its icon is shiny, which you get from a universal passive that activates whenever Healing Trance / Innervate is used. So use the Healing Trance / Innervate often. In a pinch you can use Vindicate / Consuming Darkness without the buff active but it will eat into your Force regeneration and exacerbate the problem; this problem in turn can be alleviated by popping Force Barrier which purges all the debuffs from that ability.
- Learn your boss fights and use Restoration / Expunge to cleanse your tanks, yourself, and co-healers, then DPS in that priority order.
- When not keeping up the above priority rotations of bubble and Force management, use the buff skill Rejuvenate / Resurgence to then use Keeper of Peace / Rally for burst heals for two people, Salvation / Revivification for AOE burst heals, Wandering Mend / Roaming Mend for bringing the lowest of your party up with a burst, and Benevolence / Dark Healing when it’s made shiny by the other skills (it’s otherwise a Force eater).
- For stats, aim for 2054 Alacrity (7.14% in the details screen) and then the rest into critical. With the 7.0 gearing system, you can choose to instead just take the static gear you get and upgrade it, min-maxing isn’t exactly necessary for most modes and content. Just be aware of that alacrity breakpoint.
- For Tactical choice, it’s only One for All. This Tactical improves Salvation / Revivification, the skill that’s Area of Effect to target that applies a Healing Over Time buff on 8 allies within the casting area.
- For Legendary Implants, Unmatched Haste is the universal implant for all game modes and all Disciplines of Sage / Sorcerer and since it deals with a core buff feedback loop—it increases the duration of the Mental Alacrity / Resurgence buff which makes you cast faster, and makes Force Speed lower the cooldown of that buff ability—you should always take it. After that we pick one from these: Dynamic Force reduces Force Potency / Recklessness cooldown by 15s, which is much more useful for those who’ve mastered the art of critical heals, but for beginners Revitalize is a much more accessible implant as it will make something you should already be applying a lot of—Rejuvenate / Resurgence, which gives you a buff called Force Bending / Conveyance which makes most healing abilities perform better—a tiny bit better.
For a better rundown of how each ability works and how they’re empowered by Rejuvenate / Resurgence, see: https://www.youtube.com/watch?v=mFxluElGKTI
#2 Combat Medic Commando / Bodyguard Mercenary (Republic / Empire Tech)

For the following chart, white borders denote what’s more universally accepted as optimal picks, green are situational. See https://parsely.io/parser/combat-styles/bodyguard/MTIxNzQzNzM= for more details.
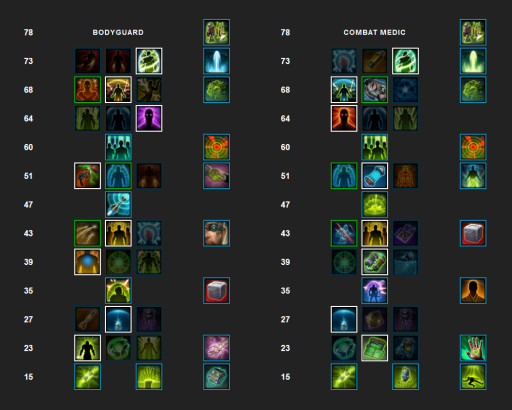
The Commando / Mercenary healer discipline is the most straightforward healing class, and focuses on single target burst type of healing, with some AOE and preventative. Here’s a rundown:
- Your first priority is mainly to keep your Supercharge buff stacks up in order to use Supercharged Cell / Supercharged Gas, which restores some energy cells / heat, makes all healing better, and makes Advanced Medical Probe / Healing Scan cheaper to use and removes the cooldown. More on that later. The buff should be up as much as possible, and so you should use Successive Treatment / Progressive Scan to give yourself 4 stacks, or Med Shot / Kolto Shot, which is a tiny single target heal that costs no energy that gives one stack each cast. Supercharge is also used to activate the raid buff Supercharged Celerity which increases all raid members’ alacrity by 10%..
- The other priority is to keep Trauma Probe / Kolto Shell up. This heals your party whenever they’re damaged, meaning less need for burst healing from you.
- The next most used ability will be using Bacta Infusion / Emergency Scan whenever its cooldown is up. It’s a single target strong heal that will then apply a healing over time buff, and also make the next Medical Probe / Rapid Scan activate instantly. For most content, just these three points alone will be enough.
- Learn your boss fights and use Field Aid / Cure to cleanse your tanks, yourself, and co-healers, then DPS in that priority order.
- The next layer is to then use Medical Probe / Rapid Scan when it’s shiny to gain a buff that can be stacked up to three times which decreases the energy cost of Advanced Medical Probe / Healing Scan. What this means is that while the buff from Medical Probe / Rapid Scan is up with a full stack of three, you can hit Supercharged Cell / Gas to be able to spam Advanced Medical Probe / Healing Scan for a much reduced cost.
- Kolto Bomb / Kolto Missile is situationally used for a burst of AOE healing.
- For stats, aim for 2054 Alacrity (7.14% in the details screen) and then the rest into critical. With the 7.0 gearing system, you can choose to instead just take the static gear you get and upgrade it, min-maxing isn’t exactly necessary for most modes and content. Just be aware of that alacrity breakpoint
- The Tactical to use is the SC-4 Treatment Scanner which will make Successive Treatment / Progressive Scan give 4 charges of Supercharged when completely channelled, which as discussed makes all your healing better when used as Supercharged Cell / Supercharged Gas or to activate the raid buff Supercharged Celerity.
- When it comes to Legendary Implants, Concentrated Fire is the must-have, making Supercharged Cell / Gas crit the next Bacta Infusion / Emergency Scan crit, as Supercharged is something we’re going to be using consistently. The other is a choice between Advanced Scanning which reduces cooldown times on Bacta Infusion / Emergency Scan and Advanced Medical Probe / Healing Scan, or Random Charge which gives you another passive way to get Supercharge stacks. Random Charge is better for beginners, while Advanced Scanning is better for those who don’t have as big of an issue keeping Supercharge up.
For a better rundown of how each ability works and how the Supercharge loop is played out, see: https://www.youtube.com/watch?v=Z-YKKBoxjqs
#1 Sawbones Scoundrel / Medicine Operative (Republic / Empire Tech)

For the following chart, white borders denote what’s more universally accepted as optimal picks, green are situational. See https://parsely.io/parser/combat-styles/medicine/ODI3YzMyMzU= for more details.
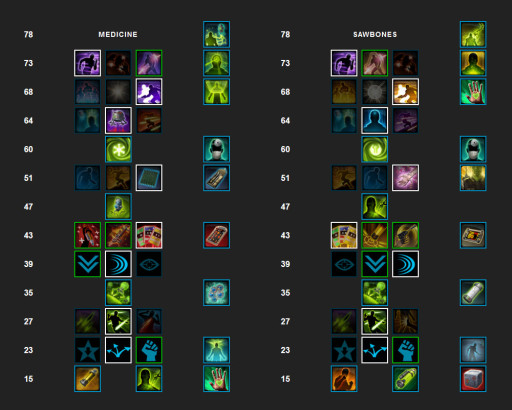
While the most effective AOE and sustained healing class, the Scoundrel / Operative is the most complex to master. It relies on placing buffs that heal over time, keeping those buffs up with small bursts, and managing a resource. So these are our priorities:
- The primary skill upon which everything else revolves around is Slow-release Medpac / Kolto Probe, which is a healing over time buff that can stack twice. You’re going to aim to stack it twice on three to four people—no more and no less, usually your tank first, then yourself, then other healers, and then DPS in terms of priority. Each tick of this healing has a chance of generating the Upper Hand / Tactical Advantage buff which is necessary to use other abilities. You can recast the primary ability if need be, but the preferred method is noted two bullet points down.
- Upper Hand / Tactical Advantage is the management then becomes the next priority. The primary active way you’ll want to generate them is by using Underworld Medicine / Kolto Injection, which will give you a stack for each cast. There’s a passive called Medical Burst / Kolto Burst that makes Underworld Medicine / Kolto Injection AOE into 8 nearby allies if you cast it on yourself. Note that the Tactical and Implant combo of Diagnostics Probe and Field Medic makes this key ability better. Other ways to generate this resource include going out of Stealth to generate two stacks at the start of the battle—Disappearing Act / Cloaking Screen can be used mid-battle to enter Stealth, then just break it by right-clicking the buff or using a stealth-breaking ability. Trick Move / Holotraverse on a safely positioned ally generates one stack while purging immobilizing effects and granting immunity. Dodge / Evasion generates one stack while increasing the chance to avoid damage.
- Those stacks of Upper Hand / Tactical Advantage will then be used to cast Emergency Medpac / Surgical Probe, which refreshes the duration of Slow-release Medpac / Kolto Probe at a lesser cost than casting the main ability all over again. Kolto Pack / Kolto Infusion is another method of using those stacks to refresh the duration but is less optimal. This resource is also used to activate the raid buff Stack the Deck / Tactical Superiority, which increases crit chance.
- Learn your boss fights and use Triage / Toxin Scan to cleanse your tanks, yourself, and co-healers, then DPS in that priority order.
- When you run out of energy, use Cool Head / Adrenaline Probe. Use Kolto Cloud / Recuperative Nanotech on a target plus three more allies within range to add another healing over time buff, and more importantly also to increase all healing done to them. If you took the Kolto Mark / Nano Mark passive, target your tank with Kolto Cloud / Recuperative Nanotech ability to give them that 20% boost to all healing received. Finally, burst AOE healing is provided by using Kolto Waves, a channelled ability that also has a chance of generating Upper Hand / Tactical Advantage.
- In terms of Tacticals, Scoundrel / Operative gets the choice between Critical Surgery and Diagnostics Probe. Critical Surgery makes Emergency Medpac / Surgical Probe always crit on targets with less than 50% health, while Diagnostics Probe makes Emergency Medpac / Surgical Probe reduces the cast time of the next Underworld Medicine / Kolto Injection by 0.25s per stack, or makes it instant with 3 stacks. Diagnostics Probe is a bit more proactive and is useful at all times as Emergency Medpac / Surgical Probe is a key ability, and buffing it always instead of when allies are in danger—the conditions for Critical Surgery rely too much on something that shouldn’t be happening anyway, but it is useful in case you’re newer and need a bit of a safety harness.
- Legendary Implants used are Tactician, which makes Upper Hand / Tactical Advantage also grant an increase to crit chance, and either Aggressive Treatment or Field Medic. Field Medic gives a 15% chance every time you cast a healing ability to make the next Underworld Medicine / Kolto Injection a critical hit, so it’s best paired with Diagnostics Probe. Aggressive Treatment makes Bushwhack / Toxic Haze also heal allies standing in it. Either make an ability you’re using often better or give one more avenue to heal.
For a better rundown of how each ability works, and a crash course in managing Upper Hand / Tactical Advantage, watch: https://www.youtube.com/watch?v=mOu69q8XbfY
As always, may the Force be with you. Cue Star Wars credits theme song!
You may also be interested in:
- SWTOR Best Classes Tier List [SWTOR Best And Worst Classes Revealed]
- [Top 10] SWTOR Best Builds That Are Powerful
- [Top 4] SWTOR Best And Worst Class Story
- [Top 15] SWTOR Best Armor Sets That Are Excellent
- SWTOR Best Companions for Every Class
- [Top 5] SWTOR Best AoE Class
- SWTOR Best Romance for Each Class
