![[Top 5] DbD Best Chucky Builds That Are Excellent](/sites/default/files/styles/responsive_image_600xauto/public/2024-10/Chucky%20MI_0.jpg.webp?itok=jsNULJFw)
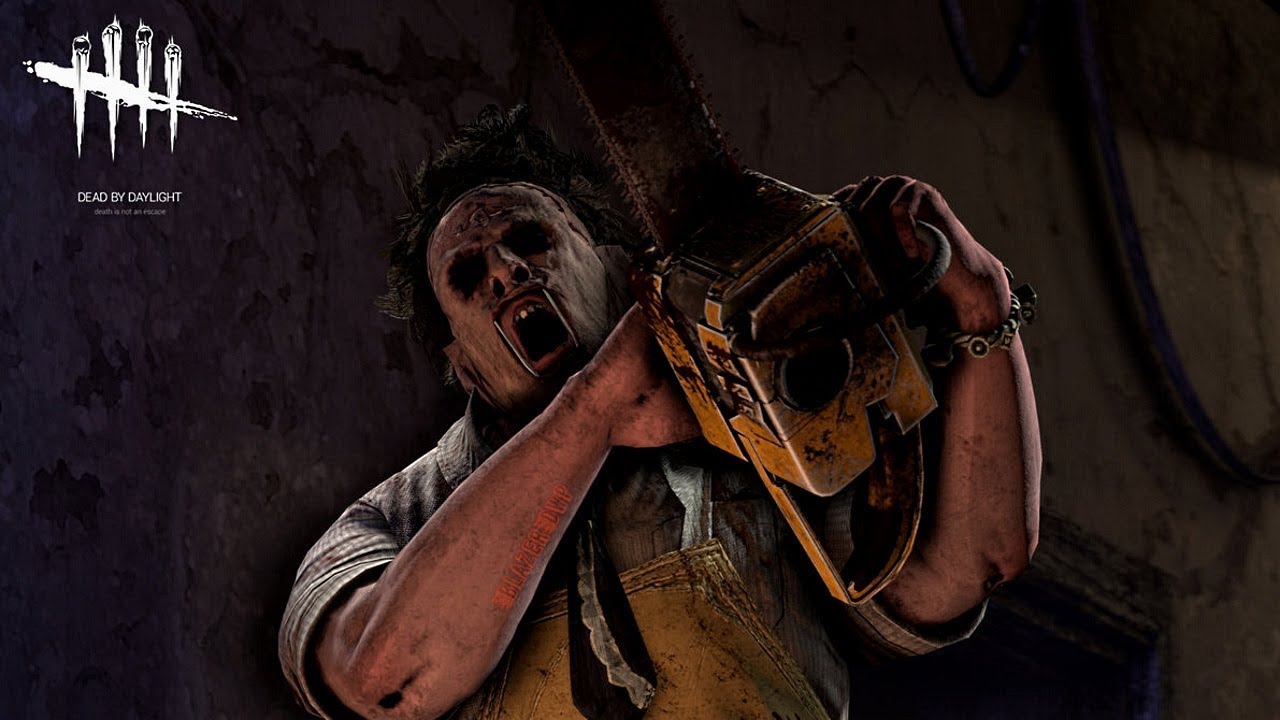
With his trusty chef’s knife in hand, the Good Guy, more commonly known as Chucky, is a Dead by Daylight killer that’s loved by many killer mains but feared by even more survivors. Underestimating this little fellow is the biggest mistake that you can make. Just look at the killer rankings – Chucky remains an S-tier killer even after he was nerfed. But before you can become the next lore-accurate Charles Lee Ray, you’ll first have to understand the complex gameplay mechanics behind this infamous doll.
Chucky boasts one of the most powerful abilities in the game: Playtime’s Over. By pressing the secondary power button, Chucky can go into Hidey-Ho Mode. During this time, Illusory Footfalls spawn around the map and Chucky completely conceals his terror radius and red stain. Chucky can also perform his special Slice and Dice attack while in Hidey-Ho Mode to dash towards survivors in a manner similar to the Blight’s Rush. And don’t worry about windows or dropped pallets blocking your way. Chucky’s small frame gives him the agility he needs to scamper under or over obstacles. After the scamper action is completed, the sprint automatically connects, so you can chase down your prey with little to no problem.
Chucky has three unique perks:
Batteries Included
This perk is often regarded as a late-game perk. Killers equipped with this perk get a 5% speed boost when they’re no more than 12 meters away from a completed generator. The effect does linger after you leave that 12-meter range, but only for a few seconds.
Friends ‘Til the End
One of Chucky’s more overpowered perks. This perk allows the killer to see their obsession’s aura and expose them after hooking a regular survivor. If it so happens that the one you’re hooking is your obsession, a random survivor becomes your new obsession as they let out a scream and reveal their location.
Hex: Two Can Play
A fun hex perk that activates after those who equipped it are stunned or blinded a certain number of times. Once the perk gets triggered, a dull totem turns into a hex totem. Until the hex totem is cleansed, any survivors who are dumb enough to stun or blind you will now be blinded themselves.
In this article, I’ll introduce to you some of the best builds for being the Good Guy.
Build 1 - Revenge is a Dish Best Served Cold
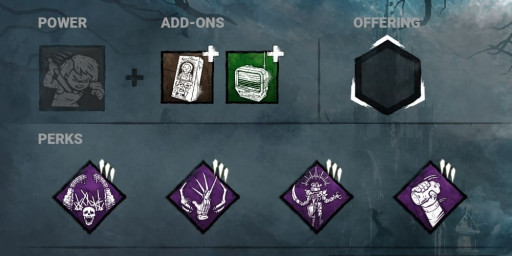
Every killer has their own distinct late-game build and Chucky is no different. To start things off with a bang, I’ll show you a build that can help you get your revenge on those T-bagging survivors and turn the tables at the last minute.
This build provides the killer with a spike in power and lethality after all the generators have been repaired. Not only does it prolong the survivors’ deadly stay in the Entity’s realm, but it also gives you, in essence, a map-wide haste boost. Don’t think you can just stand idly in a corner for most of the match though. If you want to please that ancient botanic monster and climb the bloody ladder, you need to move quickly in preparation of the eventual powering of the gates.
All you have to do is…
- Hunt down your obsession. Ignore all other survivors. You’ll want to start injuring your obsession as soon as possible.
- Pick your target wisely. The fundamental principle of Remember Me is that you can get up to four tokens, one for every time you injure your obsession. The perk still works even if you switch obsessions. The last thing that you want to do is go on a wild goose chase against an iridescent, prestige 100 player.
- Hook as many survivors as you can. This build doesn’t offer much in early or even mid-game, but if you’re good at mind games, you might be able to score a few hooks before end-game strikes.
- Kick the right generator. When all but three generators have been repaired, you’d want to kick the one that’s furthest away from the other two. You can then patrol the two other generators.
- Sacrifice everyone after the exit gates are powered. This is the time when the build really shines. You’ll run like the wind as the survivors struggle to even pull down the lever at the gate. But make sure to kill the obsession first.
This build is good for…
Late-game Chases
- All generators automatically pop after the gates are powered. This gives you a speed boost with map-wide coverage, thanks to Battery Included.
- Machine Learning gives you another speed boost for 60 seconds if survivors complete the generator that you’ve kicked. Trust me, you’ll need that extra boost since Chucky has a slower walking speed than the average survivor.
- Machine Learning also makes you undetectable. Paired with Chucky’s short build, you’ll be catching survivors off guard left and right.
- The Portable TV addon activates once the gates are powered, making your Slice & Dice rushes 70% longer. This sudden leap in skill duration synergizes perfectly with the Good Guy Box addon, which reduces your Dice & Slice cooldown.
Extending Late-game
- Four stacks of Remember Me make it so that survivors need to spend 44 seconds opening the gates, and that is if the killer doesn’t drop by to say hi.
- Survivors can barely get a break, having to open the gates, but also unhook survivors that you’ve downed in just 30 seconds.
- The nightmare doesn’t end there. Blood Warden, with the right conditions fulfilled, prevents survivors from leaving even if the gates are opened.
Build Requirement
Addons:
Good Guy Box
- Decreases Dice & Slice hit cooldown by 7%.
Portable TV
- Slice & Dice duration increased by 70% once the Exit Gates have been powered.
Perks:
Blood Warden
- As soon as an exit gate is opened, Blood Warden is activated. The auras of any Survivors located within Exit areas are revealed to you.
- Once per match, hooking a Survivor while Blood Warden is active calls upon The Entity to block both Exits for all Survivors for 30/40/60 seconds.
Remember Me
- You become obsessed with one Survivor.
- Each time your Obsession loses a health state, gain 1 token, up to 2/3/4. Each token increases the opening time of the exit gates by 6 seconds up to a maximum of 12/18/24 additional seconds.
- The Obsession is not affected by Remember Me.
Machine Learning
- After performing the damage generator action, this perk activates.
- While this perk is active, the next generator you damage will be compromised until it is completed. The generator is highlighted in yellow.
- When the compromised generator is completed, you become Undetectable and gain 10% Haste for 40/50/60 seconds. Then, the perk deactivates.
- If you damage a generator while another generator is compromised, the compromised generator becomes the latest one damaged.
Batteries Included
- When within 12 meters of a completed generator, you have 5% Haste.
- The movement speed bonus lingers for 1/3/5 seconds after leaving the generator's range.
Build 2 - Run Chucky Run
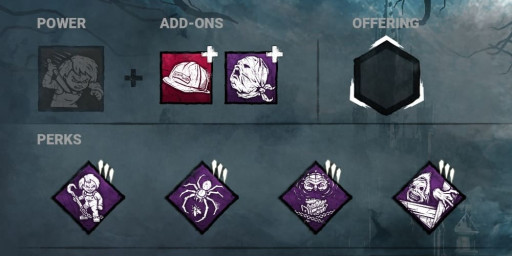
Chucky’s a ruthless killer, but he isn’t omnipotent. His moving at 4.4m/s means that he walks slower than regular survivors do and would normally require bloodlust to succeed in M1 chases. This build right here is made specifically to compensate for this Achilles’ heel of his, or rather Chucky’s heel, if you’d like.
This build gives Chucky that extra movement speed that’s essential in chases while slowing down generator repair. When used in clever conjunction with Chucky’s own ability, this sadistic doll can shred through survivors and pallets alike. It’s every killer’s dream: M1, M2 and through and through. The inherent viability of M1 hits in this build also makes it the ultimate stepping stone for less experienced Chucky mains.
All you have to do is…
- Find your obsession. Just like how it is with the previous build, you want to go straight for the obsession.
- Turn into Michael Jackson. Once you enter chase with your obsession, let them escape. Start moonwalking until the chase theme stops. You have to let them go three times.
- Let the slicing frenzy begin. After you’ve gotten all three stacks for Play With Your Food, you can start hunting survivors down. It’s highly recommended that you start with someone who’s not your obsession.
- Direct your prey to the nearest window. Do this and you just might get a promotion in the Realm. Chase survivors into areas where vaults are the only option of escape, like the shack with the pallet already dropped.
- Go back to your obsession for tokens. Your obsession is like your ATM. Whenever you need more stacks for Play With Your Food, simply go back to them and repeat the previous steps.
This build is good for…
Obtaining Information
- After hooking a regular survivor, Friends ‘Til the End shows you the aura of your obsession. With decent map knowledge and an analytical mind, you can probably predict where they’re going.
- If it’s your obsession that you’re hooking, a random survivor will scream, in turn revealing their approximate location.
- Deadlock blocks the generator that’s closest to completion. You can bet there are opportunistic survivors lurking nearby, ready to hop back onto the generator to pop it.
Short Chases
- The Hard Hat addon breaks pallets as you chase down survivors, clearing the path for your next M2 attack.
- The Plastic Bag addon makes it difficult for survivors to flee the scene with exhaustion perks like Lithe.
- With Unbound, you get 5% haste for vaulting and that allows you to rapidly close the distance between you and the panicking survivors.
- Friends ‘Til the End exposes the obsession, who’s frankly done nothing wrong save for entering the match as a survivor against you.
- Play With Your Food acts as your very own renewable source for speed boosts. Now that’s what I call being environmentally aware.
Build Requirement
Addons:
Hard Hat
- Performing a Scamper under a pallet breaks it immediately.
Plastic Bag
- If a survivor walks through an Illusory Footfall, they suffer from Exhausted for 15 seconds.
Perks:
Friends ‘Til the End
- You become obsessed with one Survivor.
- When you hook a Survivor that is not the Obsession, the Obsession becomes Exposed for 20 seconds and reveals their aura for 6/8/10 seconds.
- When you hook the Obsession, another random Survivor screams and reveals their position and becomes the Obsession.
Play With Your Food
- You become obsessed with one Survivor.
- Every time you chase your Obsession and let them escape, you receive a token up to a maximum of 3 tokens.
- Each token increases your movement speed by 3/4/5%.
- Performing a basic attack or Special Attack spends one token.
Deadlock
- After a generator is repaired, The Entity blocks the generator with the most progress for 15/20/25 seconds. You see its white aura during this time.
Unbound
- This perk activates for 24/27/30 seconds after a Survivor becomes injured by any means.
- After vaulting a window, you gain 5% Haste for 10 seconds. This effect cannot stack with itself.
Build 3 - Hanging by a Thread
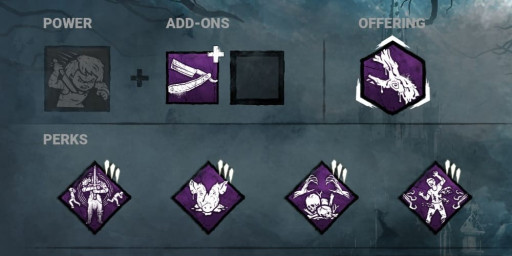
Before all else, I’d like everyone to take a moment to appreciate the pattering of Chucky’s stumpy feet. He’s trying his best, as I’m sure you can tell, but most Chucky mains will tell you that Chucky’s not really putting his best foot forward, both literally and metaphorically, in applying map pressure. And while our Good Guy’s base kit seems to point to that conclusion in every way possible, this build might just change your perception on the matter.
The most common way for a killer to exert map pressure is to exhibit high mobility, which allows them to be everywhere all at once. And even with chase builds like the previous one, Chucky still falls short in that regard. This pressure build, however, gives Chucky a hand by preventing survivors from healing and punishing them for their medical efforts.
All you have to do is…
- Get your first hit. Unlike the first two builds. You can injure any survivors through any means.
- Pay close attention to loud noise notifications. Hex: Face the Darkness is now activated and survivors will scream their lungs out periodically. Consider helping them out by taking them down, just so they have something else to scream about.
- Hit and run. Do not down the first survivor who got injured unless someone is cleansing your totem. But yes, go all out for those who thought themselves lucky that they’re not the first one to be found.
- Hook survivors on scourge hooks. Survivors hooked specifically on scourge hooks will now suffer from a healing penalty upon being rescued. On top of that, they’ll also receive a generator repair penalty if they push through and heal.
- Guard your totem until mid-game. As useful as Hex: Face the Darkness is for collecting information, it, like all things in life, cannot stay forever. As mid-game approaches, you can fool survivors into thinking they’ve won the game by cleansing your totem. What they don’t know is that they’ve just given you the golden opportunity for activating Hex: Pentimento.
- Activate your second hex perk. Hex: Pentimento now takes the place of Hex: Face the Darkness. Survivors now may not find themselves screaming like a goat every two seconds, but neither can they repair any generators at a remotely decent pace.
- Take everyone out. All the survivors are injured and the gates are still closed. Dish out a few more M2s and the game would be over in no time.
This build is good for…
Applying map pressure
- Good survivor mains will tell you to never heal until end-game, but doing that with Chucky is no different than playing with fire since he tends to strike in moments least expected and from angles most unpredictable.
- Straight Razor and multiple perks in this build inflict the Mangled effect on survivors, which extends the time they need for healing. These perks also regress healing progress when the healing action is interrupted. And with a hit-and-run playstyle, you can be certain we’ll be barging in and sending them right back to square one.
- The hex perks give survivors an extra objective that they, in a realistic sense, have no choice but to complete, effectively turning the presence of the hex totem into another source of map pressure.
Snowballing
- Most survivors are going to stay injured the entire game due to the Mangled effect.
- Survivors who have just spent half a decade healing themselves will now receive a debuff for generator repair speed, giving you sufficient time to plunge your knife into them a second time.
- Keeping everyone injured means you can down everyone in one hit. Since Chucky’s capable of gaining the Undetectable effect by just pressing a simple button, all the survivors are going to be lying dead on the floor before they even register what hit them.
Build Requirement
Offering:
Putrid Oak
- Calls upon The Entity to Considerably decrease the distance between sacrificial hooks appearing in the world.
Addon:
Straight Razor
- Slice & Dice attacks inflict the Hemorrhage and Mangled status effects for 10 seconds.
Perks:
Hex: Face the Darkness
- Injuring a Survivor by any means lights a Dull Totem, activating the Hex.
- While the Hex is active, all other Survivors outside of your Terror Radius will scream every 35/30/25 seconds, revealing their positions and auras for 2 seconds.
- When the Survivor enters the dying state or becomes healthy, the Hex totem becomes dull again and this perk deactivates.
- If the Hex totem is cleansed, this perk is permanently disabled.
Sloppy Butcher
- Wounds inflicted by basic attacks cause Survivors to suffer from the Hemorrhage and Mangled status effects for 70/80/90 seconds.
- Increases the rate at which healing progression is lost from Hemorrhage by 25%.
Hex: Pentimento
- You see the aura of destroyed Totems. You can perform a ritual on a destroyed Totem to rekindle it as a Hex Totem for Hex: Pentimento. For each Hex Totem active at the same time, Hex: Pentimento gains an additional effect.
- 1 Hex Totem: Decreases Survivors' repair speed by 20/25/30%.
- 2 Hex Totems: Decreases Survivors' healing speed by 20/25/30%.
- 3 Hex Totems: Decreases Survivors' recovery speed from being downed by 20/25/30%.
- 4 Hex Totems: Decreases Survivors' exit gate opening speed by 20/25/30%.
- 5 Hex Totems: All Totems are blocked by the Entity.
- When a previously rekindled Hex Totem is removed by any means, its remains are consumed by The Entity and it cannot be rekindled again.
Scourge Hook: Gift of Pain
- At the start of the trial, 4 random hooks are changed into scourge hooks. You see their auras in white.
- When a Survivor is unhooked from a scourge hook, they suffer from the Hemorrhage and Mangled status effect for 90 seconds. The first time the Survivor is healed, they suffer a 10/13/16% speed penalty to healing and repairing actions until injured again.
Build 4 - Classic Horror
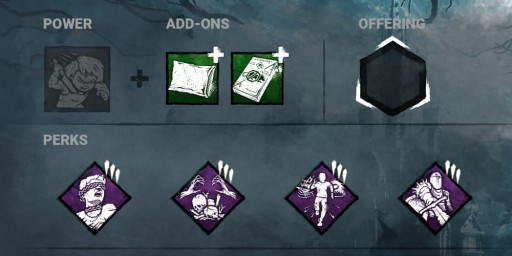
What is Dead by Daylight? Is it a cat and mouse chase where survivors shake their behind every time a pallet is dropped or is it a horror game? Well, the answer varies and it is all down to your build. Use this Chucky stealth build to show those T-bagging enthusiasts that you’re the boss and that real menace usually approaches in silence.
Chucky, as a killer who can suppress his terror radius at will, is designed with a stealth playstyle in mind. And just like all other stealth killers seeking a new life in The Entity’s realm, Chucky relies heavily on the 119th element in the periodic table: the element of surprise. One missed ambush attack and it’s all over. This stealth build aims at maximizing the accuracy of your hits while minimizing your terror radius, allowing you to land every M1 or M2 attack that you make.
All you have to do is…
- Locate your first victim. Unless the survivors have expected the unexpected and have armed themselves with Distortion, you’ll see all their aura upon entering the match.
- Go into Hidey-Ho Mode. As you get closer to them and the generator they’re repairing, activate your power. This will temporarily eliminate your terror radius. They’ll see your footfalls, but they won’t have a single idea who you’re going after.
- Land a hit. Depending on the distance between you and the survivor, you may want to go for either an M1 or an M2.
- Assess the situation. If there are two or more survivors on the generator, you might want to kick it instead of leaving it be. This will reveal the aura of any survivors hiding nearby. Some survivors like to stick around and jump back on generators they’ve been working on because killers tend to chase after the person they’ve just injured.
- Treat all survivors equally. Prioritize hooking survivors who’ve not yet been hooked to make sure everyone gets a little bit of that Hex: Plaything.
- Rekindle totems. There’s no way for you to keep an eye on all four hex totems, but if survivors do decide to cleanse them, you get the choice to rekindle them with Hex: Pentimento, which hands out debuffs like mass-printed pamphlets.
This build is good for…
Stealth
- All the aura-reading perks in this build can be used for gathering information, which you can subsequently utilize for strategic pathing.
- While Chucky can turn Undetectable on demand, his footfalls often act like an alert for survivors and blow his cover. However, Hex: Plaything makes it impossible for survivors to judge how close you are to them.
- The Silk Pillow addon decreases your terror radius, giving you more leeway to activate M2.
Tactical Chases
- Aura-reading perks like Nowhere to Hide allows you to take weird shortcuts in chases despite not having direct line of sight with survivors.
- Lethal Pursuer extends the effects of all aura-reading perks for two seconds, providing you with ample time to plan your next course of action.
- The Rat Poison addon reveals auras with M2 hits. This means you might see another survivor’s aura mid-chase, upon which you are more than welcome to switch targets by first dealing an M1 hit, then an M2.
Build Requirement
Addons:
Silk Pillow
- Terror Radius is reduced by 6 meters, but Slice & Dice charge time is increased by 50%.
Rat Poison
- While performing a Slice & Dice, the auras of Survivors within 12 meters of you are revealed for 5 seconds.
Perks:
Hex: Plaything
- The first time you hook a Survivor, they become Cursed and Hex: Plaything activates on a Dull Totem. The Cursed Survivor suffers from the Oblivious status effect until Hex: Plaything is cleansed.
- Hex: Plaything's totem aura is revealed to the Cursed Survivor when within 24/20/16 meters of it. For the first 90 seconds, only the Cursed Survivor can cleanse the totem.
Hex: Pentimento
- You see the aura of destroyed Totems. You can perform a ritual on a destroyed Totem to rekindle it as a Hex Totem for Hex: Pentimento. For each Hex Totem active at the same time, Hex: Pentimento gains an additional effect.
- 1 Hex Totem: Decreases Survivors' repair speed by 20/25/30%.
- 2 Hex Totems: Decreases Survivors' healing speed by 20/25/30%.
- 3 Hex Totems: Decreases Survivors' recovery speed from being downed by 20/25/30%.
- 4 Hex Totems: Decreases Survivors' exit gate opening speed by 20/25/30%.
- 5 Hex Totems: All Totems are blocked by the Entity.
- When a previously rekindled Hex Totem is removed by any means, its remains are consumed by The Entity and it cannot be rekindled again.
Lethal Pursuer
- At the start of the trial, the auras of all Survivors are revealed to you for 7/8/9 seconds.
- Any time a Survivor's aura is shown for a period of time, its duration is increased by 2 seconds.
Nowhere to Hide
- Whenever you damage a generator, reveal the aura of all Survivors standing within 24 meters of your position for 3/4/5 seconds.
Build 5 - Aim for the Head
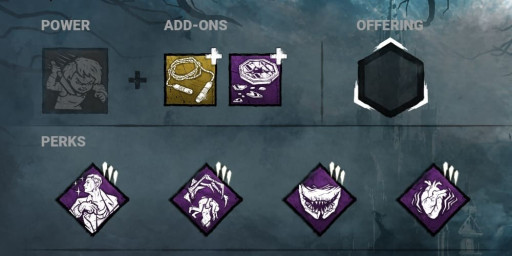
You might not know this, but Dead by Daylight is actually rather educational, particularly for those who are interested in Chemistry. First you learn about the element of surprise, then you learn about sublimation. You know, that process where solid turns into gas directly? That’s right, the game’s got its own version of sublimation. It’s called the Exposed effect, which you’ll learn to inflict on survivors with this build.
As I’m sure you’re aware, Chucky excels at injuring survivors with M1. Keep yourself out of their direct line of sight and nine times out of ten, you’ll be able to land an M1 while in your Hidey-Ho mode. This build capitalizes on that to send everyone straight to the Entity. Just remember to always stay in the shadows. No sane person would welcome a killer with open arms, especially when they’re exposed.
All you have to do is…
- Down your first survivor. This is the hard part, but trust me, it’s worth it.
- Look around as you pick them up. Some generators are going to be blocked. You want to look for those that are not blocked and hook the survivor nearby.
- Go into Hidey-Ho mode. With your terror radius and red stain gone, you should be able to catch survivors by surprise by sneaking up on them from weird angles.
- Click your left mouse button. The survivor you’ve snuck up on is exposed, but you can only take them down in one hit if you use your M1. It’s important that you bear in mind that M2 doesn’t trigger that sweet exposed effect.
- Manage generator repairs. You may not be a survivor, but that shouldn’t stop you from keeping survivors off certain generators. Try to spend some time patrolling generators on one side of the map to make sure all the uncompleted generators are within your terror radius.
- Repeat the process. You can always initiate a new cycle of pain and suffering if the survivor you’re after is no longer exposed.
This build is good for…
Speed Slaughter
- The Jump Rope addon gives you a longer Slice & Dice duration, making your first down considerably more attainable.
- Starstruck exposes survivors within your terror radius when you’re carrying or hooking a survivor. When paired with Distressing, which gives you a larger terror radius, you will be exposing a new unfortunate soul with every hook that you get.
- Thrilling Tremors shows you where to hook your survivor so that you’re closer to your next victim.
- Agitation allows you to get to hooks faster.
- The Mirror Shards addon gives you further information as to where the survivors are.
Generator Slow-down
- Survivors, knowing that they’re exposed, are always more inclined to leave generators alone until the effect wears off.
- Thrilling Tremors blocks generators that are not being repaired.
- A larger terror radius deters survivors from getting on generators near you, but of course, you can always completely suppress your terror radius with your ability if need be.
Build Requirement
Addons:
Jump Rope
- Increases duration of Slice & Dice by 8%.
Mirror Shards
- The Good Guy can see the Illusory Footfalls around Survivors.
Perks:
Starstruck
- While carrying a Survivor, any other Survivors within your Terror Radius suffer from the Exposed status effect.
- The effect persists for 26/28/30 seconds on Survivors who leave your Terror Radius, as well as those within the radius when you hook or release the carried Survivor.
- Starstruck has a cooldown of 60 seconds once a Survivor is no longer carried.
Thrilling Tremors
- After picking up a Survivor, all Generators not being repaired by Survivors are blocked by The Entity and cannot be repaired for the next 16 seconds. Affected generators are highlighted by a white aura.
- Thrilling Tremors can only be triggered once every 100/80/60 seconds.
Agitation
- Increases your movement speed while transporting bodies by 6/12/18%. While transporting a body, your Terror Radius is increased by 12 meters.
Distressing
- Your Terror Radius is increased by 22/24/26%. Gain 100% more Bloodpoints for actions in the Deviousness category.

