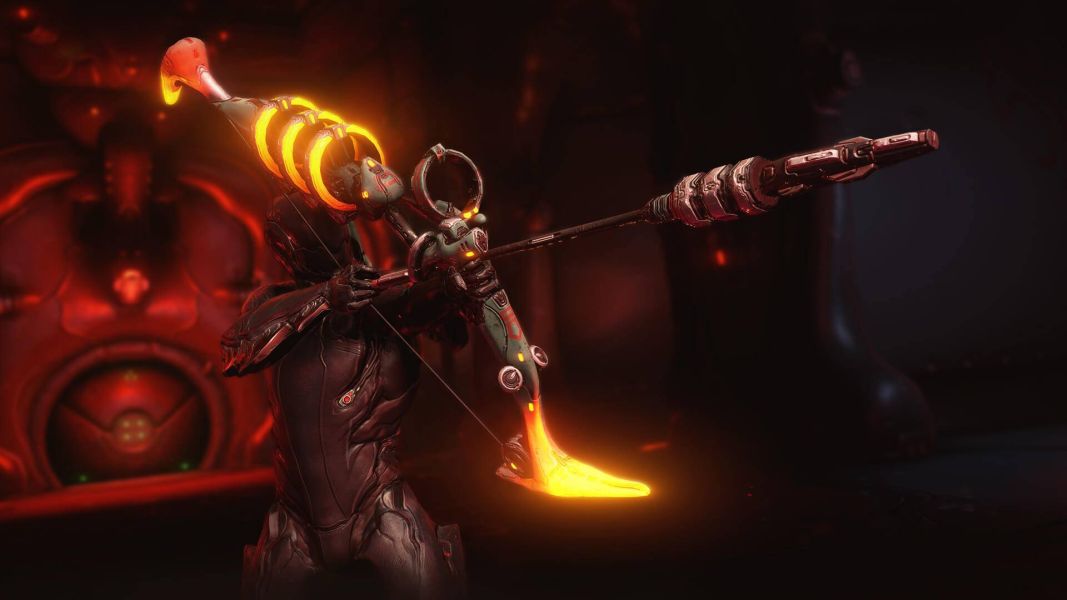
Looking to Amp up your Amp experience?
Picture this; you’ve just completed “The War Within” quest and can finally freely run around as your operator. You remark several things about your brand-new body.
Your operator’s running speed is about as high as a toddler who just learned how to walk. The average size of Warframes and most enemies make your operator feel like a midget, in comparison.
Lastly, the Mote Amp you’ve oh so generously been given by DE` works on Eidolons about as well as a feather hooked to a long selfie stick.
Seriously, enemies that are even remotely armored are going to scoff at you for even trying to take them down with that thing. Eidolons, whose stats alone are lightyears higher than your average level 100 Grineer Lancer, are going to stomp you into space dust before you can even gasp at the Mote Amp’s nonexistent damage.
Upon coming to this agonizing realization, you immediately head for “The Quills” in search of anything that can at least put a scratch on those bastard Eidolons. Welcome to the world of Amp combinations!
Amps comprise of three different components. The Prism, The Scaffold, and the Brace. Seven different tiers of each component type exist in-game, with the first four being accessible through Cetus, and the latter five being obtainable through Fortuna. Amps are named X-Y-Z, where each letter would be replaced by a number that denotes a component’s tier, in the order mentioned above.
- Prism = Your Amp’s primary fire
- Scaffold = Your Amp’s secondary fire
- Brace = Your Amp’s passives
There have been no notable changes in the last year with regards to Amps. If you’re already somewhat familiar with them, this will serve as a perfect refresher for you!
Remember that higher tiers don’t always mean better equipment. There exists a myriad of Amp combinations that suit a variety of different purposes. We’ve got the top 10 best ones here, for you Tenno, who are itching to finally start dealing damage with your operators!
10. 1-1-1 (First Amp to craft)
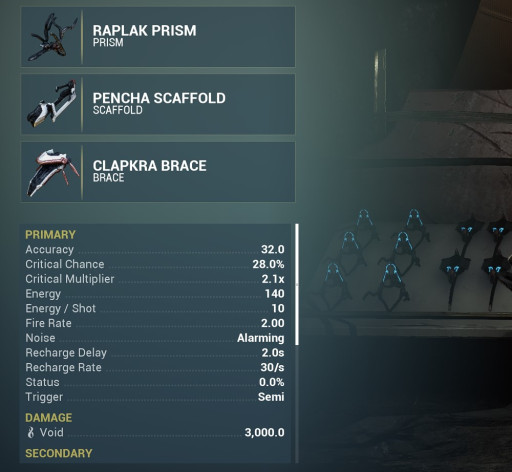
When you need to rid yourself of that horrid Mote Amp, any Amp combination you could get a hold of would suffice. However, I’d have to assume that if you’re at that stage, you don’t exactly have access to many of the required resources for higher tier Amps.
Thus, the 1-1-1 Amp combo seeks to provide you with humble beginnings on your Eidolon hunting journey. It’s not exactly anything special, but you’ll at least be considered a threat to Eidolons now, which is quite honestly a monumental leap for you as a Tenno.
Despite this Amp not being very luxurious or especially powerful, obtaining it would still be in your best interest, as it’ll familiarize you with the Amp crafting system and provide you with a foundation, with which you begin to explore other Amps.
What it excels at:
- Allows you to finally start hunting Eidolons;
- Very inexpensive build requirements;
- Allows your operator to actually become a somewhat viable source of damage now.
Build details:
- Raplak: Semi-automatic, with long range;
- Pencha: High damage beam that takes 0.75 seconds to fully charge;
- Clapkra: Increases total Operator energy capacity.
9. 1-1-2 (Enhanced alternative to the 1-1-1)
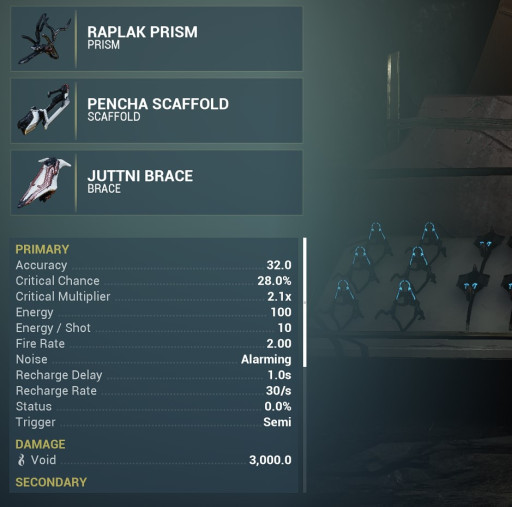
Let’s say you’ve jumped the gun a little, and already leveled up to rank 2 with “The Quills.” After I’m done saluting you for actually attempting to help your squadmates fight an Eidolon with your Mote Amp, I’d like to direct you to build the 1-1-2.
Despite having bravely clawed your way to this point, resources might still be scarce for you. Therefore, the 1-1-2 is a resource-efficient Amp combo that effectively allows you to use your alt-fire forever, due to the decreased energy regeneration delay.
Being able to infinitely fire your Amp, is something you’ll likely come to find is invaluable for efficiently taking down an Eidolon’s pesky shields.
What it excels at:
- Allows you to start hunting Eidolons;
- Inexpensive to craft;
- Allows you to infinitely use your alt-fire;
- Allows your operator to become a somewhat viable source of damage.
Build details:
- Raplak: Semi-automatic, with long-range;
- Pencha: High damage beam that takes 0.75 seconds to fully charge;
- Juttni: Reduces Amp recharge delay by 1 second.
8. 2-2-3 (Good Amp for Eidolons)
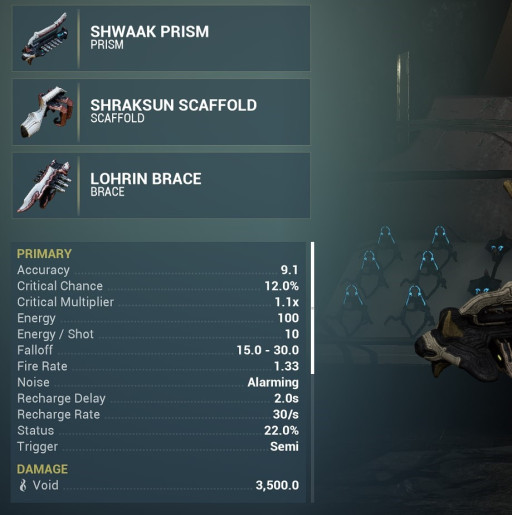
Ready to start properly hunting Tridolons? The Teralyst, Gauntulyst, and Hydrolyst are no easy foes to take down.
Fortunately, the 2-2-3 has come to your rescue! In the past, many Tenno armed themselves with this deadly Amp combination, for it was deemed to be the most effective at bringing Eidolons to their knees.
Sadly, this Amp is no longer top dog. However, this mighty combo still packs quite a punch!
The prism’s ability to punch through various enemies and guarantee an impact proc on every shot makes this a valuable tool in your operator’s arsenal.
The scaffold is what you’ll mainly be using to slay Eidolons. It fires a projectile that does 3000 damage on contact, and an extra 4500 damage upon exploding. Not only do you total 7500 damage, but each stage of damage procs critical damage on its own.
This is made even more effective by your brace, which will be your go-to final component until you can get your hands on the tier 7 brace. Providing an extra 12% to your status and critical chances; this brace is basically the cherry on top for your Amp.
What it excels at:
- Powerful enough to defeat most enemies;
- Very viable for Eidolon hunts;
- Only requires materials found in Cetus.
Build details:
- Shawaak: Short-range explosion with punch through and a guaranteed impact proc;
- Shraksun: Fires a projectile that deals 3000 damage on impact, and 4500 damage during its 8m radius explosion;
- Lohrin: Adds an additional 12% to your Critical and Status chances.
7. 3-3-2 (Viable alternative to 2-2-3)
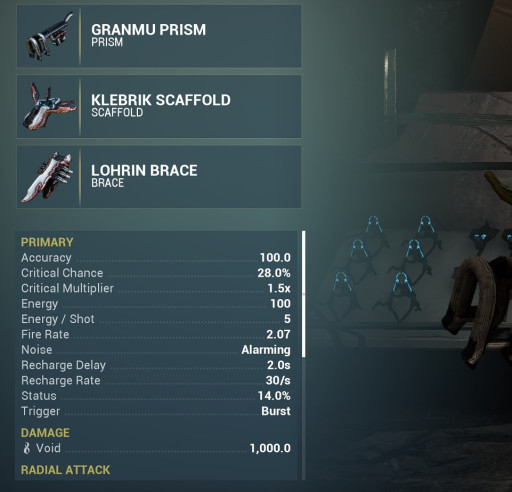
At this point, I’m certain you’ve just about had it with those pesky Vomvalysts. After all, they have an obsession with annoying Tenno every opportunity they get.
So, if the 2-2-3 doesn’t quite satisfy your hatred for Vomvalysts, then the 3-3-2 is the bug spray you’re looking for- I mean Amp…definitely meant Amp.
While the prism does less overall damage to Eidolons, the splash damage means you end up hitting them more times, which is more potential for critical hits.
The scaffold, however, allows you to effortlessly melt enemies, or in your case, Vomvalysts, with complete ease. Seriously, it basically has built-in aimbot, because it auto-homes in on targets.
What it excels at:
- Very good for hunting Eidolons;
- Decimates Vomvalysts with minimal effort;
- Reduced time between shots, as your brace reduces energy recharge delay.
Build details:
- Granmu: Grenade launcher that fires a burst of 3 grenades, each one dealing 2000 damage on contact. It has a splash radius of 3.5 meters;
- Klebrik: Beam that auto-targets enemies, even behind cover. It has high critical and status chances;
- Juttni: Reduces Amp recharge delay by 1 second.
6. 2-3-6 (Perfect for Kuva Siphons)
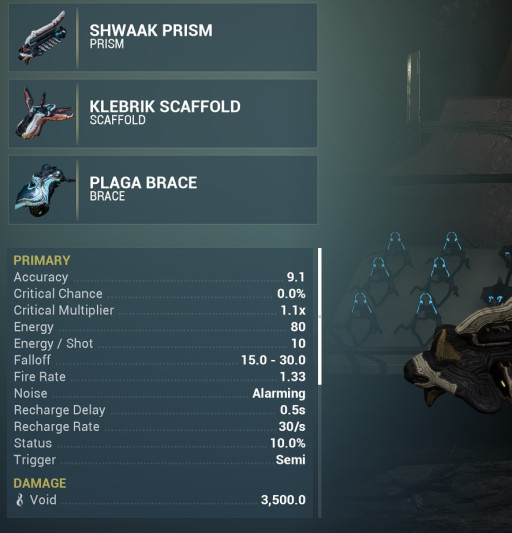
When any conversation revolves around Amps, it’s usually about what kinds of horrors they unleash upon Eidolons. Kuva Siphons are seldom mentioned, though.
Indeed, Siphons also require a proper Amp. Thus, the 2-3-6 chimes in with its powerful prism that can easily attack the Kuva clouds.
Meanwhile, your scaffold can easily get enemies out of the way, as it auto-homes in on them and deletes their health bars.
What it excels at:
- Kuva clouds can be effortlessly hit;
- Enemies can be dealt with easily, with the scaffold;
- Energy economy is great, thanks to the brace.
Build details:
- Shawaak: Short-range explosion with punch through and a guaranteed impact proc;
- Klebrik: Beam that auto-targets enemies, even behind cover. It has high critical and status chances;
- Plaga: Reduces operator energy pool by 20, but also lowers recharge delay by 1.5 seconds.
5. 7-3-7 (Best for Normal Missions)
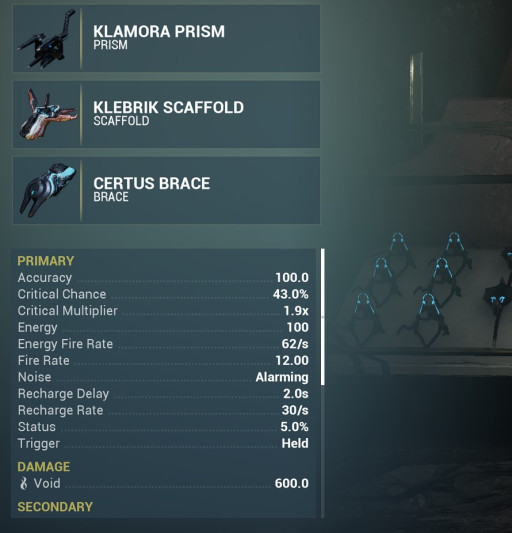
What if one day you decided that your Warframe isn’t doing it for you anymore? Well, if that hunk of metal really isn’t cutting it for you, entire starchart missions could be run as your operator!
With the 7-3-7 Amp you’ll be mowing down enemies as you progress through the starchart. Whether it’s a spy mission, survival or even interception, this Amp will serve you well.
Your prism will unleash a destructive void Kamehameha (it really looks and feels like the real thing!) at your enemies from up to 13 meters away.
The trusty scaffold will eliminate any pesky enemies that you can’t quite seem to hit with your prism, like shield ospreys. The damage of your whole Amp is further amped (I’ll stop) by your brace.
What it excels at:
- Highly effective against most starchart enemies;
- Decent AoE with the prism;
- Perfect for quickly finishing small enemies like ospreys.
Build details:
- Klamora: Short range, wide void beam. It is 3 meters wide up to 13 meters away. Highest critical chance of all prisms;
- Klebrik: Beam that auto-targets enemies, even behind cover. It has high critical and status chances;
- Certus: 20% increase to Amp’s critical chance.
4. 5-4-7 (Good for Ropalolyst and Profit Taker)
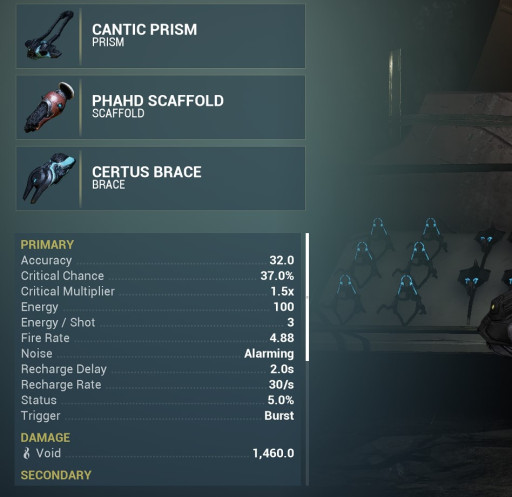
I’m guessing many of you forgot about the Ropalolyst and the Profit Taker. They’re not as often talked about, especially the Ropalolyst.
However, both of these bosses require that you craft an appropriate Amp. If you wish to challenge them. You’ll need it to crack through the Ropalolyst’s shields or to change the damage vulnerability on the Profit Taker.
This Amp allows you to fight from a distance, mainly thanks to the prism. In addition, the shield pylons on the Profit Taker can be easily destroyed with your scaffold.
What it excels at:
- Taking down the Ropalolyst and Profit Taker;
- Easily destroying the Profit Taker’s shield pylons;
- Quickly cycling the Profit Taker’s damage vulnerability.
Build details:
- Cantic: Three shot burst, with high accuracy, long range and high critical chance. Good aim required, though;
- Phahd; Fires a glaive that bounces between targets for a maximum of 4 per shot;
- Certus: 20% increase to Amp’s critical chance.
3. 4-4-7 (Good alternative for Ropalolyst and Profit Taker)
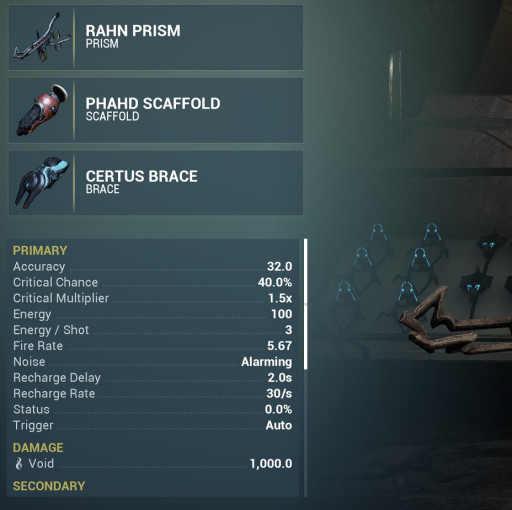
If fully automatic weaponry is your go-to, swapping out the Cantic prism on the 5-4-7 for the Rahn prism is a perfectly viable option for defeating the Ropalolyst and Profit Taker.
What it excels at:
- Taking down the Ropalolyst and Profit Taker;
- Easily destroying the Profit Taker’s shield pylons;
- Quickly cycling the Profit Taker’s damage vulnerability (this time with the Rahn prism).
Build details:
- Rahn: Fully automatic rifle, perfect for high critical damage builds;
- Phahd; Fires a glaive that bounces between targets for a maximum of 4 per shot;
- Certus: 20% increase to Amp’s critical chance.
2. 6-2-7 (Longtime meta for Eidolon hunting)

For the most avid Eidolon hunters out there, the 6-2-7 has been and continues to be the main meta Amp for you.
Seriously, the flamethrower prism you use, combined with the Void Strike ability from the Madurai focus tree, allows you to effectively shower the Eidolon with heaps and heaps of damage.
Generally, most Meta squads usually have someone equipped with this Amp, who charges up their Void Strike to take down Eidolon shields.
What it excels at:
- Can instantaneously destroy Eidolon shields;
- Incredibly effective at utilizing the damage boost from Void Strike;
- Insanely high damage.
Build details:
- Lega: Short-range AoE flamethrower;
- Shraksun: Fires a projectile that deals 3000 damage on impact, and 4500 damage during its 8m radius explosion;
- Certus: 20% increase to Amp’s critical chance.
1. 7-7-7 (Highest damaging Amp for Eidolons)
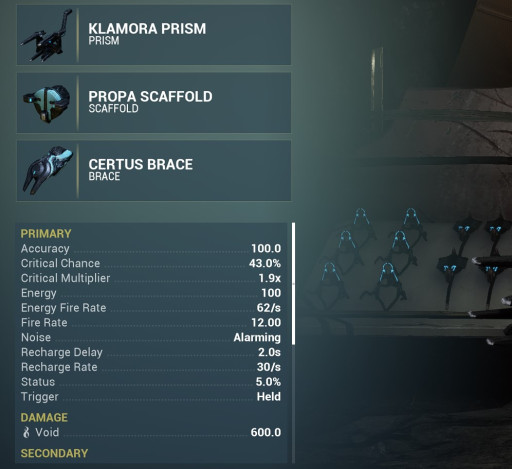
Finally, we have the cream of the crop, the crème de la crème, the very best Amp combination for your Eidolon hunting needs.
The 7-7-7 hits Eidolons with jaw-dropping amounts of damage, thanks to its scaffold paired with Volt’s shield.
You could swap out the tier 7 prism for the tier 6, if you so desire. Seeing as this build mainly revolves around the scaffold, the prism is basically a matter of preference.
What it excels at:
- High damage with scaffold, that is further boosted by critical damage;
- Beats all other Amp combinations for hunting Eidolons;
- Provided you’re skilled enough, it can prove to be extremely effective.
Build details:
- Klamora: Short-range, wide void beam. It is 3 meters wide up to 13 meters away. Highest critical chance of all prisms;
- Propa: Fires a slow-moving projectile that explodes upon touching anything. It has a large radius;
- Certus: 20% increase to Amp’s critical chance.
You May Also Be Interested In:
- Warframe: Best Warframes, Ranked Weakest To Strongest (Warframe Tier List)
- Top 10 Warframe Best Primary Weapons (And How to Get Them)
- [Top 5] Warframe Best Arch-guns And How To Get Them
- [Top 5] Warframe Best Melee Weapons And How To Get Them
- [Top 5] Warframe Best Kuva Weapons And How To Get Them
- [Top 11] Warframe Best Weapons And How To Get Them


