While Borderlands 2 is all about looting guns and shooting enemies, you’ll still need good gear to stay alive. This guide shows you the top 10 gear choices to get you through the game, with where to get them and why to use them. Read on, and happy Vault Hunting!
10. Flame of the Firehawk
Image
Shield Type: Nova
Manufacturer: Maliwan
Rarity: Legendary
Element: Incendiary
Unique Ability: Grants Burn damage immunity.
From the ashes she will rise. Named after Lilith, and making the wielder feel like a glorious phoenix, The Flame of the Firehawk is an incendiary nova shield. When depleted, it releases waves of fire that deal Incendiary damage to enemies.
This shield is great for early game because the nova effect goes off during Fight For Your Life, nabbing Second Winds when it kills enemies. Burn immunity also helps a ton in early levels. Finally, it’s an easy pick up, as the side mission you receive it from is only level 8, and easy to clear!
What It Does Best:
Burn Immunity: One less damage source to worry about.
Nova Damage: novas are great burst damage, and super helpful when your shields are down.
Second Wind: this shield’s novas continue in Fight For Your Life, potentially killing enemies and earning your Second Wind.
Early Game: it’s the only legendary weapon to be handed from a mission, making it a guaranteed pick up in early game if you go after it.
Best Uses:
Any character can make good use of this shield early on, staying alive longer with nova bursts earning Second Winds and dealing damage to enemies. It can be paired with Moxxi weapons to really take advantage of their healing with damage effects. Finally, Krieg players will especially want this shield, as it works well with his Hellborn and Mania trees.
Where To Get It:
You’ll receive it after completing the side mission Cult Following: The Enkindling in Frostburn Canyon, a level 8 side mission you can complete very early in your play through.
9. Love Thumper
Image
Shield Type: Roid
Manufacturer: Bandit
Rarity: Epic
Element: Incendiary, Shock, Corrosive, or Explosive
Unique Ability: When depleted, grants your melee attacks bonus Roid Damage.
Unique Ability: melee attacks are turned into explosive novas.
If thumping you is wrong, I don’t want to be right. They say the best defense is a good offense, and the Love Thumper delivers on that front. This shield provides Roid Damage on depletion, and upgrades your melee attacks into novas.
This shield has a slow recharge delay, encouraging you to go full melee while it’s down. It’s great for melee characters like Krieg and Zer0, who are already in the heat of close range combat. The increased damage is also just good to have in most situations.
What It Does Best:
Melee Damage: Nova and Roid boosted melee damage helps a ton in close combat.
Recharge Delay: you usually don’t want delay, but in this case it helps you dish out damage.
Big AOE: nova melee attacks basically gives you a larger attack radius.
Best Uses:
As mentioned, melee Zer0’s and Krieg can really make use of the increased melee damage. Gaige’s Deathtrap can also make use of it, with Sharing is Caring increasing the damage her robot can do. For pure damage, with little regard to actual defense, this shield is a fun pick.
Where To Get It:
Complete the mission Best Mother’s Day Ever, in The Highlands, to get a copy of this shield.
8. Fabled Tortoise
Image
Shield Type: Turtle Shield
Manufacturer: Pangolin
Rarity: Legendary
Element: n/a
Unique Ability: Massive increased shield capacity at the cost of lower health penalty.
Unique Ability: Decreased movement speed; increased when depleted.
Win by a hare. If turtling up and becoming a walking tank sounds like a good time to you, look no further than the Fabled Tortoise. This shield sports a massive shield capacity, with the trade-off of reduced movement and health.
It may not be a great fit for everyone due to the health and speed decreases, but the Fabled Tortoise is still a more than respectable choice. If you want a huge shield, the Fabled Tortoise provides. It also plays nicely with shield increasing skills, as the already huge shield capacity can enjoy boosts from other sources.
What It Does Best:
High Base Capacity: the shield capacity is significantly higher than average.
“Health-gating”: Some skills are dependent on you being at a certain health capacity. The Fabled Tortoise can help keep you at that threshold.
Capacity Growth: Class mods and skills can push the shield capacity even further, with numbers reaching towards the millions if built correctly.
Best Uses:
It’s best with skills that can boost its overall capacity: Gaige’s Myelin skill, for example, is a nice pair with its 15% capacity max boost. It’s also a good alternative to a similar shield in this list, the Hoplite, as they are similar with some gameplay differences,
Where To Get It:
The Fabled Tortoise can drop from anywhere. If you’re looking to farm it, Blue in the Caustic Caverns has an increased drop rate.
7. Hoplite
Image
Shield Type: Turtle Shield
Manufacturer: Pangolin
Rarity: Seraph
Element: n/a
Unique Ability: Massive increased shield capacity at the cost of lower health penalty.
Unique Ability: Decreased movement speed; increased when depleted.
Unique Ability: Increased effects with every Hoplite user.
Alone a mere soldier, together an unstoppable phalanx. The Hoplite is not too different from the Fabled Tortoise, but it does have some key differences.
The biggest difference is the potential. Since the Hoplite increases capacity with each wearer by 20%, it’s looking at up to 80% better performance.
This shield is available very late game, so if you’re looking to get through the main story, don’t worry about it just yet.
What It Does Best:
High Base Capacity: the shield capacity is significantly higher than average.
“Health-gating”: Some skills are dependent on you being at a certain health capacity. The Fabled Tortoise can help keep you at that threshold.
Capacity Growth: Running a full team with this shield rewards you with an 80% increase in capacity.
Teamwork: this shield is perfect for players geared towards multiplayer.
Best Uses:
If pure shielding is what you’re looking for, the Hoplite is a good choice if you’re squaring up with like-minded players. It works nicely with shield abilities, and for characters who appreciate health gated buffs.
Where To Get It:
You’ll have to wait until Ultimate Vault Hunter Mode to fight Pete The Invincible, but it’s worth the wait.
6. 1340 Shield
Image
Shield Type: Absorb Shield
Manufacturer: Vladof
Rarity: Unique
Element: n/a
Unique Ability: Can absorb enemy bullets , adding them to your ammo.
Unique Ability: Voice cues alert you to shield changes.
If you can’t beat ‘em, join ‘em. The 1340 is a fun shield, absorbing enemy bullets and turning them into ammo for you. Additionally, it has a built-in robot voice that updates you on your status!
Its stats are not too far off from other blue rarity shields. The voice modifier affords you some situational awareness, that’s both functional and fun!
What It Does Best:
Alerts: the 1340 will call out when your shield is low, depleted, and recharging. Good for players who find it hard to pay attention to those details.
Absorb Attacks: What better way to negate an attack than to absorb it completely!
Ammo Efficiency: the extra ammo from absorbed attacks is a nice payoff.
Best Uses:
While it may not be best for long term use, it’s a consistent shield with its absorb chance and ammo conservation. Voice lines reminding the player of their status are a handy bonus too. If you’re looking for a low rarity, easy to get shield, it’s a more than decent choice!
Where To get it:
The mission Out Of Body Experience, found in Bloodshot Ramparts, rewards you with this shield.
5. Impaler
Image
Shield Type: Spike Shield
Manufacturer: Maliwan
Rarity: Legendary
Element: Corrosive
Unique Ability: launches homing spikes.
Unique Ability: deals corrosive spike damage to melee attackers.
Vlad would be proud. True to its namesake, the Impaler shield spikes enemies. Any spike shield deals damage back to melee attackers, and the Impaler is no different. What is different is that bullets also trigger this effect.
The Impaler is nasty, in the best possible way. Dealing corrosive damage back to any form of attack ensures you’re dealing lots of damage at any given time. It’s a great defensive and offensive tool!
What It Does Best:
Corrosive Damage: every spike from this shield dishes out corrosive damage, great for unshielded enemies.
Defense: Spikes activating with basically any damage source makes this shield a great defensive measure.
Offense: for the same reasons, the Impaler is a great choice if you’re looking to maximize damage.
Accuracy: the spikes from this shield hone on their targets, so they’re never a waste.
Best Uses:
This shield will benefit players who want to maximize damage. Skills that require killing enemies will work nicely with the Impaler. A kill hungry character like Krieg, for example, will especially like the bonuses it brings.
Where to get it:
Like many, it can be found in any loot source. Your best shot is fighting The Warrior, or The Handsome Sorcerer.
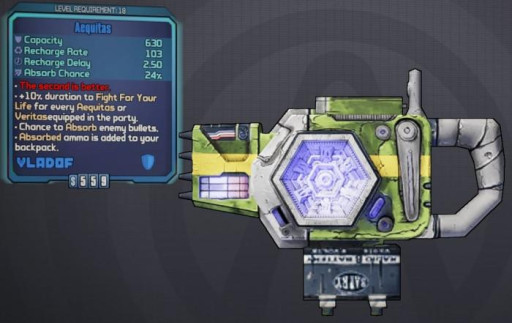
4. Aequitas
Image
Shield Type: Absorb Shield
Manufacturer: Vladof
Rarity: Unique
Element: n/a
Unique Ability: Can absorb enemy bullets, adding them to your ammo.
Unique Ability: 10% more time in Fight for Your Life, increased with every wearer.
The second is better. Vladof delivers another Absorb shield, with this one increasing your Fight for Your Life window.
Like the Hoplite, the Aequitas asks for a full team wearing I, to give you a whopping 40% more time when you’re down. That time is nothing to scoff at, as it’s literally a matter of life or death!
What It Does Best:
Survivability: that extra time when you’re down to earn a Second Wind is invaluable.
Absorb Attacks: What better way to negate an attack than to absorb it completely!
Ammo Efficiency: the extra ammo from absorbed attacks is a nice payoff.
Teamwork: a coordinated party will best make use of this shield, with a 40% Fight for your Life buff!
Best Uses:
It’s good for long fights where reviving would really set you back. A full team sporting this will enjoy above average survivability!
Where To Find It:
Complete the mission Clan War: Wakey Wakey to get a copy.
3. Rough Rider
Image
Shield Type: Standard Shield
Manufacturer: Jakobs
Rarity: Rare
Element: n/a
Unique Ability: Increases max health. Unique Ability: increases resistance to all damage types.
Unique Ability: 0 shield capacity; never recharges.
It takes more than that to kill a Bull Moose. The Rough Rider joins the list as a popular choice in the fandom. The 0 shield capacity may seem off-putting at first, but it’s very promising!
Having a constant 0 capacity means it will always activate skills dependent on shield depletion. To name a few, that means Zer0’s Fearless, Maya’s Fleet, Anton’s Crisis Management, and a handful of other skills. This makes it great for maximizing those effects!
20% increased damage resistance and increased max health helps keep you alive. That being said, newer players may be thrown off by the play style of this shield, and might prefer a more standard one.
What It Does Best:
Damage Resistance: 20% universal resistance is no joke. That’s a lot of damage to ignore!
HP: the Rough Rider gives a sizable HP bonus.
Skill Activation: because it is technically always depleted, it’s perfect for activating skills based on that requirement!
Regenerative Builds: if your build asks for a lot of health and regen, the Rough Rider works nicely with its increased HP and damage resistance.
Best Uses:
All around, this is a very strong end-game shield. It’s best if you want to take advantage of shield depletion skills; Salvador for example, will appreciate having Out Of Bubblegum always active. High health makes regenerative builds even better, which works nicely with Moxxi weapons too.
If you’re looking for high level play, this shield is very rewarding!
Where To Get It:
The Bulwark in Hunter’s Grotto can drop it. You’ll need Sir Hammerlock’s DLC to get to that area.
2. The Sham
Image
Shield Type: Absorb Shield
Manufacturer: Vladof
Rarity: Legendary
Element: n/a
Unique Ability: Can absorb enemy bullets, adding them to your ammo.
Unique Ability: Reduced shield capacity and recharge delay.
Wow, I CAN do this all day. Sporting an extremely high absorption rate, the Sham enters the list as a highly sought after shield.
There’s no better counter to bullet-based enemies than this shield. It’s low capacity is balanced out by absorbing the majority of enemy bullets!the absolute lowest rate of absorption it can carry is 77%, and that’s already an excellent rate.
What It Does Best:
Shut Down Bullet Using Enemies: with a bullet absorption rate that can reach 94%, you'll become nearly immune to bullet damage.
Rocket Launcher Support: rocket launchers eat ammo quickly. The Sham’s huge absorb rate helps to curb that, keeping you well stocked!
Absorb Attacks: What better way to negate an attack than to absorb it completely!
Ammo Efficiency: the extra ammo from absorbed attacks is a nice payoff.
Best Uses:
Use it in situations where you know you’ll be under heavy fire. You’ll absorb most of the damage, and in turn you’ll be able to shoot back with your replenished ammo!
The Sham is noticeably weaker against enemies who don’t use bullets, but aside from that it’s an extremely powerful shield.
Where To Get It:
Your best shot is farming BNK-3R in The Bunker, because that boss drops a ton of other loot as well.
It’s also droppable from any other loot source, and you can also try your luck with The Handsome Sorcerer and Puro Pete the Invincible for other high rates.
1. Bee
Image
Shield Type: Amplify Shield
Manufacturer: Hyperion
Rarity: Legendary
Element: Any
Unique Ability: When fully charged, your next shot deals bonus Amp damage.
Unique Ability: Amp shots do not drain shields.
Float like a butterfly… Capping off the list is arguably one of, if not THE, best shield in the game.
The Bee offers you huge amp damage, without the cost of shield drain. This lets you unload super powered shots without the worry of making yourself vulnerable. It does come with a low shield capacity, and the long recharge delay can be troublesome, but the sheer power this shield brings to the table more than balances that out,
What It Does Best:
Amp Damage: The Bee powers your shots significantly.
Consistency: No shield drain means you can consistently pump out huge amp damage.
Multi-shot Damage: each bullet fired from a gun carries its own amp damage. 5 bullet spread? 5 times the damage.
Adaptable: most of the cast can make good use of the Bee, with skills like Kinetic Reflection reaching 100% with it, or Axton’s Willing helping to mitigate the recharge rate.
Best Uses:
Overall, the Bee is excellent in the end-game. It makes great use of multi-shot weapons, with each projectile carrying it’s own amp damage.
It works well with the whole cast, and with adjustments works with a great amount of skills. It’ll reward you with high damage you don’t want to miss out on.
Where To Get It:
While it can be found in any lootable source, your best bet is the Hunter Hellquist, found in Arid Nexus - Boneyard.
Where To Go From Here
In the end, these unique shields all offer unique experiences. Pick and choose them based on situations, and don’t be afraid to use whatever you pick up on the way too. Arm up, and enjoy your ride on Pandora!