As with most eSports games, your FPS matters in DOTA 2. Your Frames Per Second can alter DOTA 2's response rates and have an impact on the game's smoothness. In high-level games, it can be a small FPS difference that determines whether a creep is last-hit or denied.
So how do you check your FPS in DOTA 2?
Fortunately, DOTA 2 has its own FPS counter that can be turned on. Here’s how:
Step 1: Launch DOTA 2 and open Settings
The settings bar is located at the top left of the screen. It’s the small gear icon.
Click the gear to open Settings.
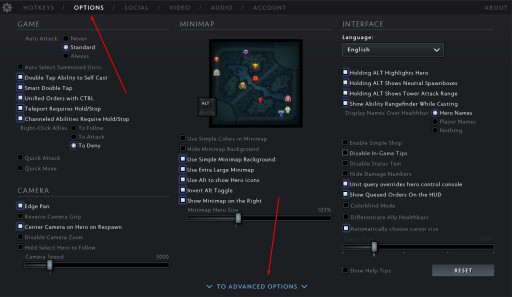
Step 2: Open Options
When you open Settings, the first thing you see is the Hot Keys tab.
We’re looking for the “Options” tab, which you can open by clicking Options near the top of the Settings menu.
Step 3: Open Advanced Options

Instead, the feature is hidden away in Advanced Options. Click “To Advanced Options” at the bottom of the Options tab.
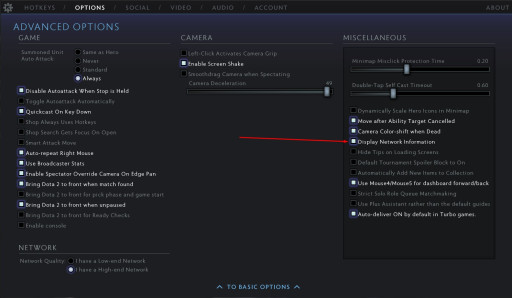
This should open up even more Options.
Step 4: Turn on the FPS counter

Here, turn on “Display Network Information”.
This option shows you lots of useful things: Your ping, packet loss, and most importantly, your FPS counter.
You can watch a video tutorial here.
And that’s it. With the setting on, DOTA 2 will show your FPS on the top right of your screen every time you’re in a match.
You May Also Be Interested In:
- Dota 2 Best Heroes Current Patch! (OP Heroes That Wreck Enemies)
- [Top 15] Dota 2 Best Beginner Heroes That Are Powerful!
- Dota 2 Best Settings That Give You An Advantage
- Dota 2 Best Mid Lane Players In The World Right Now
- Dota 2 Best Carry Heroes To Rampage The Enemy Team!
- Dota 2 Best Heroes For Solo MMR (That Wreck Hard)
- [Top 25] Dota 2 Best Skins That Look Freakin' Awesome
- Dota 2 Best Heroes To Gain Fast MMR
- Dota 2 Best Offlaners That Are Excellent


