15. Render Scaling
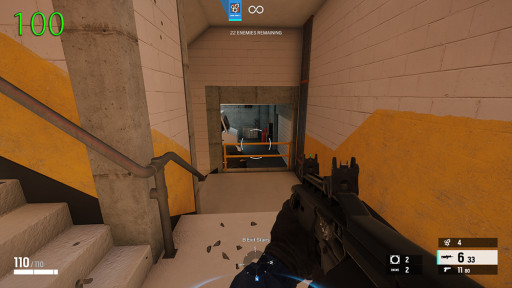
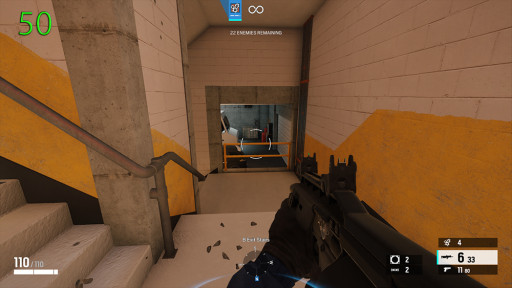
This is one of the most performance heavy settings in the game. In layman’s terms, it is what affects your true resolution of the game. For example, if you’re playing at 1920x1080 resolution and your render scaling option is set to 50, the game will be rendered at 1360x764. 50 is the default setting by the way, and I recommend sticking with the default option. While it may sound unattractive, if you’re not playing at 4k, you wouldn’t really notice a difference between 50 and 100.
Going 100 can drastically decrease your frame rates. In my personal tests, it reduced my system performance by 20-30 fps. And as you can see from the screenshots above, there’s practically no difference between the image quality, therefore, you won’t have to worry about not seeing the enemy well at 50. In fact, if you zoom in on the white van area on the screenshots and compare, 100 render scaling produces deeper and richer shadows, which can be detrimental when detecting enemies.
What Should You Set It To:
- 50
How to Apply:
- From the main menu, click the gear icon on the right corner of the screen
- Go to Graphics
- Click Render Scaling and keep it at 50
14. Anti-Aliasing
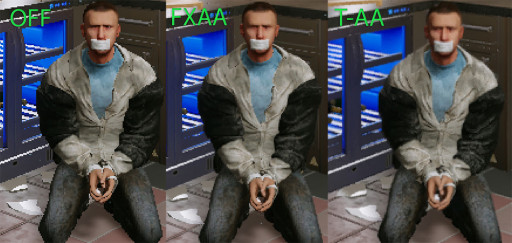
Anti-Aliasing, just like in most games, is a performance-heavy setting, so it might be tempting to turn it off, however, for this one, I recommend the T-AA option. The T-AA option doesn’t eat up a lot of system resources but would still do a great job at softening the object’s edges. This is important because more pixelated images may negatively affect your visual of the enemy at long distances as they might appear like most of the clutter in the map.
The T-AA option is also the one among all the choices that doesn’t take up a lot of video memory, so going with the T-AA option will increase your system performance, and the more frame rates you have, the faster you’ll be able to react to enemies, especially when partnered up with a monitor that has a high refresh rate.
What Should You Set It To:
- T-AA
How to Apply:
- From the main menu, click the gear icon on the right corner of the screen
- Go to Graphics
- Click Render Scaling and keep it at 50
13. Zoom-In Depth of Field
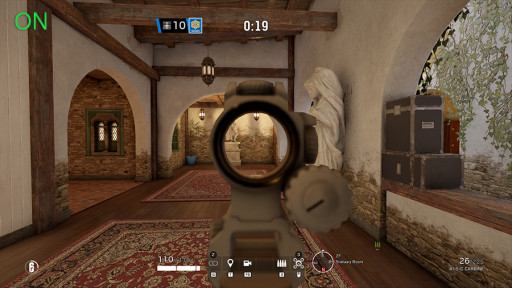

This one you should just turn off, for most games, and of course in Siege. Just as the screenshots above show, it adds some useless blurring on your weapon’s back end. It’s not just useless, it doesn’t look good as well and could just potentially distract you from targeting your enemies. And although not by much, some blurring will also take up system resources. Even three to five added fps will help a lot in a very competitive game like Siege.
What Should You Set It To:
- Off
How to Apply:
- From the main menu, click the gear icon on the right corner of the screen
- Go to Graphics
- Click Zoom-in depth of Field and turn it off
12. Lens Effects
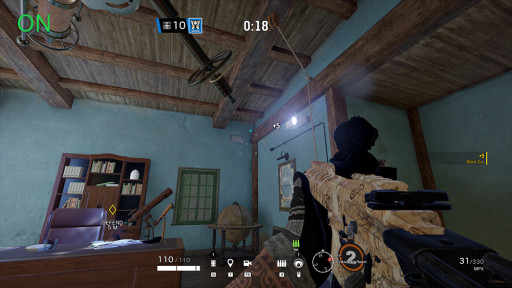
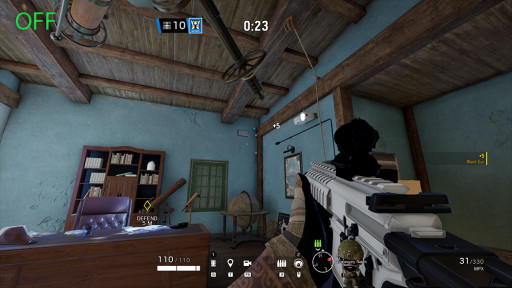
Turning this on will result in stronger lights emitting from items within the map like that projector light in the screenshots above. As you can see, the light is quite strong and could just potentially obstruct your vision from seeing your enemies clearly, especially as there are also some lights in the game that are on the floor. On, with added lens effects will also result in God rays from the sun outside, which could hinder you from seeing windows that were broken in for spawn peeking.
And in case you’re worried about not being able to see Valkyrie’s cam well if you turn this off like some guides say, the screenshots above are proof that even with this setting off, the strength of Valkyrie’s Black Eye cams remain the same. Ubisoft did that for balancing purposes, and this setting only affects lights from items within the map and environmental lights.
What Should You Set It To:
- Off
How to Apply:
- From the main menu, click the gear icon on the right corner of the screen
- Go to Graphics
- Click Lens Effects and turn it off
11. Ambient Occlusion
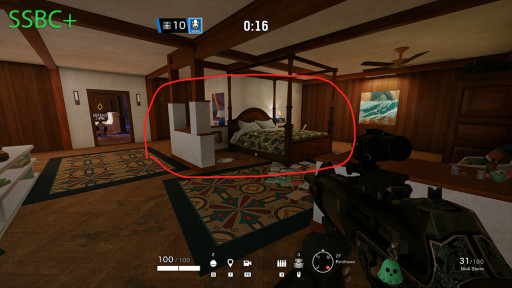

It may not be that much, but every little bit of help matters in a highly competitive game like Siege, and turning off ambient occlusion will reduce the darkness in corners of the maps, allowing you to see enemies that are waiting in ambush there much easier. That is because ambient occlusion, just like in most games, provides deeper and richer shadows, and in single-player non-competitive games, that’s great, but for Siege, practically is the priority.
This setting doesn’t only affect visuals, but performance as well. Because it affects the lighting and shadows, it has a lot of effect on system performance as well. So, turning off this setting wouldn’t only provide you with visuals of the enemies, it will also increase your frame rates which in Siege goes a long way when it comes to gameplay and reacting to enemies faster.
What Should You Set It To:
- Off
How to Apply:
- From the main menu, click the gear icon on the right corner of the screen
- Go to Graphics
- Click Ambient Occlusion and turn it off
10. VFX Quality
This setting makes the clutter in the maps richer and denser, and that could affect your ability to spot enemies who are hiding behind the bushes, especially when you’re trying to spawn kill. Within the map, its higher settings increase the quality of particles, which you do not need at all. In fact, the lesser particles you see inside the map, the better you can spot your enemies.
This goes double for beginners, because when I was a beginner, I can’t count the number of times I’ve shot some particle that is floating inside the map. The particles will just distract you and if you accidentally shoot them, you’re potentially compromising your location to the enemies as well. Putting this on low would give you clearer visuals of the enemy, less distraction, and more frame rates because this eats some system resources too.
What Should You Set It To:
- Low
How to Apply:
- From the main menu, click the gear icon on the right corner of the screen
- Go to Graphics
- Click VFX Quality and set it to low
9. Reflection Quality
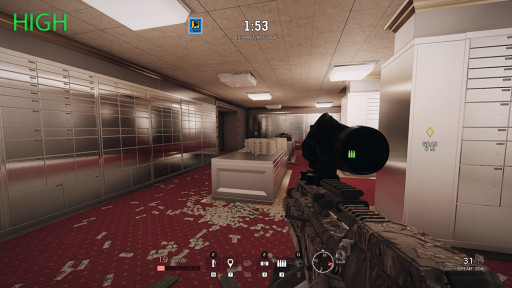
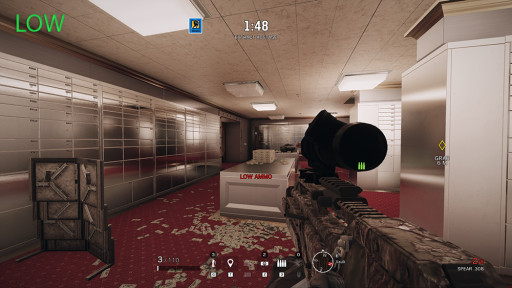
As you can see from the screenshots above, there’s absolutely no difference between high and low settings, even with areas in the maps that are supposedly high in reflections, like the vault area here in Bank. And because there’s practically no difference between each setting, players are advised to just keep this on low and benefit from any frame rates that you can get.
Besides, there’s really no area in any map that better reflection quality will help you see your enemy clearly, not even on the vault area in the Bank. It’s really just a useless setting that doesn’t change anything and is just potentially eating up system resources. And in case I missed something that actually shows the effects of higher reflection quality settings, like the reflection on your scope from your end, be mindful that it’s not practical to have anyway.
What Should You Set It To:
- Low
How to Apply:
- From the main menu, click the gear icon on the right corner of the screen
- Go to Graphics
- Click Shadow Quality and set it to low
8. Shadow Quality
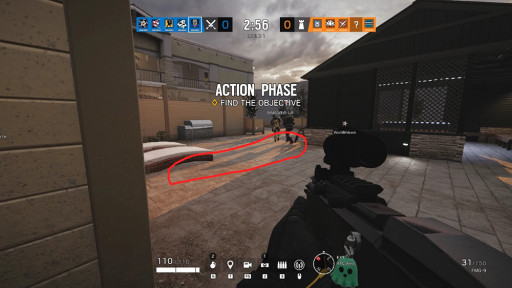
This is one of those settings that you shouldn’t put into its lowest value. That is because the lowest shadow quality setting will only provide static shadows in the map, meaning the basic shadows like the ones from tables, items, or structures. It will not produce dynamic or moving shadows like the shadows from operators, which is very important at times when it comes to detecting where your enemies are.
So, for this one, I recommend going with medium. Not only will medium settings still provide you with moving shadows of your enemies, it will also not be so heavy on system performance, because shadow quality settings, just like in most games, tend to be taxing on system resources when put in higher values. So, with medium, you’ll maintain a good way to detect your enemies while also having more frame rates.
What Should You Set It To:
- Medium
How to Apply:
- From the main menu, click the gear icon on the right corner of the screen
- Go to Graphics
- Click Shadow Quality and set it to low
7. Shading Quality
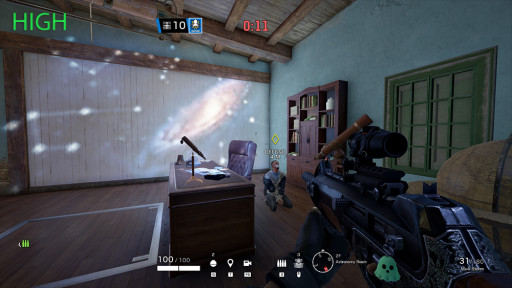
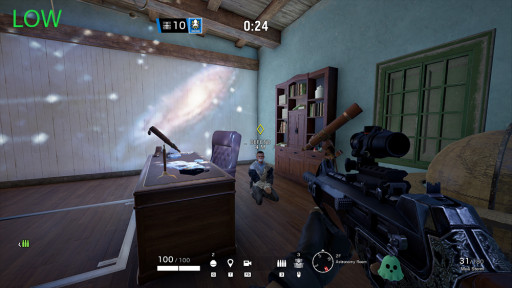
I’ve run a lot of tests on this one and I can’t, for the life of me, find the difference between high and low settings. Its in-game description says that it adjusts the rendering’s visual fidelity by tweaking the lighting quality, skin subsurface scatter, etc. But in reality, if higher settings do make a difference, it would be very small and not really noticeable while playing the game.
And if its in-game description is true and it enhances the shading quality within the game, then all the more reason to keep it on low settings. That is because any enhancements on the shading quality could produce richer and deeper shadows, which could make it harder for you to detect enemies in darker corners of the maps. Besides, every little bit of system performance will help you competitively, and turning it to low will give you more frame rates.
What Should You Set It To:
- Low
How to Apply:
- From the main menu, click the gear icon on the right corner of the screen
- Go to Graphics
- Click Shading Quality and set it to low
6. LOD Quality
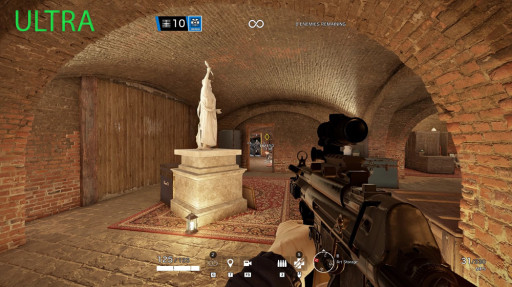
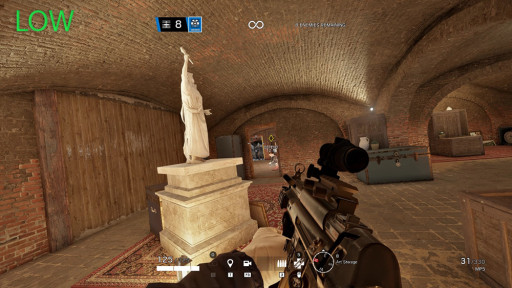
There are a lot of debates on this one. Some say that it softens the edges of the operators’ sprites, making them more recognizable over long distances. Which will generally help in spawn peeking, as seeing your enemies with jagged sprites could make you confuse them as just one of the clutters in the map. As for the tests I’ve performed, I didn’t really see any difference between ultra and low.
So, the safest route you can go for this one is opting for the medium option. With the medium option, you’ll have good balance between performance and visuals and If there’s any truth to the claims that higher LOD settings will make enemies appear smoother which is important in long distances, then at least you went for the middle ground and played it safe, while also reserving more system resources in favor of more frame rates.
What Should You Set It To:
- Medium
How to Apply:
- From the main menu, click the gear icon on the right corner of the screen
- Go to Graphics
- Click LOD Quality and set it to medium
5. Texture Filtering

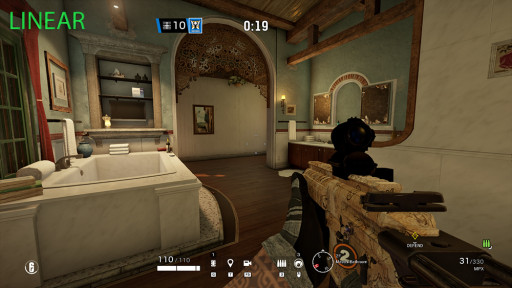
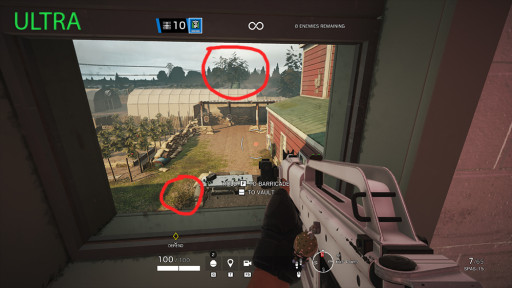
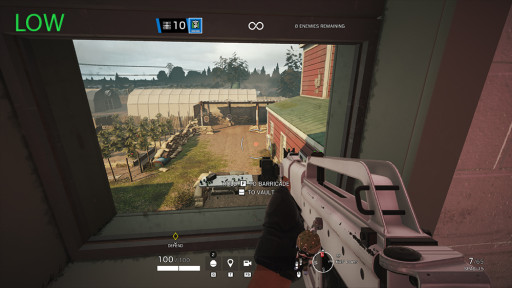
If you zoom at the screenshots above and compare the two images well, especially the spot with the red mark, you will see that higher values of texture filtering gives more details to the backdrops of the maps. And that would be great if you’re playing a single-player non-competitive game, but this is Siege, one of the most highly competitive shooting games there is, so my advice is to prioritize practicality. Added details on the maps’ backdrops will only help your enemies hide better and blend to the surroundings.
Picture this, which scenario would you be able to spot an enemy better? A) when the wall or bed behind him is full of details, or B) when the wall or bed behind him looks bland? Of course, it’s going to be the latter. Putting this setting on Linear will help you recognize your enemies faster among all the backdrops and clutter in the maps, and the faster you recognize them and register to your brain that there’s an enemy there, the faster you would be able to react.
What Should You Set It To:
- Linear
How to Apply:
- From the main menu, click the gear icon on the right corner of the screen
- Go to Graphics
- Click Texture Filtering and set it to Linear
4. Texture Quality
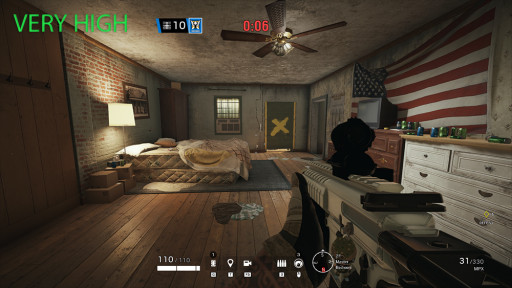

Texture quality is the heaviest setting in the game. Its highest setting can take up more than 6gb of video memory while its lowest setting only takes up around 1gb. Which makes this one a no-contest, obviously, you should go for the lowest setting because it will give you the best system performance possible and will drastically increase your frame rates, and as we all know, the more frame rates you have, the faster your reaction time could be.
And performance isn’t the only reason for you to put this setting to its lowest one. As you can see from the images above, the difference between very high and low is very noticeable and this setting even gives more details to objects and backdrops in the game, which could help your enemies hide better or blend in to their surroundings. Just looking at the images above, obviously, it would be much easier to spot and react to an enemy in front of the bed with the low texture quality setting compared to the one which was set to very high.
What Should You Set It To:
- 50
How to Apply:
- From the main menu, click the gear icon on the right corner of the screen
- Go to Graphics
- Click Texture Quality and set it to low
3. T-AA Sharpness
Like render scaling, T-AA sharpness falls under the anti-aliasing category, and it enhances it. The higher the value, the sharper the image will be. However, you wouldn’t want to put this setting on its highest value because, as with a lot of images, too much sharpening could make objects look jagged or pixelated. And that’s not great when it comes to recognizing enemies behind all the clutter in the map, because the enemy and the objects around will appear pixelated.
You also wouldn’t want to put it on a low value, because it will make enemies, objects, and backdrops in the maps appear blurry, and that’s not great for competitive gameplay and spotting enemies either. So, with this setting, I recommend players to stick with the default value which is 50. With this value, the user will have just enough sharpness for good image quality and spotting enemies.
What Should You Set It To:
- 50
How to Apply:
- From the main menu, click the gear icon on the right corner of the screen
- Go to Graphics
- Click TAA Sharpness and keep it at 50
2. Aspect Ratio
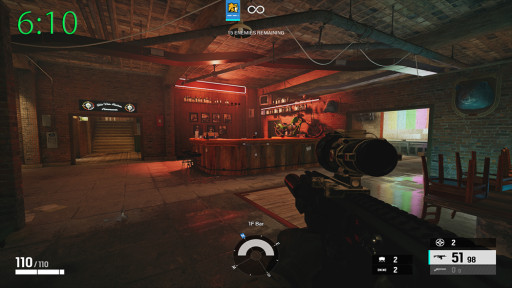
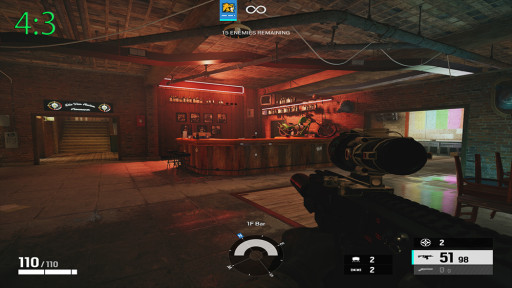
Aspect ratio is one of settings in the game that affects your gameplay a lot. As you can see from the images above, there’s a big difference between the two aspect ratios, and there are many more, I just chose those two because they’re the most popular settings. The most popular aspect ratio for pros is the 4:3 which is understandable because it widens the images, making everything in the game appear bigger, and of course, that translates to players spotting enemies better.
However, most players don’t play in the pro-league, and for players who play online, the 6:10 is the most recommended because the exaggerated stretching of the 4:3 aspect ratio, with the latency online, can make it so that operators, especially the ones with 3-speed rating, appear faster, and while they may appear a bit bigger, they’ll be harder to hit because they will seem to be too fast.
What Should You Set It To:
- 6:10
How to Apply:
- From the main menu, click the gear icon on the right corner of the screen
- Go to Display
- Click Aspect Ratio and select 6:10
1. Field of View
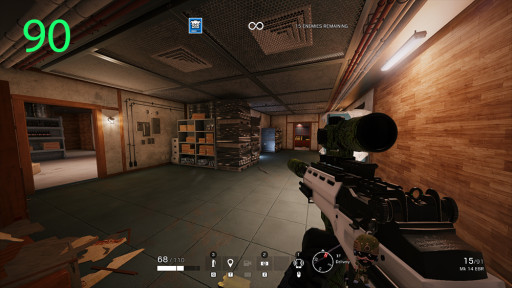
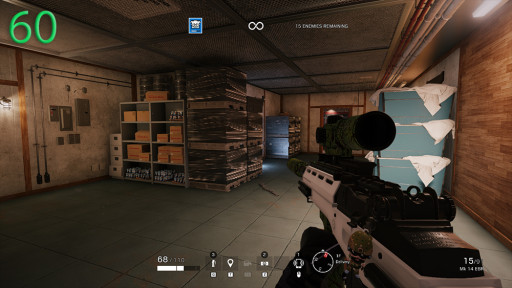
With the two images above, you would be able to see how the highest field of view setting looks compared to the lowest one. The general idea is, the higher the field of view value is, the more peripheral view you can have, and that’s great for reacting to enemies that are coming from your sides. With 90 field of view, you’d have less chance of being killed by enemies on your side without you even seeing them.
That is why a lot of pro-players use 90 as their field of view value. However, like I mentioned above, most players are not pros, and if you notice through the images above, higher field of view values also mean that your front view will appear further, and this can be detrimental when it comes to detecting enemies on your frontal angle. That is why for this setting, I recommend somewhere in the middle ground, which is 75-80.
What Should You Set It To:
- 75 or 80
How to Apply:
- From the main menu, click the gear icon on the right corner of the screen
- Go to Display
- Click Field of View and select 75 or 80
Attention operator, please be advised. There is a new directive from Six. Read up on these related articles, and prepare for deployment:
You May Also Be Interested In:
- Rainbow 6 Siege Tier List 2021 [Rainbow 6 Siege Best Operators]
- [Top 10] Rainbow 6 Siege Best Weapons
- [Top 7] Rainbow 6 Siege Best Attackers
- Rainbow 6 Siege Attachment Guide (R6 Best Attachments For Every Weapon)
- [Top 25] Best R6 Settings That Give You An Advantage
- [Top 15] Rainbow 6 Siege Best Graphic Settings
- Rainbow 6 Siege Best Weapon Attachments
- Rainbow 6 Siege Best Operators 2021
- [Top 7] Rainbow 6 Siege Best Defenders
- Rainbow 6 Siege Roles Explained And How To Play Each One
- [Top 10] Rainbow 6 Siege Best Players
- [Top 5] Rainbow 6 Siege Best Nomad Loadouts
- [Top 5] Rainbow 6 Siege Best Jackal Loadouts
- [Top 5] Rainbow 6 Siege Best Glaz Loadouts: From Worst to Best
- [Top 5] Rainbow 6 Siege Best Finka Loadouts
- [Top 5] Rainbow 6 Siege Best Lion Loadouts
- [Top 5] Rainbow 6 Siege Best Castle Loadouts
- [Top 5] Rainbow 6 Siege Best Dokkaebi Loadouts
