25. Lower Your Graphics Settings
This is one of the first things that you should do, and you should get used to how the graphics look in the game because the first step in determining when an enemy is hiding behind all the environmental sprites is being familiar with their natural look in the first place. And in case you’re worried that the game won’t look good with low graphics settings, do not worry, because there’s really not much difference between its ultra and low settings.
Shadows are an exception though. Do not put shadows on low because it will only produce static shadows from static objects in the game, such as tables, vases, etc. Medium is the lowest setting you can get with shadows that will still show the real time shadow of enemies, which is really useful in detecting them.
24. Start an Aim Lab routine

Aim Lab has a partnership with Rainbow Six Siege and has great training modules that are specifically designed for Siege. It’s a very light program which you can fire up easily and get into the training modules fast. Pick a few of the training modules for Siege which you can do every day as a routine to avoid getting rusty.
I personally do the C4 arcs, Detection Shot, Scanning, Entry 2, Clubhouse Entry, and Kafe Entry. You can finish these six training modules within 10 minutes, and they’re a fun way to keep improving your reaction time, crosshair placement, pre firing, and familiarity to common enemy angles. It’s just like you’re a real operator and Aim Lab is your shooting range which you have to do regularly for practice.
23. Play Unranked as Soon as You Can
Luckily the clearance level for you to be able to join unranked games is only 10, so you can get into it very fast. Quickmatch, formerly known as Casual, is fun but since players can quit any time and lose without really losing anything, a lot of players play very sporadically, so you won’t really learn the real mechanics of the game.
Unranked is a great way to prepare you for Ranked matches, and these are the game modes that will show you the real Siege, so to speak. The movements of players are more coordinated and organized because most players really want to win. And it is in these game modes where you will truly learn the tactical aspects of the game.
22. Get Used to Higher Zoom Levels Early On
A lot of beginners get scared of equipping 2.5x - 3.0x scopes in their loadouts because they’re worried that they will be at a disadvantage in close range, and it’s true that most encounters in Siege happen in close range. It’s also true that you will be at a disadvantage in close range with higher zooms. But only in the beginning.
Once you get used to higher zoom levels at close range, it’ll start being easier for you to land your hits, especially headshots at close range, because enemies will appear bigger when you’re using higher zoom levels. That’s why you should practice flicks early on. Flick shots are shots that come from a sudden switch to aim-down-sights (ads) position from the hip fire position. So, from being a disadvantage in close range encounters, once you’re used to it, the higher zoom level will even be an advantage.
21. Pick the Best Loadout Settings for You
Just because one loadout setting works very well for somebody, even for a pro, doesn’t mean it will work well for you as well. Set up your own loadout settings. Discover how each attachment mixes feel for you through Training Grounds – Terrorist Hunt game mode. And test out as many settings that you can.
Never stop experimenting on your loadouts, especially when a new season comes, because Siege is an evolving game with tons of changes every season. For example, the angled grip that was very popular for years has quickly lost its popularity because of the big nerf that came with Operation Demon Veil.
20. The Value of Pre-firing
Pre-firing is something that you’ll be able to do well once you’re familiar with the maps and the common angles that players use. It is the act of shooting even before peeking to see if an enemy is actually there. Of course, this is more effective if you’ve scouted the area first with a drone or camera and see where the enemy actually is.
19. Free Up Some Screen Space
Less items displayed on your screen means more space for you to see your enemies. You can free up a lot of screen space by turning off some HUD settings that don't really do much to contribute to your performance in the game. Freeing up screen space doesn’t just give you the advantage of seeing the game’s environment better, it’ll also lessen the amount of distraction you could have.
My recommendation is to turn off these HUD settings: Loadout inputs, Stance indicator, General Reminders, Operator reticle, and Destroyed drones.
18. Get Used to Higher FOV Values
The default FOV value is 60, but everyone starting the game should change it to a higher value. My recommendation is 75 minimum. Higher FOV values increase the peripheral view which is a great help when it comes to detecting enemies that are coming from the sides. The higher the FOV value is, the wider your view would be.
The downside of having a high FOV value is that the front view will appear smaller. But you can counter that drawback by following #22. With the use of scopes that provide high zoom levels, the drawback from having a high FOV value will be subsided.
17. Switch to Advanced
This is for Gadget and Drone Deployment. You should start getting used to the advanced option as early as you can because the advanced option allows you more control of your gadgets and drones. For example, advanced gadget deployment allows Thermite to cancel the deployment action of his Exothermic Charge. This is important when you’re trying to do a hard breach but a Bandit player is performing a Bandit Trick on the other side.
As for the drone deployment. The advanced option will allow you to stay in operator view after you deploy a drone. The manual option makes it so that you will automatically go into drone view right after you deploy a drone, and that could leave you vulnerable, especially when you just accidentally deployed your drone in the middle of a gun fight.
16. Go Green
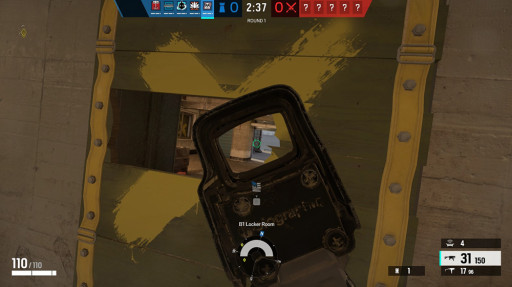
Crosshair visibility will play a big role when it comes to your performance in Siege. Having a crosshair that you can always clearly see will allow you to target enemies effectively. And for that, the color green is the best. It will make sure that your crosshair will always be clear, even when you’re aiming at long distances or on green sprites.
The turquoise works very well as well. There’s not much noticeable difference between turquoise and green crosshair anyway. This is the crosshair color that many pros and popular Siege youtubers use, such as Macie Jay, Beaulo, and Pengu.
15. Terrorist Hunt – Training Grounds
I recommend doing this whenever you hop in the Training Grounds game mode for testing your loadout settings or when you’re doing challenges. It’s a great way for you to get used to better crosshair placement as well as improve your detection senses, because seriously, the opponents in this game mode have the best skin in when it comes to concealing one’s presence.
14. The Mute Options Are Your Friend
As a solo queue player, I can only give you some ideas of the toxicity I’ve received from random players, especially when I was a newbie that was hopping in on Ranked games. I’m used to it by now, but when I was a beginner, it affected my performance negatively whenever someone in my team was being toxic to me, and this is a common thing that happens to beginners.
What helped me get used to playing on Ranked alone is the mute option. You effectively mute all chats by default by going to the General Options and disabling the Text Channel. You can do this with the voice chat by going to the Audio Options and putting the Voice Chat Volume to 0.
You can also do it manually at the start of the game by holding the Tab button and clicking the text and mic icon of other players. I recommend this to new players who want to get used to Ranked gameplay without getting flamed by other players.
13. Play Operators that Affect the Game Even When They’re Dead
This is one of my go-to advice whenever a beginner friend asks me what operator he or she should play. I usually point them to Rook, Kapkan, Frost, etc. Operators whose special gadgets leave a great influence on the fight even though the player is already dead. This allows the player to be of value to the team even when he or she got taken out early, and that’s a big boost of morale, especially for beginners.
Kapkan and Frost can kill enemies even when they’re already dead. There are so many times when a dead Kapkan or Frost player changes the tide momentum of the game just because their gadgets managed to neutralize an enemy or more. Rook on the other hand can buff his whole team’s armor, and that’s a big factor in the match regardless of the situation.
12. Keep Roaming When Defending
Another advice that I always give to beginners. Roaming may be intimidating, heck, it’s intimidating even for Siege veterans, so I understand how intimidating it would be for beginners. But getting used to roaming early on will allow you to practice calming your nerves while playing Siege, which is a very intense game, so staying calm is very important.
Roaming is also the best and fastest way to master the map layouts. When roaming, you’ll be able to discover every nook and cranny of the maps. You’ll also be able to discover hiding spots and awkward angles which you can use to ambush unsuspecting enemies.
11. Learn the Value of Rotation Holes
In most objective areas, you only need one rotation hole. But in others, such as 2F Oregon, you would need three rotation holes to defend the area effectively. Rotation holes doesn’t only allow you to see the other bomb site well, they also will allow you to rotate and flank in order to get a better position to engage enemies. That is why, when you’re using a Defender that has an impact grenade on his or her loadout, you should always choose the impact grenade rather than the alternative gadget.
10. Start Getting Used to Spatial Sound

As the image above shows, spatial sound lets you hear sounds that are coming from all directions. Yes, Siege’s sound design can be weird at times, but I can assure you that using spatial sound helps in determining whether the sound is coming from above or below, even for a bit. It’s always better to have spatial sound on than not. Even if you don’t believe that it affects the game a lot. It also will not harm your sound, so you might as well just turn it on.
There is a free spatial sound that comes with Windows. You can activate it by right clicking the sound icon at the bottom right corner of your screen in Windows interface, and then choosing spatial sound – Windows Sonic for Headphones. There are premium ones called Dolby Atmos and DTS Heaphone X. For Siege, I recommend DTS.
9. Use Night Mode
Night Mode is the most popular Dynamic Range for Siege players, and understandably so. Night Mode may lower the sound quality of the game, but it will allow players to hear soft or quiet sounds better. Like the sound of footsteps or the sounds that players make when they crouch, prone, or lean. It also increases the range of hearing these types of sounds.
You can enable Night Mode by going to the Audio options and setting the Dynamic Range to Night Mode. This Dynamic Range setting works very well when partnered with a really good 7.1 headset like the Hyper X Cloud II.
8. Learn how to Quick Lean
Quick leaning is a technique used mainly for scanning. It’s done by hitting the lean key + the movement key for the same direction you’re leaning, followed by the movement key for the opposite direction. This will allow you to quickly peek and also quickly hide. This will make it very hard for enemies to land a shot on you. Players who have mastered quick leaning can also hit enemies while doing this action.
7. Add Friends
Solo queueing is fun, but if you really want to get to the next level and stay in the higher ranks, you gotta have a solid and constant team. The problem with solo queueing is even when you’ve managed to become really good in the game, it’s very hard to avoid being teammates with random players who are just trolling or just incompetent.
With a constant team, you would be able to learn strats together, communicate and learn callouts together, and you’ll have the peace of mind that your team’s performance will be more or less constant, not sporadic like in solo queueing.
6. Play Random Operators
Knowing what you’re dealing with will greatly help you to overcome it. And that’s why it is best if you know how to play every operator in the game. That will allow you to predict how your enemies will likely move, or how and when they will use their special gadgets. Knowing how to effectively play each operator will let you effectively counter them when you’re fighting against them.
5. High Horizontal – Low Vertical Sensitivity
Most of the large adjustments on aim that you will be doing in Siege will be horizontal. There’s an enemy on the far left of your screen? A high horizontal sensitivity will help you respond to that enemy quickly. A high horizontal sensitivity will also allow you to scan and case the area quicker and with much less effort.
Vertical however, is a different matter. Low vertical sensitivity is recommended because in Siege, you wouldn’t really have to make big adjustments to your vertical aim a lot. Low vertical sensitivity will also help your aim and recoil to be more stable.
4. Lower ADS Sensitivity
Speaking of making big adjustments to aim. You would usually only do that while you’re in hip fire position. Most of the time, when you’re already in ADS position, you’re ready to aim at the enemy instead of making big adjustments in aim. That is why it’s better to opt with a low ADS sensitivity. At least lower than your vertical recoil.
This is recommended by champions, especially in consoles. In fact, they recommend going as low as you can. Having low ADS sensitivity will make your aim and recoil steadier. Therefore, you’ll be more accurate.
3. Practice Crosshair Placement Early
Even if the opponent is crouching, it is still better to always aim high, because it is always easier to bring down your aim than to bring it up. So, if the opponent appears and is crouching, all you have to do is bring down your aim and chances are, you’d be hitting his or her head anyway.
2. Watch the Basics in Youtube
Having an idea of what skill or gadget your enemies possess will always help you when it comes to dealing with them.
1. Treat Ranked as Your Real Training Grounds
In Ranked, you will learn how to coordinate with players even when you’re solo queueing and not using voice comms. You will learn how to coordinate your movements with them just by watching their outlines, and use strats to counter a strat that was used on you by your enemies in the previous round. Ranked is where you will really experience real Siege, and staying in Ranked is the only way to get good.
Attention operator, please be advised. There is a new directive from Six. Read up on these related articles, and prepare for deployment:
You May Also Be Interested In:
- Rainbow 6 Siege Tier List 2021 [Rainbow 6 Siege Best Operators]
- [Top 10] Rainbow 6 Siege Best Weapons
- [Top 7] Rainbow 6 Siege Best Attackers
- Rainbow 6 Siege Attachment Guide (R6 Best Attachments For Every Weapon)
- [Top 25] Best R6 Settings That Give You An Advantage
- [Top 15] Rainbow 6 Siege Best Graphic Settings
- Rainbow 6 Siege Best Weapon Attachments
- Rainbow 6 Siege Best Operators 2021
- [Top 7] Rainbow 6 Siege Best Defenders
- Rainbow 6 Siege Roles Explained And How To Play Each One
- [Top 10] Rainbow 6 Siege Best Players
- [Top 5] Rainbow 6 Siege Best Nomad Loadouts
- [Top 5] Rainbow 6 Siege Best Jackal Loadouts
- [Top 5] Rainbow 6 Siege Best Glaz Loadouts: From Worst to Best
- [Top 5] Rainbow 6 Siege Best Finka Loadouts
- [Top 5] Rainbow 6 Siege Best Lion Loadouts
- [Top 5] Rainbow 6 Siege Best Castle Loadouts
- [Top 5] Rainbow 6 Siege Best Dokkaebi Loadouts

