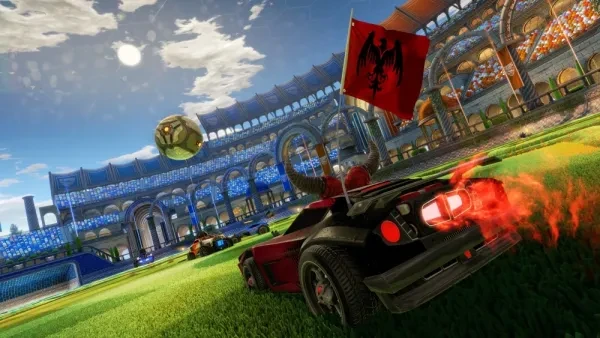
Time for a pit stop, let's fine tune every single setting that will up your game!
Whenever you start a new game, you can just play the tutorial, learn the controls, and you’re good to go, right? Not in Rocket League. There’s no doubt about it that Rocket League is one of the most mechanically challenging games to ever exist. Every “try hard sweat” to ever play the game will tell you that mastering the basics is only the beginning of your journey. It’s at that point you begin to realize the massive impact these minor settings changes can have on your game experience and road to hitting that sweet sweet 360 Musty flick. Whether you’re new to the game or a seasoned pro, let’s take a look at 25 settings that could make the difference for you.
Gameplay Settings
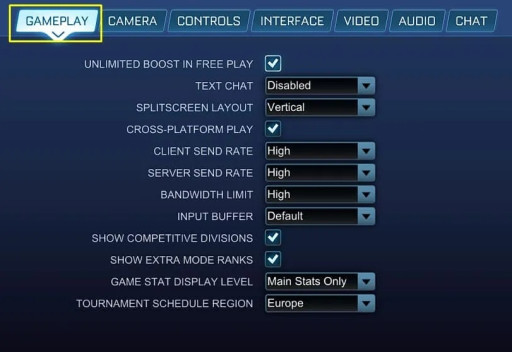
Rocket League Gameplay Settings Menu
Starting off with the Gameplay settings, there’s nothing too complicated here. Just a bunch of bandwidth client mumbo jumbo you probably don’t care about and should leave on default. However, there are a few things here that could enhance your gaming experience.
1- Text Chat: Controls what types of text messages you’d like to receive from all the players, including all those pesky 12-year-old kids spamming “What a save!”
- Setting this to “Team Only” will allow you to stay focused on the game and probably rage less.
2- Game Stat Display Level: Shows the various stat notifications you receive during gameplay.
- Choosing “Main Stats only” to block useless notifications from hogging up a good part of your screen every 10 seconds.
3- Tournament Schedule Region: Selects which tournament schedule you will be playing based on a region.
- If you’re wondering why all the tournaments are so late, early, or laggy...for once, it’s actually your ping’s fault. Set this to your region or the closest to you.
- Be careful, this setting can only be changed once every 24 hours.
Camera Settings

Rocket League Camera Settings Menu
Now onto the fun part! The camera settings are where you’ll start feeling like an RLCS Pro...or at least viewing your car like one. Adjusting these settings will change your experience massively because a game about flying cars really relies on your viewing angle and preference.
4- Camera Shake: Enables the screen to shake every time you strike the ball.
- Unless you enjoy turning on some dramatic music and feeling like your Vin Diesel in Fast and Furious, I’d highly recommend turning this OFF.
-
It brings no advantage and almost all players have it turned off.
5- Field of View: Controls how much of the field you see. The more you see, the better decisions you’ll make.
-
Setting this at somewhere between 100 to 110 would be best. I’d personally recommend 110 since it gives you maximum sight.
-
It may be uncomfortable at first, but it beats having your opponents come out of your blindside to beat you to the ball.
6- Distance: This controls how far your camera will be behind your car.
-
Most players keep this at a standard 260 to 290. I personally like to copy Squishy’s 270 on this one.
-
Since your car will be all over the place in a game of rocket league, you probably want to see as much of it as possible.
7- Height: Similar to distance, this controls how high your camera will be positioned above your car.
-
This one’s mostly preference. It’s usually between 90 to 110, so I like to go down the middle at 100.
8- Angle: This decides the default angle your camera will be pointing towards your car.
-
Again, mostly down to preference, but this angle is more relevant to choose as your hand-eye coordination depends on it.
-
Preferable to use this at -5 to -3. I like a -4 personally.
9- Stiffness: This controls how hard and precise your camera will follow your car.
-
You’ll be drifting and turning your car around a lot. Turning this one on too high will make your camera move just as much as your car which may cause everything around you to feel like a blur. Too low and your car may just drift off-screen.
-
Somewhere in the middle of 0.35 to 0.70 is the general use. Squishy prefers 0.45.
10- Swivel Speed: This one decides how fast your camera will swivel around your car.
-
I’d highly recommend turning on Freeplay and trying this one out yourself.
-
During fast-paced games in the upper leagues of Diamond where you’ll be turning back and forth, you may thank yourself for adjusting this one.
-
Goes all the way between 2-10. Down to preference.
11-Transition Speed: Controls the speed of switching between your two camera modes.
-
You may feel that turning this one on to the highest would be smart as it starts to snap back and forth saving you a lot of time to dunk on those noobs. Not quite.
-
There’s a lot of information your eyes can see in the middle of the transition such as a loose ball, your teammate going for the ball, or an opponent suddenly pressuring you.
-
I’d recommend keeping this between 1 to 1.3.
Controls Settings
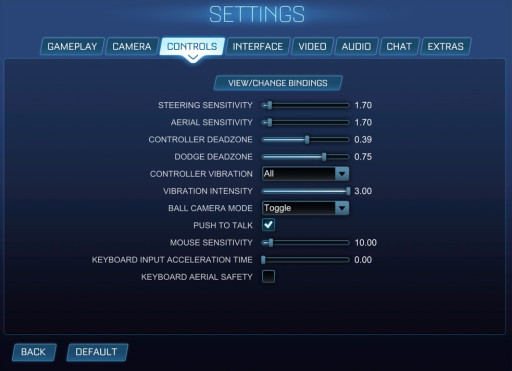
Rocket League Controls Settings Menu
Sensitivity is a common word in the gaming industry. We’ve all maxed out our sensitivities in some games to imitate our favorite streamers’ awe-inspiring movement, but… that doesn’t exactly apply in Rocket League, it’s more like an actual mechanic shop where accuracy is key. In the controls section, we’ll autotune our keys and sensitivity.
Key Bindings
- As you gain more mechanical skills in the game, you’ll start wanting to use a larger number of key combinations at the same time.
-
If you don’t want to reach the Platinum ranks and suddenly find yourself button-mashing, like you’re playing Mortal Kombat, trying to keep up, you might want to consider these key changes.
-
They space out your keys on your controller in order to give you a better grip.
12- Powerslide: From SQUARE to L1 on the Playstation. From X to Lb on the Xbox.
13- Air Roll: From SQUARE to L1 on the Playstation. From X to Lb on the Xbox.
14- Air Roll right (or left): Change it to SQUARE on the Playstation, or X on the Xbox.
15- Steering and Aerial Sensitivity: These two control your stick sensitivity when steering on the ground or flying in the air.
-
If you’ve been playing for hours and found yourself still struggling to dribble or aerial, then this change could be for you.
-
A lot of players instantly see improvements when they go into Freeplay and test out what they like because not every pair of hands is built the same.
-
I’d recommend testing it out yourself between 1 to 2. Squishy uses 1.4 for both if that helps.
16- Controller Deadzone: This measures how much you’ll need to move your analog stick before the car responds on the ground or in the air.
-
The first thing this setting could fix is a problem called “Stick Drift”. It’s when your stick gets a lil old and starts to slightly move on its own causing your car to sway left or right when it should be moving in a straight line. To test if you have this, turn your setting all the way to 0, and drive in a straight line in Freeplay. If it moves, turn the setting up slightly till the problem disappears.
-
The second thing this setting could help you with is dribbling. When dribbling the ball on your car, you have to make very small adjustments constantly, just like you would with a steering wheel on a normal car. So, turn this down to 0.05 or 0.10 to make your stick extra responsive.
17- Dodge Deadzone: This measures how much you’ll need to move your analog stick to Dodge or flip forward instead of your car double jumping.
-
Once you reach the Platinum ranks, feel proud of yourself, and set your eyes on the Diamond ranks is the moment you’ll realize how important “fast aerialing” is.
-
When learning to fast aerial, you’ll find yourself backflipping constantly while trying to double jump.
-
Setting this somewhere between 0.45 to 0.75 should fix that. I use 0.7 as I backflip a lot.
18- Controller Vibration: Controls when the controller needs to uselessly vibrate to tell you something you already saw with your eyes.
- Do your hands and yourself a favor by disabling it. It’s simply a distraction.
Interface Settings
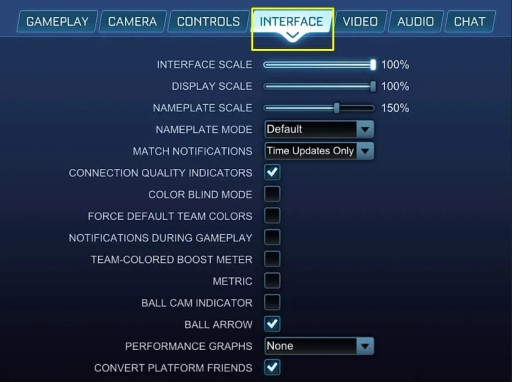
Rocket League Interface Settings Menu
The interface really depends on your preference as a player. Do you care about indicators and statistical information or do you rely on your eyes and instincts more? Either way, I have a way you can have a good balance of both.
19- Interface Scale: This modifies the size of all elements you see on your screen such as your boost meter and scoreboard.
-
I’d suggest lowering it down to 85% as it will show you more of the ball and the action.
20- Nameplate Scale: This controls the size of the nameplates that appear above all the other cars.
-
Again, when your friends are whiffing ball after ball while piling on top of each other, it’s useful not to have huge nameplates covering the action.
-
Decrease it somewhere between 100 to 150.
21- Ball Arrow: Enables an on-screen arrow above your car that points to the ball.
-
You’ll need this when you’re swirling in the air after you missed your aerial to determine where the ball is to get back to defend. Yes, I’ve been there. A lot.
Video Settings
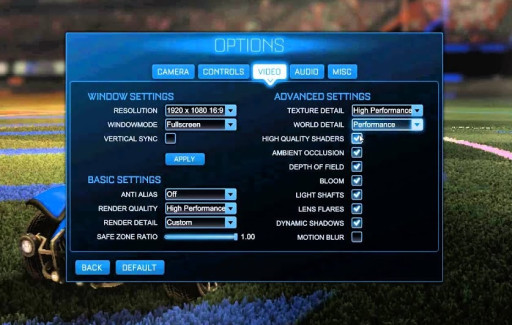
Rocket League Video Settings Menu
This is where all the computer geeks have the most fun tweaking their game! Graphics or performance? Visual effects or zero distractions? Video settings are arguably the most important settings in rocket league and just about every other game.
22- Visual Effects: Settings that make your game look nicer and more realistic...if that’s something you’d even notice while trying to defend, attack, and not ball chase simultaneously.
-
Just turn everything off except for transparent goalposts.
-
Bloom, motion blur, and everything else will simply make things harder to spot in a fast-paced game.
23- Graphics/Resolution settings: Needless to say, Frames per second > Graphics.
-
The smoother your game is, the smoother your shots will be. Keep your game running as fast as possible. FPS drops are the enemy.
Audio Settings
This section controls the overall volume of all sound and music.
24- Play Soundtrack in Game: Plays music from the playlists when in-game.
-
If it’s your thing, it’s your thing. I wouldn’t want MonsterCat blasting in my ear while I’m trying to hear what my teammates are communicating with me. Disable it.
25- Ambient and Crowd Volumes: Controls the volume of the crowd and ambient sounds in the arena.
-
You’ll probably get sick of hearing these noises after playing 500+ hours of the game as I did.
-
Turn them down to 25% at least.
These were the 25 settings that can help you reach your next level in Rocket League! I hope this guide helped you learn a few new things about how diverse this game can be.
You may also be interested in:
- Top 15 Rocket League Tips For Outplaying Your Opponents
- 15 Best Rocket League Settings That Give You an Advantage
- Top 10 Rocket League Best Plays (2020)
- [Top 10] Rocket League Best Players In The World Today
- [Top 10] Rocket League Best Car Designs
- Top 5 Rocket League Best Cars
- Best Wheels In Rocket League That Look Freakin Awesome
- Top 5 Rocket League Best Crates


