![Warframe Infested Weapons Main Photo [Top 15] Warframe Best Infested Weapons That Are Powerful (Latest Patch Echoes Of The Zariman)-01](/sites/default/files/styles/responsive_image_600xauto/public/2022-08/top_15_warframe_best_infested_weapons_that_are_powerful_latest_patch_echoes_of_the_zariman-01.jpg.webp?itok=Yi0rLzQD)
Though the Grineer Empire and Corpus Conglomerate continually hone their knowledge on weaponry to produce increasingly dangerous items of destruction, they’re not the only weapons you need to fear.
Enter stage, the Infested. At first glance, you wouldn’t think that these ravenous beasts would make for great blacksmiths, but you’d be surprised with what the Infestation can do to weaponry from the other factions.
From serrated blades tainted with deadly toxins to Infested arrows that explode into clouds of noxious gasses, Infested weapons are just as, if not more deadly than anything the Grineer, Corpus, and Tenno can come up with.
And here are my own top 15 weapons of this class. Let me know what you think in the comments down below!
15. Mios (Melee Weapon)

When you think organic, living weapons, whips aren’t really what comes to mind, but the Infestation isn’t picky and thus the Mios is born. This Blade and Whip will extend and slice open your enemies and give their wounds a couple of nasty lethal infections. Antibacterial proof.
A little fun fact, the Mios is a fan-made weapon from a player called RedSkittlez submitted to DE’s Community Melee Weapon Contest
What the Mios excels at:
- Long-range
It should go without saying (but then I’d have less stuff to put here) that since the Mios is a whip, it’ll have great reach. Specifically, it has a reach of 2.5m. That 8.2ft to you non-metric plebs. So you’ll be able to sashimi your foes near and far.
- Intoxication
Though the Mios’ default attacks don’t actually inflict toxin damage, the radial damage from its slam attack does. Although, the 25% status chance for the toxin damage does not change with mods (It can increase and affect any other element you mod into the weapon though).
How to get the Mios:
You can research and obtain the Mios Blueprint in the Bio Lab of your clan dojo.
Mios Details
14. Zymos (Secondary Weapon)

Despite a recent stealth nerf that decreased its critical chance and damage capabilities, the Zymos can still come in handy and, in my opinion, is still a fun and gimmicky weapon.
It fires toxic spores that explode upon impact. Simple enough.
But upon headshot, the spores will stick to the enemy’s head before exploding. And after the explosion, 6 more spores will come out from the blast and will chase down nearby enemies for further toxin damage.
Another little gimmick the weapon has: when you score a headshot, the opponent’s head will inflate before the spore explodes. The size change reverts after the explosion though so it’s pretty much just an aesthetic touch.
What the Zymos excels at:
- Crowd control
Not only will the Zymos’ explosions and additional spores damage large groups of enemies, but it’ll slow them down too! The initial shot impact, explosion, and generated spores will all force Impact procs. The Impact status effect causes staggering.
- Benefiting from headshot bonuses
Since you’ll most likely be aiming for the head with this weapon, you’ll be getting the headshot damage boost (a 2x damage boost for most enemy types) often with it.
How to get the Zymos:
The blueprints for this weapon can be bought from Father using Entrati standing. You can find Father in the Necralisk in Deimos. Note that you have to be Rank 1 - Stranger with the Entrati to be able to buy the Zymos’s main blueprint and component blueprints.
The main blueprint costs 2,000 Entrati standing while the blueprints for the Barrel and Receiver each costs 1,000 Entrati standing.
Zymos Details
13. Pox (Secondary Weapon)

Unlike most other thrown weapons in Warframe, the Pox doesn’t pierce enemies or deploy themselves as mines, these babies simply blow up on impact!
After the detonation, the Pox will release a cloud with a 3.6m radius that will continue to deal toxin damage for 4 seconds. The explosions don’t cause any self-stagger so feel free to use them as close to you as you want.
What the Pox excels at:
- Choking chokepoints
The toxic clouds the Pox leaves behind are ideal for blanketing chokepoints and tight spaces with toxins that will harm any opponent that tries pushing through.
- Injecting poison into their veins
Both the impact and the toxic clouds have a status chance of 35%. This makes the Pox way more useful when modded with a variety of status effects. It’ll even make holding chokepoints even easier with the enemies being affected by multiple status effects at once.
How to get the Pox (the weapon, not the disease):
You can research and obtain the Pox Blueprint in the Bio Lab of your clan dojo.
Pox Details
12. Phage (Primary Weapon)

So far, all the Infested weapons I’ve shown have dealt toxin damage. If you’re concerned about the status effect variety of these weapon types, then the Phage should ease your mind.
This infested shotgun beam weapon deals viral damage through 7 highly spread-out beams. Each beam is initially really weak on its own, dealing only 5 base viral damage. But of course, it wouldn’t make it this far into the list if it really was weak.
First off, the viral damage type. This damage deals bonus damage against organic Grineer and Corpus opponents while dealing reduced damage against infested enemies. Its status effect increases any damage dealt to the opponent inflicted with it. It increases the damage dealt to them by 100%. If you inflict the status effect on an enemy that already has it, it will stack and add 25% more damage dealt. This can keep stacking up to a whopping 325% additional damage to a target.
So that 5 base damage is going to grow larger as it inflicts its status effect (plus any additional damage you gain from modding).
And if that’s not enough, aiming while firing the Phage will cause the beams to bunch up until it will effectively be a single beam that deals the combined damage of all 7 beams.
What the Phage excels at:
- Versatility
Due to its special effect, the Phage is useful as both a crowd control weapon and a weapon to take out single tanky or high-priority enemies.
- Status effects
Each beam has a 15.5% status chance, increasing this with mods and concentrating them makes the weapon consistently proc status effects.
How to get the Phage:
You can research and obtain the Phage Blueprint in the Bio Lab of your clan dojo.
Phage Details
11. Cerata (Melee Weapon)

The Infestation has turned this glaive into the jagged-edged, nightmare that it is now. Like a lot of Infested weapons, the Cerata has base toxin damage.
If you’re not familiar with thrown melee weapons, you hold the melee button to throw the glaive which will bounce around, hitting enemies and dealing damage before returning to you. You could also press the heavy attack button while the weapon is in flight to detonate it (explosion damage is affected by your combo count, similar to regular heavy attacks), and automatically cause the glaive to go flying back to you.
The Cerata’s base toxin damage is really useful since it forces the toxin to proc as well as the impact proc that most thrown weapons force whenever it explodes. This makes its explosions far deadlier than normal.
What the Cerata excels at:
- Procing toxin and impact status effects
With a guaranteed chance of inflicting these two status effects, the Cerata is best thrown at shielded enemies since the toxin status effect ignores shields and damages health directly.
- Procing everything else
Aside from its guaranteed procs, the Cerata also has a very good status chance of 33% when thrown uncharged and 34% when thrown charged. So you can add any additional elements you want onto the weapon and have it dish out those status effects consistently.
How to get the Cerata:
You can research and obtain the Cerata Blueprint in the Bio Lab of your clan dojo.
Cerata Details
10. Tysis (Secondary Weapon)

The Tysis fires darts that deal corrosive damage over time. The DoT is not considered a status effect and is simply how the weapon delivers its damage.
It’s a really simple weapon that is just amazing at taking down heavily-armored targets by melting their armor in seconds and making them vulnerable to follow-up attacks with your other weapons and abilities.
What the Tysis excels at:
- Status effects
The Tysis has one of the highest status chances among all secondary weapons (it’s tied with the Epitaph and Kuva Nukor) with a status chance of 50%. It really lives up to its “injection gun” aesthetic by being a weapon that can easily inject any status effect you want on an enemy.
- Wearing down armor
Since its base damage type is corrosive, the Tysis is an ideal weapon when facing heavily armored enemies. The corrosive status effect strips away an enemy’s armor. One the first proc, it will strip 26% of the victim’s armor. Succeeding procs will add 6% up to a max of 80% with 10 stacks of corrosive procs.
How to get the Tysis:
You can simply buy the Tysis’ blueprint from the in-game market. You can access the market from the console across the console where you access your quests.
Tysis Details
9. Catabolyst (Secondary Weapon)

Following up the Tysis is another corrosive-based weapon, the Catabolyst. Instead of needles, however, this sidearm fires a beam that’ll melt any armor it makes contact with. Pretty simple so far, so now let’s take a quick drift.
The “magazine” where the Catabolyst’s ammo is stored is actually a bladder or a small sack filled with some deadly juices. Whenever you reload, instead of just dropping your used magazine, your Warframe lobs it wherever you’re aiming at that moment. The bladder explodes on impact, spraying the area, and any foes in it with corrosive acid. Disgusting and gruesome, yet effective and deadly.
Also note that the damage, critical chance, status chance, and even the explosion radius of the bladder grenade increases from zero ammo.
What the Catabolyst excels at:
- Making it (acid) rain
The beam, non-empty magazine grenade impact, and explosion have a 43% status effect each. On the other hand, when you toss a completely empty magazine, the status effect ramps up to 59% for both the impact and the explosion.
Honestly, both those numbers are incredibly high and you’re going to proc your status effects easily with this weapon, especially when you mod it for that.
- Armor stripping
Like the Tysis, the Catabolyst also has base corrosive damage so it’ll be able to soften up armored enemies for you or your allies to make the kill a lot easier.
- Acid grenade launching
The grenade feature is incredibly useful as a crowd control weapon. Try to resist reloading until you run out of ammo to maximize its potential. I know your FPS instincts tell you to do otherwise, but try and fight it.
How to get the Catabolyst:
You can research and obtain the Catabolyst Blueprint in the Bio Lab of your clan dojo.
Catabolyst Details
8. Mire (Melee Weapon)
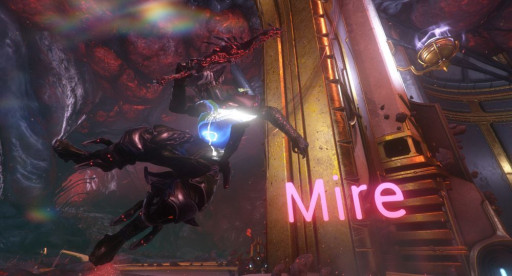
A lot of Infested weapons have a lot of wild and unique effects due to them being mutated from severe exposure to the Infestation. And while the Mire looks like a crazy sword, with its deformed shape and spikes sticking out of its perimeter, it’s a pretty straightforward weapon.
It’s a sword that deals large toxin damage and is focused on dealing status effects, It also has the fastest base attack speed among all swords (1.08). Nothing too fancy, but it doesn’t have to be. It just works.
What the Mire excels at:
- Sowing status effects
The Mire has a status chance of 31%, making it a heavily status effect-focused weapon. Make sure to add lots of extra elements and status effect-boosting mods to maximize its potential.
- Slashing around at the speed of sound
Having the fastest attack speed compared to all swords in the game makes the Mire great for quick kills and as well as rapidly stacking up big combos for high-damaging heavy attacks.
- Bypassing shields
Since it deals toxin damage and has a high status chance, it’s highly effective against shielded, fleshy enemies (like Corpus Crewmen). Both the primary toxin damage as well as the toxin status effect bypass the enemy’s shields and damage their health directly.
How to get the Mire:
You can simply buy the Mire’s blueprint from the in-game market. You can access the market from the console across the console where you access your quests.
It is also given as a reward for beating the Mesa Specter in the Pluto-to-Eris Junction.
Mire Details
7. Pathocyst (Melee Weapon)
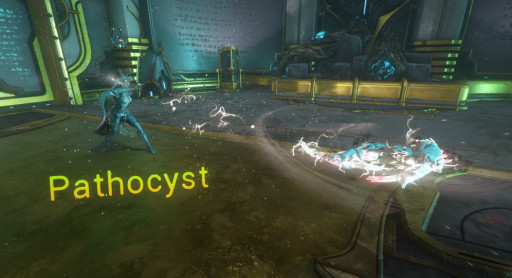
Like the Cerata, the Pathocyst is an Infested boomerang. Unlike the Cerata, the Pathocyst deals mostly viral damage instead of toxin. It’s one of the reasons that I placed it higher on the list. The viral status effect that increases the damage an enemy takes is such a good effect that will help you take down higher-level enemies much much quicker.
Another reason is a special effect the Pathocyst has. When it’s tossed or when it hits an opponent (even with just melee strikes), it will spawn Infested pods that hatch into Maggots. These Maggots will then latch onto enemies and stagger them before exploding for some damage.
What the Pathocyst excels at:
- Crowd control
The Maggots are an incredible tool that can help you deal with massive numbers of enemies. They will confuse and slow enemy forces down as well as deal damage to them while you can continue attacking or do something else.
- A lot of damage
The Pathocyst’s charged throw and explosions have the highest base damage among all glaives’ throw and explosion damage. They also have the highest critical multiplier (2.5x). Match that up with the weapon’s already considerable critical chance and you’ll be decimating enemies in no time.
- Blanketing enemies with status effects
With a 30% status chance for normal melee attacks, 33% for the normal throw, and 35% for the charged throw, the Pathocyst can spread even more chaos with various status effects while the Maggots continue to do their thing.
How to get the Pathocyst:
The Pathocyst’s blueprints and parts all drop from the Zealoid Prelate boss on Deimos. The blueprint and parts each have a 33.33% chance of dropping every time you beat him.
Pathocyst Details
6. Mutalist Cernos (Primary Weapon)

An Infested version of a classic Tenno bow, the Mutalist Cernos’ bows release toxic clouds on impact.
Sounds similar? Well, that’s because the Pox from earlier on this list did the same thing. Except the clouds that the Mutalist Cernos generates last much longer, from 4 seconds to 10 seconds. And of course, since the spores are in the form of arrows, the initial impact damage hurts way more than the Pox’s. The Pox only deals 50 toxin damage on impact while the Mutalist Cernos deals 205 (mainly impact) damage when uncharged and 410 when fully charged.
Although, think twice about using this bow on stealth missions, despite being labeled as “silent” the spore clouds alert enemies.
What the Mutalist Cernos excels at:
- Dealing with Nullifiers
If you hit a nullifier bubble, the arrow will still generate a spore cloud on the surface of the bubble, dealing damage to it until it pops. Those enemies are extremely annoying so having this bow to lessen their threat level is a good idea.
- Creating zones that deal constant damage
The spore clouds are really useful in keeping large crowds under control. You can use them to keep some distance between you and them or to distract them while you do something else like hacking panels.
- Being the best status chance bow
Of all bows, the Mutalist Cernos is undisputed in having the highest status chance of 49%. Add multiple status elements on this weapon, sit back and watch as enemies catch your status effects inside your spore clouds.
How to get the Mutalist Cernos:
You can simply buy the Mutalist Cernos’ blueprint from the in-game market. You can access the market from the console across the console where you access your quests.
Mutalist Cernos Details
5. Hirudo (Melee Weapon)

Use these bladed sparring weapons to tear into your opponent's opponent’s flesh and sap their vitality. The Hirudo has a vampirism effect that triggers every time you land a critical hit with it.
Each critical hit will regenerate your health by 5% of the damage that hit dealt.
I personally love this weapon and have a great riven mod for it. It effectively makes you immortal as you spam attacks on high-health enemies, even when surrounded and being fired at by other enemies.
What the Hirudo excels at:
- Critical hits
The Hirudo’s incredibly high base critical chance (30%) and critical multiplier (3x), means that not only will you be able to trigger the lifesteal effect frequently, but each hit will also give you large amounts of health.
- Making you faster
An effect that sparring weapons have is giving you an additional 5% movement speed when they’re “held”. It might not sound like much, but in a fast-paced game that emphasizes mobility, you take what you can get.
- Vampirism
The Hirudo’s main pitch is of course its lifesteal capabilities. This vastly increases your Warframe’s survivability in battle. The best defense is a good offense eh?
But that’s not all, apart from its vampirism effect, the Hirudo actually has another effect called “Invigorated”. This is a buff that increases your max health by 5% for each critical hit and lasts for 15 seconds. This buff can stack 5 times, meaning a total added 25% to your max health.
How to get the Hirudo:
You can simply buy the Hirudo’s blueprint from the in-game market. You can access the market from the console across the console where you access your quests. Keep in mind that you need a Kogake to build the Hirudo (this weapon can also be bought on the market).
Hirudo Details
4. Sporelacer (Kitgun Chamber)

Now here’s an unusual entry, unlike the others in this list, the Sporelacer isn’t actually a whole Infested weapon but simply a weapon part specifically a Kitgun chamber.
Kitguns is a system in Warframe that allows players to buy parts and craft their own personal primary or secondary weapon based on their own preferences. Kitgun chambers determine how the weapon fires, they differ when used as a primary or secondary weapon. Whether your Kitgun turns into a primary or secondary weapon all depends on what type of Grip you choose.
When used as a primary, the Sporelacer will act as a fully-automatic weapon that fires projectiles that ricochet off of surfaces.
When used as a secondary, the Sporelacer launches a glob of toxins that explodes and splits into three smaller globs upon impact.
What the Sporelacer excels at:
- Versatility
Since it’s a Kitgun component, the Sporelacer has a ton of potential capabilities. It can match your playstyle easily with the right grip and loader. You can get the damage, fire rate, critical chance, and other attributes of the weapon just right for how you want to play the game.
- Crowd control
As a primary, each shot explodes and deals area of effect (AoE) damage before ricocheting up to 2 more times (each ricochet causing another explosion).
As a secondary, its projectiles blow up and can take out large groups of enemies, and then it multiplies, dealing even more damage to surrounding baddies.
In both modes, the Sporelacer is ideal for keeping large numbers of enemies at bay.
- Melting flesh
As a secondary, Sporelacer deals mainly toxin damage which is best for targets with flesh, meat, and bones (like Corpus Crewmen). Its damage and status effect also ignores most shields in the game, the exception being the shields of boss enemies.
How to get the Sporelacer:
The Sporelacer blueprint is bought from Father in the Necralisk in Deimos. It is accessible starting at Neutral rank and costs 500 Entrati Standing.
Sporelacer Details
3. Lesion (Melee Weapon)

Now we have the Lesion, an Infested polearm with a wicked-looking blade on one end that can slice up foes on its receiving end. Despite being an Infested weapon, the Lesion doesn’t have innate elemental damage… not at first at least.
It has the added special effect of increasing its own attack speed by 15% and toxin damage by 100% for 6 seconds whenever it procs a status effect. This buff is non-stackable and does not refresh when you proc another status effect.
What the Lesion excels at:
- Status effect spreading
The Lesion has a status chance of 37%, making status builds its main focus. Add elemental damages and increase its status chance even more with mods
- Boosting itself
The bonus that it gives itself is incredibly useful. A 100% toxin damage boost is a huge game changer, and the attack speed boost is impressive too. With those boosts, all of a sudden, the Lesion turns into a blur of poisonous blades, ripping through enemy lines.
- Hitting five Grineer with one swing
The Lesion has a reach of 2.7m, so a single swing from this polearm can hit multiple enemies at once.
How to get the Lesion:
You can simply buy the Lesion’s blueprint from the in-game market. You can access the market from the console across the console where you access your quests.
Lesion Details
2. Bubonico (Primary Weapon)

All the other weapons on this list are handheld, the Bubonico is unique in that the weapon holds you. It appears to be a growth that takes over your entire arm. It’s safe though… probably… keep your psychiatrist on speed dial juuust in case.
The Bubonico has two firing modes. Its primary fire shoots 7 toxic projectiles at once while its secondary firing mode fires a burst of three viral projectiles.
Also, Bubonico doesn’t make use of regular ammo, it replenishes its own magazine automatically when not under use.
What the Bubonico excels at:
- Giving you the freedom to do other things
Because it’s an arm cannon, your other hand is free to do other things. You can carry objects and fire the Bubonico while downed, which you can usually only do with secondary weapons.
- Critical hits
The Bubonico has a high critical chance for its primary fire (25%) and a high critical multiplier for both firing modes (2.3X for primary and 3.5X for alternate).
- Status procs
The alternate fire has the highest status chance out of all primary launcher weapons (57%).
How to get the Bubonico:
You can research and obtain the Bubonico Blueprint in the Bio Lab of your clan dojo.
Bubonico Details
1. Proboscis Cernos (Primary Weapon)
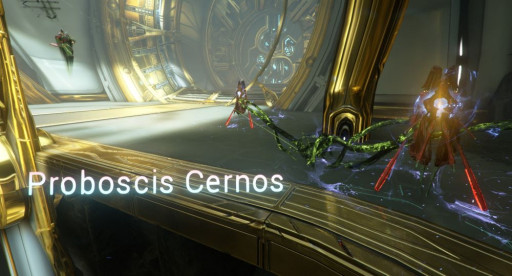
Here it is, the epitome of the Infestation’s effect on traditional weaponry: the Proboscis Cernos. Supposedly an even more Infested version of the Mutalist Cernos.
Each arrow launched from this bow is a death sentence in the form of appendages, reaching out and grabbing all enemies within 9 meters of the arrow’s impact zone. These appendages then drag their targets towards the center before blowing up and coating everything with its viral ooze.
This bow is ridiculously easy to obtain too, sure you need the Mutalist Cernos to craft it, but that’s a weapon that is incredibly easy to access too.
What the Proboscis Cernos excels at:
- Being viral
The Proboscis Cernos comes with innate viral damage on its appendages/tentacles and the ensuing explosion. This bow also has an impressive status chance, making sure that everyone gets their fair share of the viral status effect.
The viral status effect acts as a damage multiplier for any damage the affected enemy takes. It increases damage by 100% for the first proc for 6 seconds, any further procs will add 25%, capping out at 325%.
- Crowd control
Sucking in all surrounding enemies makes handling messy and chaotic crowds much easier.
- Setting enemies up for further damage
Since the appendages gather enemies together in one spot, you can use other weapons or Warframe abilities to follow up on this and deal even more damage to any survivors.
How to get the Proboscis Cernos:
You can simply buy the Proboscis Cernos’ blueprint from the in-game market. You can access the market from the console across the console where you access your quests.
Proboscis Cernos Details
You May Also Be Interested In:
- Warframe: Best Warframes, Ranked Weakest To Strongest (Warframe Tier List)
- Top 10 Warframe Best Primary Weapons (And How to Get Them)
- [Top 5] Warframe Best Arch-guns And How To Get Them
- [Top 5] Warframe Best Melee Weapons And How To Get Them
- [Top 5] Warframe Best Kuva Weapons And How To Get Them
- [Top 11] Warframe Best Weapons And How To Get Them


