The Best Hunt: Showdown Settings That Give You an Advantage Over Your Enemies
In Hunt: Showdown, getting PVP kills is all about skill and timing.
How good you are with your equipment and how well you know how to play the game are major factors in your success, as well as seeing and engaging enemies before they see and engage you.
However, there are a few things that you can change settings-wise that will help your ability to identify and react to potential targets faster.
These are the 20 best settings in Hunt: Showdown:
20. Monitor resolution
Make sure your resolution is set to your monitor’s native resolution settings so that you can see as clear as possible. This is especially important for catching distant movements, as well as movements between the cracks in the wood of buildings.
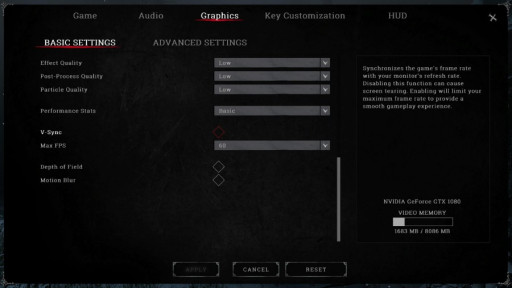
In order to change it, go to your in-game settings and go to the graphics tab. The first option is the resolution setting, as shown in the image above. You should choose your monitor’s resolution. I have a 4K monitor, and have in the past, tried to play in 1080p. What I found was thatI am able to catch details at 4Kthat I cannot at 1080p.
These kinds of tiny, inconspicuous movements will mean life or death. Hunt: Showdown is all about paying attention. Sight and sound are key elementsand if you can’t see an approaching enemy coming through the bush or if you can’t hear a hidden hunter inside a nearby barn, you are done for every time.
19. Full screen mode
If you are in windowed mode, make sure you are set to full screen. There are settings you can change, which we will explore later, to improve your FPS as it tanks in full screen. To change to full screen, you need to go to the settings menu and open the graphics tab. The full screen option is right below the resolution.
Full screen allows you to get the most out of your visual range. It also helps with immersion and engagement with what you are seeing. This is important in the same way that accurate monitor resolution settings are. Being immersed in this game is important because it helps you maintain focus and attention.
Losing focus because you are distracted by something else on your computer or simply because you are not fully immersed will lose you more matches than anything else. I have found that I will die to simple things like hellhounds, because I was not keeping a close ear to my environment.
18. Disable V-Sync
V-Sync is not a very useful feature in general, except for very specific monitors. All it does on most monitors is drag down performance significantly without a noticeable graphical return. In order to disable it you need to go to the graphics tab in the settings menu and scroll down to the bottom. You will find it above the performance stats option. Clicking on the button so that it is empty, as in not filled in with red, means that it is off.
Anything that negatively impacts your performance without providing more color or object clarity will end up being a detriment to you. Ideally, you want 60 FPS and good visual clarity at the same time. This will help you identify discrete movement and react quicker.
V-Sync can cause your FPS to drop off, especially in graphic-heavy areas. I have been in the unfortunate situation, more than once, of losing in a face-off with another hunter because my FPS suddenly tanked when I needed it to stay stable.

17. Disable motion blur
Motion blur is the hideous monstrosity of a graphics setting straight from the mind of a madman. It was meant to impart some kind of realism to the look and feel of the game. Instead, it makes the graphics melt into one another like a lovecraftian nightmare. To disable it, go to the settings and go to the graphics tab. It is the bottom option, and is disabled when the button in empty, as in not filled in with red.
Motion blur drags down performance, ruins long range attention when in motion, and is just plain useless. When I first started playing Hunt: Showdown I didn’t realize that motion blur was enabled.This caused me to lose one of my first matches because I missed a key movement to my left in one of the stalls in a horse barn in Davant Ranch.
16. Disable depth of field
Depth of field is not as devastating to your FPS as motion blur, but it’s not useful. There is some debate here, if only to play devil’s advocate. With depth of field enabled, when aiming down the sights, any distraction from your peripheral vision is muted so that you can focus on what you're aiming at. The issue is that as you get more experienced, you’ll find that you can tune that distraction out when you’re focused on a single enemy, but the benefit of being able to spot enemies in your peripheral vision cannot be outweighed.
To disable it, go to settings and go into the graphics tab. It will be right above motion blur. Like the last two options, it is a button that needs to be empty instead of filled in with red. I used to play with depth of field on, and I have found that I would aim at a hunter and completely miss his buddy, hiding in the bush aiming at my head.
15. No Max FPS cap
This is another one that some will argue on. Some will say that if you cap your FPS at 60 you will experience less peaks and troughs when you enter new areas. I like to let my GPU act freely, and run as best as it can. It may come down to the quality of your GPU and what it can and can’t handle.
To set this, go to the settings and go to the graphics tab. At the bottom, above depth of field and below V-Sync you will find a tab that allows you to set your max FPS at a variety of settings. If V-Sync is enabled, this option will be greyed out, so make sure to disable V-Sync.
14. General graphics settings
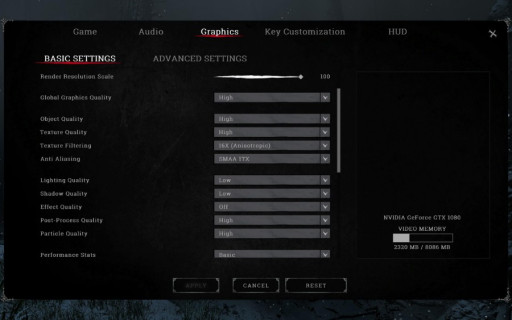
This covers the actual visual clarity and quality of the graphics. In Hunt: Showdown you always want to strike the perfect balance between performance and visual clarity. Certain graphical settings should be set on low, and others on high, according to what your PC can handle while maintaining about 60 or more FPS.
These settings are the meat of the graphics tab in the game settings, and you should go through and read each one’s short description on the right to see what it’s about. Each setting has a tab that allows you to change it from low to medium to high, like any standard graphics setting.
I have all my settings set the way as shown in the screenshot above. If you can’t see it, the settings are:
- Global Graphics Quality: High
- Object Quality: High
- Texture Quality: High
- Texture Filtering: 16X (Anisotropic)
- Anti Aliasing: SMAA 1TX (you could do 2TX if your GPU can handle it, for visual clarity)
- Lighting: Low (for visual clarity at long range)
- Shadows: Low (for visual clarity on night maps and at distance)
- Effects: Off (effects like fog, smoke and haze, which would otherwise block you view, can be seen through with effects off, offering obvious advantages)
- Post-Processing Quality: High
- Particle Quality: High
13. Personalize key bindings
Make sure that you are completely comfortable with the layout of the keys. This is not a big deal, but some may find that the default key bindings are awkward and will want to change them to suit their taste and preferences. If you are used to having crouch on a different key, and if you are used to using the E key for a specific function in games like these, you can easily change them.
Go to the settings and go to the Key Customization tab. Here you will find all of the game’s basic functions and the keys associated with them. There are options of add alternate keys to each function, and there is a specific delineation between the Sprint/Aim Down Sights function so that you can bind one key for both functions or bind them to separate keys, or do both.
I have some of my keys changed up. I set my map function to the M key because that’s more comfortable to me, and I switched my E and F key functions because I’m used to my E key being for interactions and my F key for extra functions, which in this case is Dark Sight.
12. Auto hide most of the HUD
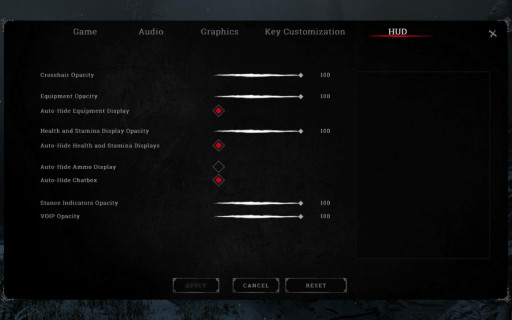
This plays into immersion in the same way that fullscreen does. There are a number of things that make up the heads up display in Hunt: Showdown. These are, chiefly: your equipment, health and stamina, ammo, and chatbox. You can find all of these in the HUD tab in the game settings. Like with other button options in the settings of Hunt, they are enabled when the button is filled in with red and disabled when it is empty.
I enable auto-hide for all the HUD options expect the ammo. The ammo display doesn’t get in the way like the others and provides me with the vital information of how many shots I have left before I run dry. Strategic shot placement will help conserve ammo, but paying attention to how much ammo is loaded will help you determine when it is and isn't appropriate to reload. How many shots you have left in total will help you determine whether or not you should engage with an enemy that doesn’t see you.
I have often been caught in a tough situation where I caught myself before I ran out of ammo, and reloaded just enough shots to take out a rushing hunter. This wouldn’t have been possible if I hadn't paid attention to my ammo. As for the other HUD options, they will come up when their information is pertinent, and you do not need to see them at any other time.
11. Change HUD opacity to your preference
This is another option that goes to the point of immersion. I have played around extensively with the HUD opacity, and for me, the full opacity was the best and most concrete way to view the various HUD options, but for others it may be distracting at that level.
To change it, you need to go to the game settings and go to the HUD tab. There you will see several sliders. All of these sliders change opacity, and I would recommend that you change them in increments of ten to fifteen in order to see how it affects your gameplay.
At one point I was playing with 25% opacity for all my HUD items. That ended up being an interesting experience, because I felt like the screen was more clear even when the HUD items were on screen, but I had to double check things over and over because I had a hard time distinguishing them in certain environments.
10. Make sure your volume is all the way up
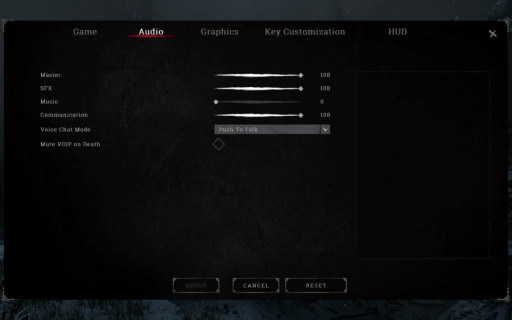
This is set by default, but you may even want to listen to this game loudly by turning you computer and/or headphone volume up. Sound is deeply important in this game, and as you get more experienced you get more attuned to what sounds are potential or definite hunters and which ones are ambient or questionable.
Being able to hear and discern different sounds is a key skill in order to be good and get kills, and if your volume is too quiet - you may miss a distant sound that will come to haunt you later in the match. To change this you can make sure the audio tab in the game settings is set according to the picture above, and you can turn your PC’s volume up.
Often times, a distant flock of crows or ducks, or a far away gunshot, will be the only indicator the entire matchthat you are playing with other hunters. Other times, you may hear a horse or some grunts behind you, off-a-ways into the swamp, that will alert you that other hunters are behind you and closing in. I have set many successful ambushes based on the sound of one grunt being killed far behind me.
9. Toggled versus hold settings
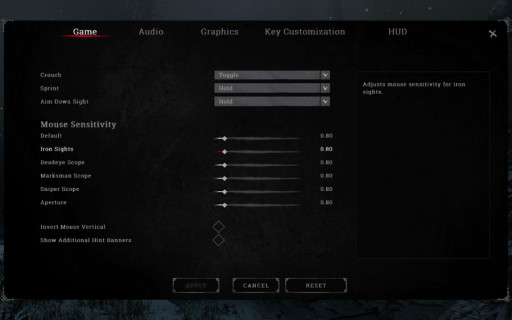
I have my crouch set to toggle and my sprint and aim-down-sights set to hold. When I press the crouch button, I only need to press it once. This allows me to stay crouched without any extra effort, and in this game you may find yourself in a situation where you will need to stay crouched for a while.
When I want to sprint I need to hold the sprint button, and the same goes for when I want to aim down my sights. This allows me to quickly switch from one mode to another without having to press the button more than once, and for these two movements it important to be able to transition quickly.
Others will argue with me on these points. Regardless of where you stand, you need to pick the settings that work for you, because you need to feel comfortable with these vital movements. Most often, the point of argument is on the aim-down-sights. Some like to toggle it because it is more comfortable or natural to them. That’s fine, and you can change it by going into the game settings and going to the game tab, pictured above. The top three are the mentioned settings, and they have tabs that allow you to select which option you want.
8. DPI setting
Your mouse DPI will determine how quickly your hunter pivots while standing still and changes direction while in motion. Low DPI means minute changes and thus more accuracy when aiming down the sights. If you like slower aiming, or are planning to play the low and slow game (preferably with a sniper), then a low DPI setting is what you want. Ideally, something below 1000, although with different mouse software you will get different results.
If you want to move quicker, a higher DPI may be for you. I had to build up to my mouse’s max DPI, which is 3600, because that’s incredibly fast. It was worth the effort, because I can aim accurately at distance when I need to and spin around and blast hunter away when the situation calls for it.
Different brands and models have different mechanisms for changing the DPI. My mouse has a button under the middle mouse button, others can be changed on your desktop. It's up to you to find out what your mouse can do.
7. In-game sensitivity settings
You can also change the individual sensitivity settings in-game. This is important for the same reason as the DPI setting, it allows you to control how precise your movements are. Specifically, the in-game settings allow you to change your sensitivity according to various factors, which are the: default sensitivity, iron sights, deadeye sights, marksman sights, sniper sights, and aperture sights. To change them, go to the game tab in the game settings and you will see a row of sliders, each one labeled with what sensitivity it controls.
Each of these sights has a different niche and thus needs a different sensitivity level. Shown above is the default 0.80 level, for reference. Personally, I have a very specific playstyle that does not make use of anything other than iron sights, and I’ve gotten quite good at using my iron sights at the same level as my default sensitivity level. I generally change my DPI if I need a low sensitivity, but I have in the past played with snipers, and presetting my sniper and marksman sensitivity settings made a huge difference in that I no longer needed to worry about DPI changes during a match.
6. Disable additional hint banners
This might be a minor thing to some, but I take my immersion very seriously. I believe that one of the most powerful contributors to a successful hunt is how deeply immersed you are into the game. Any internal or external distractions can be potentially fatal.
Hint banners may be useful to new players in the short term, but you will find that tuning them off takes some focus away from the task at hand, and ultimately erodes your focus. You can find the button on the game tab of the game settings. Like all other buttons, it may be disabled by clicking the button and leaving it empty and not filled in with red.
5. Display performance stats
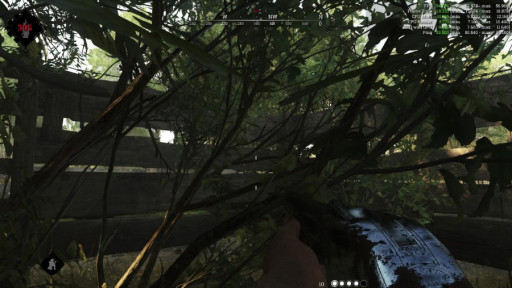
In order to find out which exact settings work for your machine, you can activate a setting in the graphics tab in the game settings, above V-Sync, that allows you to measure performance statistics like FPS and ping. These are important pieces of information because you can get a read on how well your machine can handle certain effects and settings in different areas and different situations on the map.
I have the basic performance stats on, which displays FPS and ping. The detailed stats show more in depth informations, as shown in the screenshot above. The balance between performance and fidelity can be tight, but in the end it pays off.
4. Make sure your drivers are up to date
Video driver updates are a big deal. As new games are released, companies have to update their drivers to keep performance problems to a minimum. If you have an Nvidia, for example, you can get the GeForce Experience app and quickly and easily update your drivers. You can also go to the manufacturer's website, or get it straight from Windows.
For reference, a driver update released in 2012 increased Skyrim’s performance by 45%. It’s this kind of massive improvement that will change how you play the game. I’ve had many friends drop Hunt: Showdown due to supposed optimization issues. After suggesting they update their drivers, they came back to a brand new game that ran almost perfectly.
3. Overclock your GPU
Overclocking your GPU will not deliver that kind of massive performance upgrade that a driver update has the potential to deliver, but whereas a driver update may not significantly affect performance, overclocking is guaranteed to help at least somewhat.
Overclocking will help to get you better peak performance and allows an overall higher FPS experience while maintaining a higher graphics level. In order to overclock safely and easily, you should use a program like MSI Afterburner, and this video to help you get started.
2. Tune your GPU using supported software
This is not something you generally have to worry about, but if you have a new graphics card or monitor you will want to check and make sure that your GPU is tuned correctly to the monitor’s refresh rate. You may also want to change your color setting so that the colors are more vibrant and contrasting.
This wont impact performance, and if your GPU is in sync with your monitor it should actually improve performance. Vibrant and contrasting colors will improve your ability to see things that would otherwise be hidden by pale or muted colors that blend into one another.
1. Increase your monitor brightness setting
Hunt: Showdown does not allow you to change your brightness setting in game in order to level the playing field on night maps. For some this can be a problem, as the night maps are very dark. Increasing your monitor’s gamma a little bit will help you see clearly without overexposing the light sources.
You can also turn off the full dynamic range setting if your monitor supports it, and if you can, enable the full color range on your monitor. Hunt: Showdown has a problem with heavy contrast, and if your monitor is limited in its color display and if it allows for more dynamic contrasts, then you’re getting darks being contrasted by darker colors.
To change this you need to know how to change your computer’s display settings. This may be done in windows or via the monitor itself if available. My monitor has a small joystick at the bottom to navigate display menus, for example.
There you have it. These settings will get you more kills in Hunt: Showdown, as well as enhancing the overall experience of the game.

