
So, you want to learn how to dominate as the hot-headed Miguel? Well, amigo, you’ve come to the right place. In this article, we’ll be talking about Miguel’s Top 10 bread & butter combos that can serve as your foundation while you climb your way up the Tekken ranked ladder.
This list will be ranked based on their viability as you climb your way to the top and also on their ease of use in regular games. I’ll be providing some insight into Miguel’s gameplan throughout a match of Tekken 7 as well, making sure that you know which combo to use and when to use it.
As a Miguel player and after watching other Miguel players for countless hours, there is one thing that I have to stress: consistency is key. If a combo does optimal damage but is hard to do during an actual game, then there is no use in learning that combo. Learn the combos that you can consistently do to win consistently.
Understanding the Combo System
Before we begin, it’s important to note that Tekken 7’s combo system has its own notation, as seen below. Combo notation is something that every beginner should learn in order to fully understand the game.
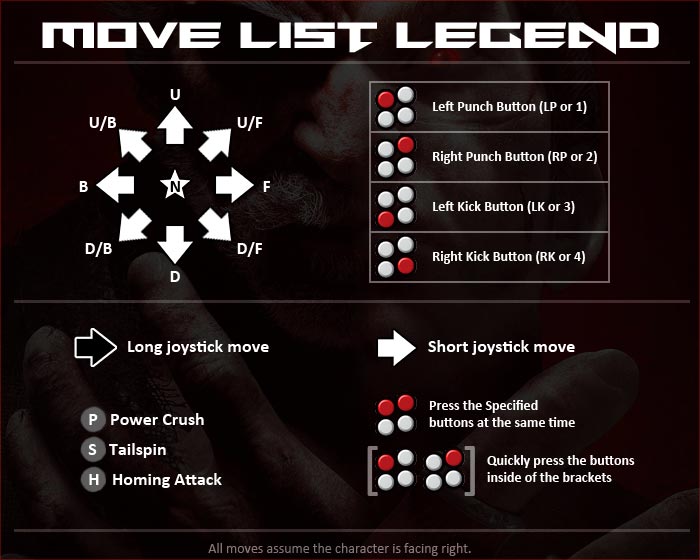
Each button is assigned a number, and special properties are denoted by specific letters.
Miguel in particular has his own special combo mechanic called the Savage Stance, or simply SAV for short. You can enter savage stance by pressing 3+4 simultaneously or by holding F during some moves (this will be noted as “ ~f ”).
10. Calambre Starter (f+1+2)
This is a micro-combo that uses Miguel’s Calembre move (f+1+2) to deal substantial damage to the opponent. Miguel’s main weakness is his range, so having an attack that is both safe on block AND has massive range means that you’ll be using this move often as you rank up. This combo gives you a guaranteed whopping additional 25 damage!
Combo route:
- F+1+2
Best used mid- to close-range to check opponents. - 3+4
This move is used to enter Savage Stance, which gives you access to… - SAV 2
One of Miguel’s heavy-hitting moves used as a powerful combo-ender
If this combo is too hard to do for a beginner, a second option would be:
- F+1+2
- D+1+2
Miguel sweeps the ground with both hands to hit grounded opponents
This combo is easier to do for newer players, but it leads to less damage. Choose the option you can do consistently!
9. Rage Drive
This is a situational combo that makes use of your rage drive when you get to low health. Miguel’s rage drive is quick and safe on block, which means that you can use this move to interrupt, surprise, or pressure your opponent.
Combo route:
- IN RAGE: d/b+1+2
Press all these buttons at the same time. - Sidestep Right
As soon as the second hit of Miguel’s rage drive hits, quickly tap down to sidestep to your right. - 3+4
Enter Savage Stance - SAV u/f+3
Common combo extender for extra damage - d/f+1 ~ f
Hold forward after hitting d/f+1 gut punch to enter Savage Stance - SAV u/f+3
Combo extension - 3,4
Be careful not to press 3 and 4 at the same time. - Ff 2,3
Miguel’s most common combo ender for damage. To push opponents closer to the wall for pressure, replace with ff 2,2
The reason this is so low on the list is because, as a Miguel player, your strengths lie in Miguel’s poking game. Staying in rage will help each poke hit harder and mean more.
8. Tortura Combo (d/b+1)
A short combo that will make use of Miguel’s move Tortura. Tortura is a good move for early online rank matches for two reasons: 1) It avoids high attacks, and 2) It makes your opponent think about low attacks. Condition your opponent to be afraid of this move, and you’ll control the pace of the match.
Combo Route:
- d/b1
The low sweeping combo starter. This can be held for a more damaging combo, but it is very risky. I recommend against it. - ws 4
ws in this instance means “while standing”, or as your character is standing up. Tip: Just mash 4 until the kick comes out. - D+4, 1+2
A quick combo-ender that leads to a mixup.
The last hit of the combo can transition into Savage Stance if you hold forward (d+4, 1+2 ~f) giving you access to powerful mix-ups (or okizeme) while your opponent gets up. Tekken isn’t just a physical battle; it’s also a mental battle.
7. Low Parry
A low parry can be done by pressing d/f just as a low attack hits you. With d/f+1 being Miguel’s best move, I admit there are times when I have accidentally parried my opponent and had no idea what to do. Practicing this combo can take advantage of a rare opportunity.
Combo Route:
- Low Parry.
- d/b+2
A common combo extender - d/f+1 ~ f
Hold forward after hitting with d/f+1 gut punch to enter Savage Stance - SAV u/f+3
Common combo extender for extra damage - 3,4
Be careful not to press 3 and 4 at the same time. - Ff 2,3
Miguel’s most common combo ender for damage. To push opponents closer to the wall for pressure, replace with ff 2,2
Being able to continue this combo after low parrying, even on accident, will make your opponent be afraid to hit you with lows. Low parrying is high risk, high reward, so it’s worth squeezing the extra damage in.
6. Cumbre Combo (SAV d/f2)
Miguel’s SAV d/f2 could be one of his best launchers because of the range and damage potential. This move launches the opponent higher into the air, leading to more damage, but it comes at the cost of punishability. Because of this, it is often used as a tool to punish an opponent’s whiffed attacks.
Combo Route
- SAV d/f+2
Long-range launcher - 3+4
Enter Savage Stance - SAV u/f+3
Common combo extender for extra damage - d/f+1
Combo extender. Be careful not to hold forward, or else you might transition to Savage Stance! I suggest letting go of the movement buttons after the punch connects - d/f+4, 2
Combo extender. Same case as above, be careful not to accidentally transition to Savage Stance - d/f+2,2
Combo extender for extra damage - Ff 2,3
Miguel’s most common combo ender for damage. To push opponents closer to the wall for pressure, replace with ff 2,2
I modified the final move of the combo to increase its consistency. The original combo ender used in the linked video uses a mechanic called dash canceling and can be very finicky.
5 Distorsión Combo (ws 2,4)
In Tekken, there are a lot of abusable low attacks that low-ranking players spam in order to get an effective but cheap win (such as Miguel’s d/b+1). In order to climb the ranks, it’s important to punish low attacks properly to discourage any more cheese.
Combo Route:
- WS+2,4
Miguel’s standard combo starter for punishing low attacks. Remember to only use this punish on attacks that can be punished. Very punishable on whiff. - d/f+1
Combo extender. Be careful not to hold forward or else you might transition to Savage Stance! I suggest letting go of the movement buttons after the punch connects - d/b+2
Common combo extender - d/f+1
Common combo extender - F+2,1
High damage corkscrew move that pushes the opponent to the wall - ff+2,1
Miguel’s most common combo ender for damage. To push opponents closer to the wall for pressure, replace with ff 2,2
In this combo, I suggest using d/f+2,2 instead of F+2,1 to avoid possibly entering Savage Stance from d/f+1 by accident.
4. Guantazo Combo (CH b+1)
Miguel is a very poke-heavy character, relying on constant pressure and movement to overwhelm opponents. Oftentimes, this overwhelming pressure can lead to counter-hits! Guantazo is a common move used by Miguel players to catch opponents who try to punch their way out of pressure. Throw this move out if you feel like your opponent is getting impatient.
Combo Route:
- CH b+1
A quick counter-hit or CH launcher. - Sidestep Right
This is an integral part of the combo since CH b+1 pushes the opponent slightly to the right. The sidestep doesn’t have to be big, just a tiny move to the right. - d/b+2
Common combo extender - d/f+1 ~ f
Hold forward after hitting with d/f+1 gut punch to enter Savage Stance - SAV u/f+3
Common combo extender for extra damage - 3,4
Be careful not to press 3 and 4 at the same time. - ff+2,1
Miguel’s most common combo ender for damage. To push opponents closer to the wall for pressure, replace with ff 2,2
Though this is a powerful tool to catch enemies trying to punch their way out of pressure, this still isn’t the best move that does that. This move lacks range, sometimes resulting in your attack whiffing. Only use this move when you’re right in front of your opponent’s face.
3. Magic 4
This is the counter-hit launch option for Miguel, and it comes at just the press of a button. The move comes out just as quickly as b+1 but is easier to use. Press 4 when you feel like your opponent is getting impatient, or if you want to hit your opponent out of a string of attacks from range.
Combo route:
- CH4
Counterhit kick. Best used up close, but range is more forgivable - f+4,2
A quick attack that locks you into the combo. I recommend getting your hands used to following up with f+4,2 as soon as CH4 registers to avoid missing the timing. - ff
This quick dash is to ensure that your next moves don’t miss. The dash doesn’t need to be long. As soon as you see your character start the dash animation, continue with the combo. - d/f+4,2
Combo extender. - d/b+2
Additional damage and wall carry - ff+2,1
Miguel’s most common combo ender for damage. To push opponents closer to the wall for pressure, replace with ff 2,2
Often times as a cheeky test for my opponent, I do the 4 kick twice in a row. This is a quick check to see if my opponent is button-happy.
2. Wall Combo
Start at minute mark - 0:39
Miguel’s pressure and excellent wall-carry is bound to push your opponent to the wall at some point. Because of this, learning a few options for your wall combo is essential! A proper wall combo should either finish your opponent off or make sure that he has a hard time getting back up. Luckily, this has both.
Combo route:
- 1
This move is situational depending on how close your opponent is to falling to the ground! If you think your opponent is still standing high enough after the wall splat for a high punch to connect, use this for extra damage - d/f+1 ~ f
This is the important part, a move that will almost always hit your opponent against the wall. Hold forward after hitting with d/f+1 gut punch to enter Savage Stance for more options. - SAV u/f+3
Ending your opponent with this move flips him on the ground, ensuring that he has less options standing up. Less options for the opponent means more damage opportunities for you.
There is also the option of replacing SAV u/f+3 with SAV 2 for more damage, but fewer options. Miguel can be very momentum-based, so more opportunities to continue pressure would benefit his gameplan a lot.
1 Hopkick Combo (u/f+4)
If you’re looking to start learning Miguel combos, this might be the easiest bread & butter combo there is. Learning the Hopkick combo will give you a base understanding of Tekken’s combo structure. This combo will also give you a combo that can be used with other varieties of launchers.
Combo Route:
- u/f+4
This is very punishable, use it wisely. - d/b+2
Additional damage and wall carry - d/f+1 ~ f
Hold forward after hitting with d/f+1 gut punch to enter Savage Stance for options. - SAV u/f+3
Common combo extender for extra damage - 3,4
Be careful not to press 3 and 4 at the same time. - ff+2,1
Miguel’s most common combo ender for damage. To push opponents closer to the wall for pressure, replace with ff 2,2
Not only does the hopkick come out quickly, but it also avoids low attacks from your opponent while hitting mid. Hopkick to avoid enemy lows, punish enemies, or simply throw one out to surprise your opponent.
As you can see from the combo route, this combo uses multiple mechanics and moves that other combos use. You can also use this combo route for the following launchers: SAV d/f+2 | d/f+2,1.
This is the first Miguel combo that I learned, and I still use this combo to this very day. I hope that these combos help you skyrocket your way to the top, and I hope that you keep consistency in mind when learning Tekken. The most damaging combo isn’t always what will win you the match.
Keep practicing, and I’ll see you in the next King of Iron Fist Tournament!
You may also be interested in:


