Rainbow Six Siege is very competitive, so you’ll need all the help you can get to rise above the competition. Although map and operator knowledge, practice, and smart loadouts are important, there’s a few settings you’ll want to make sure you have turned on to make you a more effective teammate. These tips will help you save time in the prep phase, place your precious gadgets better, make sure you don’t get caught with your pants down while on your drone phone, and help with target acquisition.
I will not discuss Vertical, Horizontal, and Aim Down Sights sensitivities below, since those come down to personal preference. However, if you’re looking for some advice, I suggest increasing them slightly so you can turn and aim faster, but not so much that you lose control. I have all of my sensitivities turned up by just 5. Likewise, the Left/Right Stick Dead Zone settings are a matter of preference. You may want to decrease these if the sticks don’t feel responsive enough, or increase them if you’ve got an old joystick that tends to drift.
All of these settings can be accessed by pressing the OPTIONS button both in-game and at the main menu, selecting Options, and pressing R1 three times to get to the Controls tab. Note: although this guide is written with the DualShock 4 in mind, all the tips and tricks apply to Xbox as well and can be accessed with the corresponding buttons.
Using Classic Controller Rotation
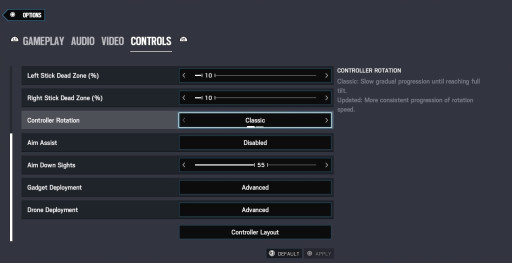
In June last year, a new setting was introduced to R6 called Controller Rotation. There are now two options: Classic and Updated. The Updated version was included to give the player “more consistent progression of rotation speed,” meaning the rate at which your character turns will be more consistent regardless of your sensitivity settings. On the other hand, the original Controller Rotation setting - Classic - gives you a “slow gradual progression until reaching full tilt.” Because I have been playing Siege for years, I greatly prefer the Classic option, and believe it to be the objectively better choice.
Reasons to go with the Classic Controller Rotation:
- Though the descriptions of each setting are technically accurate, the wording for the Classic setting is a bit off. Yes it gives your turn speed a progressively increasing speed, but it is anything but slow. The initial movement with your right stick is a bit slower to help you with fine aiming, but it quickly picks up the pace if you’re trying to turn around. The Updated version ends up feeling very sluggish simply because the speed doesn’t increase in the same way. It feels as though it takes forever for you to turn using the Updated Controller Rotation
- If you ever get caught off-guard by someone sneaking up behind you, you’ll want your full speed while turning, and the Classic allows you to not only turn quickly, but also gives you better precision aiming once you’ve spotted your assailant.
How to change your Controller Rotation:
- Locate Controller Rotation right below the Stick Dead Zone sliders, roughly halfway down the list
- If your current setting is on Updated, press LEFT on the d-pad to toggle to Classic
Disabling Aim Assist
Because Siege is a fairly competitive shooter, Aim Assist is automatically disabled for all players while in an online match. However, the option is still available to be enabled for the Situations and Terrorist Hunt game modes. I highly recommend turning your Aim Assist to Disabled for all game modes.
Why you should turn off Aim Assist:
- Practice, practice, practice. Siege is hard. Really hard. And the Situations and Terrorist Hunt game modes provide a great place to try out different operators and weapons on NPCs. There’s no sense in using any Aim Assist in these game modes if it’s just going to be taken away from you once you get into a Ranked match.
- Even if you’re just playing Terrorist Hunt for fun, it’s better to have some consistency in your settings throughout the entire game. Though you may not necessarily be practicing, you’ll still get a better feel for the aiming mechanics with Aim Assist disabled.
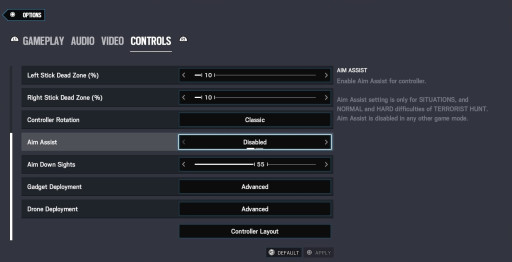
How to turn off Aim Assist:
- Directly below the Controller Rotation setting you will find Aim Assist
- Press LEFT on the d-pad to turn it to Disabled
Advanced Gadget Deployment
This may be the single most helpful setting in all of R6. Changing your Gadget Deployment setting from Standard to Advanced makes it so you must first switch to placeable gadgets, then hold the interact button (default SQUARE) to put it down. Note: this does not affect throwable gadgets such as Kaid’s Electroclaws, Thatcher’s EMP Grenades, or traditional frag, smoke, stun, and flash grenades.
The benefits of Advanced Gadget Deployment:
- You can now cancel gadget animations. In the Standard setting, once you release R1 or L1 to place a gadget, the animation must finish before you regain control of your character. This leaves you vulnerable if an enemy pops up unexpectedly. With the Advanced setting you can stop holding SQUARE in order to interrupt the action if you need to pull out your gun quickly.
- More precision in gadget placement. This helps immensely for gadgets you want to place in a very specific spot, such as Frost’s Welcome Mats, Mute’s Signal Disruptors, or Mira’s Black Mirrors. For example, when placing a Welcome Mat below a window, it’s helpful to stand as close to the wall as possible, pull out the Mat with R1, hold SQUARE, and back up until the animation starts. This will ensure the Mat is as close to the window as possible and make it harder to see from outside. The same concept applies to a Black Mirror you want on the very edge of a wall.
- Save precious time by cancelling animations when you’ve placed your operator tools or gadgets in the wrong place. Trying to get the perfect spot for a deployable shield or bulletproof camera? Need your claymore as close to a drone hole as possible so the lasers go further into the building? If you notice you’ve screwed something up the first time, you can release SQUARE to try again, saving precious seconds in the prep phase before the attackers start blowing up your barricades.
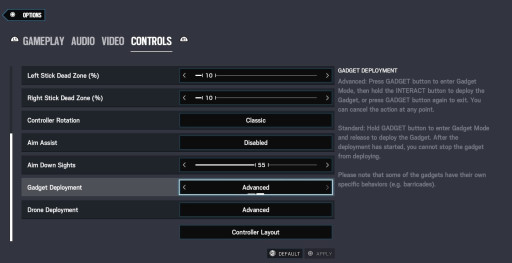
How to turn on Advanced Gadget Deployment:
- Find Gadget Deployment third from the bottom
- Press RIGHT on the d-pad to switch from Standard to Advanced
Advanced Drone Deployment
With the default settings, as soon as you throw your second drone, your character pulls out their phone to begin using it. Turning it to Advanced stops the automatic switch, and requires you press DOWN on the d-pad to enter drone view.
Why you’ll want Advanced Drone Deployment:
- The angle you need to throw a drone precisely often leaves you in a vulnerable position. Now that you don’t automatically switch, you can throw your drone, then find cover before getting into drone view.
- If you’ve got the situational awareness, you may be able to trick your opponent. When you know someone is right around a corner waiting for you, try throwing a drone past them. They may assume you’ve gone into drone view and come to kill you, where you’ll now be waiting to pop them as soon as they’re exposed.
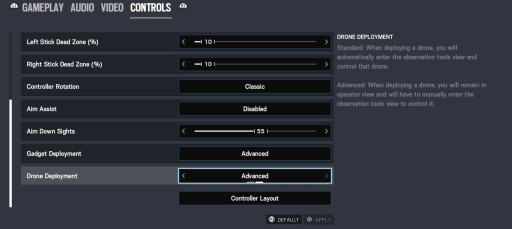
How to switch to Advanced Drone Deployment
- Make your way down the menu until you’ve reached Drone Deployment second from the bottom
- Press RIGHT on the d-pad to switch from Standard to Advanced

