Why Are Settings Important?
Settings are imperative to any game you’re playing. What your settings are can give you an advantage or disadvantage depending on how you play. For example, if you’re someone who gets distracted easily, it’s not a good idea to turn your music volume up. These small setting changes can have a huge impact on how you play the game, especially on consoles where it’s harder to be noticed as a great player.
15. Music Volume
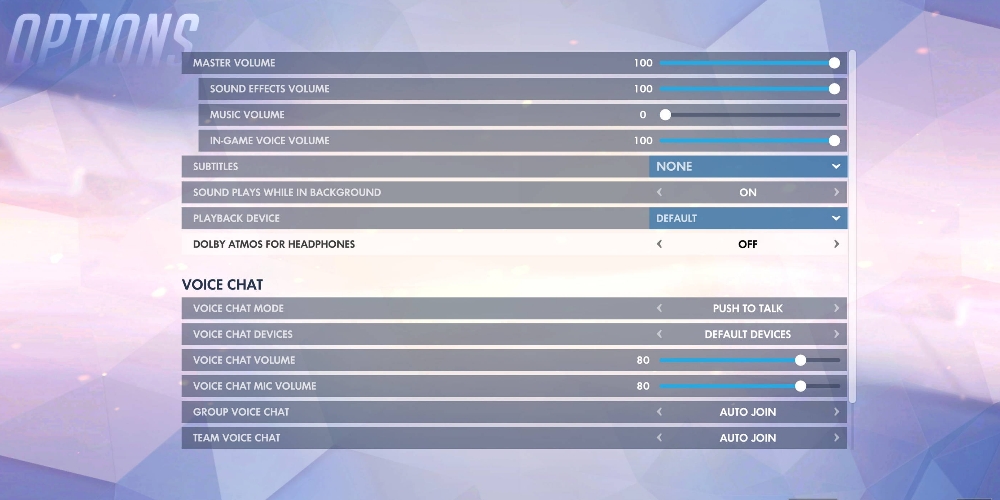
Speaking of music volume, it’s one of the most important console settings. On consoles, you have a lot more to handle than PC players. For instance, you have to worry about aim more than PC players since you don’t have the natural advantages of a mouse. That means more of your concentration is on aiming, and music can distract you from that.
Music, in general, doesn’t give you much of an advantage. The main advantage it has is that it intensifies when the game is nearing its end. Sometimes Overwatch has glitches and the music doesn’t crescendo toward the end of the game. I cannot count how many times I’ve lost games because there were no musical cues to tell me the game was ending, so I didn’t have the reaction time to jump on the objective at the last second.
That’s why music can be important, but it can also distract you from the objective if you have it too low. You should keep it at a medium volume, somewhere in between high and low. You get the best of both worlds if you set it in the middle. You can hear the crescendo at the end of the game, and you won’t get distracted throughout the main chunk of the match.
What To Set Music Volume To
- 40-60
14. Display Performance Stats
On consoles, you have less access to your network settings. In general, consoles move slower than PCs. That means PC players can check their network settings really quickly, while console players have to go through a whole process. On consoles, you should be using the display performance stats setting to make your gameplay more fluid.
This setting may seem unimportant, but you have to remember you’re playing an online game where the servers could be unstable or your internet could be unstable. Performance stats tell you about how your game is running. Yes, by the time you notice the poor performance, there’s not much you can do. However, it will stop you from playing another game, so you can instead check your internet.
On consoles, since you can’t check your internet as quickly as PC players, it’s nice to have the performance stats sitting in the corner of the screen and telling you how your game is performing. It gives you the small advantage of being able to identify and fix the problem before it gets out of hand and crashes your game.
What To Set Display Performance Stats To
- On
- Show Network Latency: On
- Show Network Interpolation Delay: On
13. Kill Feed Display
Kill feed display is extremely important for both console and PC players. It displays the kills in the match in the top right corner of the screen. If anyone dies, enemy or teammate, it will be shown in the kill feed. It will also show who the eliminated player died to and how they died. For example, if they got killed with a special ability, that special ability will show up in the kill feed.
This is extremely important since it can help you keep track of enemy abilities. You can see if anyone is dying from these abilities and how you can adapt to protect those people more. Keeping the kill feed on will help you keep track of who’s alive and who's dead.
If you’re a tank or DPS player, something that keeps you alive is the support players. The kill feed will alert you to the deaths of your supports. If you see your supports dying, you should pull back since it’s most likely a lost fight. This will give you an advantage since you won’t be feeding the enemy team's ults or staggering your team.
What To Set Kill Feed Display To
- On
12. Color Blind Settings
This setting is extremely helpful for console players, regardless of whether or not they are colorblind. As I’ve stated before, console players don’t have as much time to react to things because, in general, consoles run slower than PCs. By changing up the colors to something more noticeable, you can increase your odds of reacting in a timely manner.
For example, the default team colors are blue for friendlies and red for enemies. I have teammates in purple and enemies in orange. The orange pops more, so you can see the enemy easier. Along with that, purple is a cooler color that you won’t ever confuse with a bad one. The default bright blue can be distracting and pull your attention away from the other colors in the game.
Seeing as Overwatch 2 is full of color, choosing what color to make your teammates and enemies is more important than you realize. Make sure you set the enemy color to something that will stand out on most maps and won’t blend in with the environment. That’s why I have mine as orange instead of red; a lot of maps, like King’s Row, have red color schemes that make them harder to see.
What To Set Color Blind Settings To
- Preference
- Purple for teammates and orange for enemies is recommended
11. Allied Health Bars
This is an extremely important setting for all Overwatch players, but especially console players because it’s harder to move around the map quickly. In general, console players have lower sensitivity than PC players. That means their reaction times may not be as fast. Whatever you can do to help you react in the right way and in a timely manner is something you should do. Allied health bars are one of those things.
You can see your allied health bars when you have this feature enabled. This feature is extremely important, and you should have it on. No matter what role you’re playing, knowing if your teammates are okay is imperative to the success of the game. Allied health bars will allow you to see your teammates and their wellbeing, as well as react faster if you notice they’re losing health.
This is especially important for DPS and tank players because support players already get an outline of teammate health bars. On consoles, having the allied health bars enabled will give you a huge advantage since you can help your teammates in a timely manner.
What To Set Allied Health Bars To
- Default
10. Communication Wheel
Communication is extremely important in Overwatch 2. As I will explain later when we cover voice chat, consoles don’t have the same comms as PCs. PC players can type in the chat in mere seconds. On consoles, unless you have a keyboard handy, this is a lot more difficult. That’s where the communication wheel comes in.
You can set your communication wheel to whatever commands you think are important to your specific playstyle. However, it is recommended that you have “Need Help” and “Group Up” bound to the D-pad so you can easily ask for help. This is especially important for support players. As a side note, when a support player uses “Group Up” while their crosshair is hovering over a teammate, the voice line will change to “Come to me for healing”; this is vital to a support player’s success since it alerts your teammates that they’re not in your line of sight.
The communication wheel allows you to have fast communication with your team. It will give you an advantage since communication almost always helps teams win games. Without communication, your team has no way of knowing if you’re in danger, if you’re going in, if you want to flank, etc.
What To Set Communication Wheel To
- Left on the D-pad
- Need Help: down on the D-pad
- Group Up: right on the D-pad
9. Vibration
Vibrating controllers are my pet peeve. It distracts me so much from the game whenever I’m playing on Xbox. However, I also have a lot of friends that like the vibrations since it makes them feel like they’re impacting the game more or alerts them to certain events happening in the game.
Vibration can either be an advantage or a disadvantage to your playstyle. All it does is vibrate during the course of the game, such as when you fire your primary fire. It can make the last minute of the game feel very tense when you have all the pressure on your shoulders. In a way, it can make you feel like you’re in a movie.
If you have vibration on, the advantage it gives you is that you can get alerted to events happening in the game without needing a musical cue. You also get to feel more pressure and get sucked into the game more, leading to more personal enjoyment. If you have vibration turned off, the advantage you get is that you can focus more easily and worry less about distractions.
What To Set Vibration To
- Off if you get distracted easily
- On if you want alerts about what’s happening in the game
8. Sound Effects Volume
The sound effect volume is pretty important considering the effects alert you to danger. This setting is especially important for support players since they need to know if someone is hurt. Teammates will make groans and grunts when they’re getting damaged. As a support player, you need sound effects on and loud in order to hear those noises and react to them.
For tanks and DPS, you need to hear sound effects to listen for flankers or enemy ults. Since you’re the closest to the enemy, you have less time to react than, say, the supports. You need to have your sound effects up so you can hear when someone is about to attack.
At the same time, you don’t want it too high, or it can become distracting. In some cases, it might even scare you and make you flinch. That will put you at a disadvantage. To take advantage of the sound effects in the game, set it at a high volume so you can hear everything without worrying about getting startled.
What To Set Sound Effects Volume To
- 70-80
7. Voice Chat Volume
Voice chat volume is very important for consoles because, as a console player, typing in the chat isn’t as viable an option as it is on PC. Voice chat is especially important in competitive play. Make sure you have the volume high enough to hear but not too high so you aren’t getting your ears blasted off.
By keeping your volume high, you’re ensuring that you can hear your teammates and react to them accordingly. It will give you a major advantage since you can easily identify the threat and take care of it. Without being able to hear the voice chat well, you won’t have the same reaction time. In fact, it will be detrimental due to the fact that you’ll have to strain to hear what your teammates are saying.
Keep your volume high but not so high that a teammate's yelling will make you wince and flinch. That will only put you at a disadvantage. Keep it at least twenty below one hundred in order to protect your ears.
What To Set Voice Chat Volume To
- 70-80
- In Quick Play/Arcade, you can set it lower since it’s less important: 30-50
6. Voice Chat Nameplate Icon
This is yet another important console setting for the same reasons as voice chat volume. You’re meeting a bunch of strangers on Overwatch, which means you won’t be able to identify which voice is which in the heat of combat. Again, since you don’t have as much access to text chat, voice chat is your main source of communication.
As much as turning the voice chat volume up helps, that means nothing if you don’t know who’s talking. They can give the most detailed description of where they are and who is attacking them, but you’ll save a lot of time if you just look up and see the nameplate next to the person talking.
It will give you a huge advantage since you can see the person speaking and react in mere seconds. If you don’t have it enabled, then you’re at a disadvantage since you’ll have to ask "who is getting hurt and where" every time someone is in danger.
What To Set Voice Chat Nameplate Icon To
- On
5. Aim Smoothing
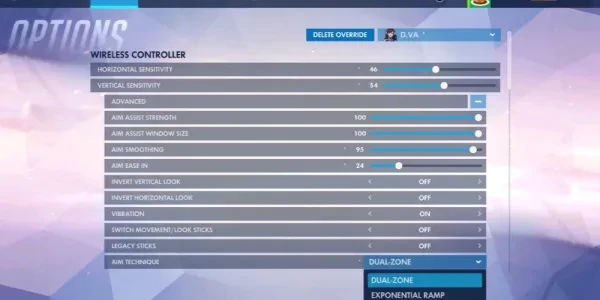
Now we’re getting into some of the most important console settings. Aim smoothing is extremely important, and it ties your sensitivity settings together. The lower the setting, the more jittery your aim will feel. The higher the setting, the smoother it will feel. This setting comes down to personal preference, as there are benefits for both sides of the spectrum.
For example, if you set your aim smoothing low, you can make more flick shots and whip around faster. On the other hand, if you set your aim smoothing high, you can have smoother gameplay with fewer distractions. You need to set this to match your preferred playing style.
It also depends on the role you’re playing. Tanks and supports don’t need to make as many flick shots. You could benefit from having high aim smoothing on tank and support, and low aim smoothing on DPS.
What To Set Aim Smoothing To
- 0-50 for players who like jittery gameplay
- 51-100 for players who like smooth gameplay
4. Horizontal Sensitivity
Horizontal sensitivity, or "sens", is how you aim. It determines how fast or slow your aim is horizontally, meaning when you move your stick from left to right. The lower the sens, the slower you move. The higher the sens, the faster you move.
The advantage this gives you depends on your playstyle. Aim is imperative in Overwatch 2, even when you’re playing a hero who doesn’t require much aim (i.e., Mercy, Symmetra). If you have high sensitivity but get overwhelmed easily, this will put you at a disadvantage. You need to find a sens that works for you.
In general, if you’re someone who prefers slower movement, you’ll need to set your sensitivity lower to compensate. This will give you more time to aim and pace your movements. If you prefer faster movement, then set your sensitivity higher for more chaotic and rapid movements.
What To Set Horizontal Sensitivity To
- 0-50 for players who prefer slower movement
- 51-100 for players who prefer faster movement
3. Vertical Sensitivity
Vertical sensitivity is similar to horizontal sensitivity in the sense that it determines how fast or slow your aim is. Only this time, this setting controls the vertical aspect of aiming, meaning up and down sensitivity. The same applies here: the lower the sens, the slower you move; the higher the sens, the faster you move.
Just like with horizontal sensitivity, vertical sensitivity can make or break your game. It can give you a massive advantage when you’re playing at a comfortable sensitivity. If you’re not, it throws off your entire game. Every aspect of the game will get thrown off if you aren’t playing at a sens that works for you.
The same applies here again: if you want slower movement, choose a lower sens. If you want faster movement, choose a higher sens.
What To Set Vertical Sensitivity To
- 0-50 for players who prefer slower movement
- 51-100 for players who prefer faster movement
2. Aim Assist Window Size
This is pretty much exactly what it sounds like: the window size of your aim assist settings. The window determines how strong your aim assist is at certain distances. In general, 30 is a good number to set your aim assist window size to. It can work for both those with high and low sensitivity.
It can give you an advantage because it helps you aim at the enemy target. As a console player, you naturally have a disadvantage against PC players since they have a mouse and keyboard. Mouse and keyboard are easier to aim with. PC players will almost always outmatch you when it comes to aiming, so whatever you can do to even the playing field, you should do.
If you have lower sensitivity, you don’t need to turn the window size up that much. You’re taking your time to aim, so if you have something that’s pulling your aim toward one or more targets, you’re going to get thrown off. The opposite is true for higher sens players: you should have a higher aim assist window to help you lock onto targets quickly.
What To Set Aim Assist Window Size To
- 30 is a good general range
- 0-50 for those with lower sensitivity
- 51-100 for those with higher sensitivity
1. Aim Assist Strength
Aim assist is the most important setting for console players, especially now that they’re playing with PC players. PC players have the natural aim advantage since they have a mouse. On consoles, you have a stick that doesn’t work as well. Aim assist is what will help you succeed with aiming.
It’s best to have high aim-assist strength to make your game move smoothly. It will give you a huge advantage when you’re on the battlefield facing down PC players, thanks to cross-platform play being the norm now. You can stand your ground and fight back. It will give you a massive advantage to have the game help pull your crosshair toward the enemy target.
Setting it high will help you aim faster. In Overwatch 2, targets are moving quickly since it’s an aggressive, fast-paced game. With the aim assist enabled and set high, you can increase the fluidity of your gameplay.
What To Set Aim Assist Strength To
- 80-100
You May Also Be Interested In:
[Top 10] Best Overwatch DPS For Beginners
[Top 10] Best Overwatch Heroes For Competitive Play
Overwatch DPS Tier List [Overwatch Best And Worst DPS Revealed]
[Top 5] Overwatch Best Heroes For Solo Carry
[Top 10] Best Overwatch Heroes For Beginners That Are Powerful

