Best Duo Mist Builds
For duos looking to experience the thrill of PvP and refine their teamwork, the Duo Mists in Albion Online present a distinct challenge. With the right synergy and item builds, you and your partner can dominate the fights and turn the Duo mists into a money making adventure. Victory depends on how well you and your duo coordinate, making it an excellent opportunity to test your skills and friendship.
Here are the Best Albion Online Best Duo Mist Builds:
5. Carving & Deathgivers
If you enjoy playing double DPS and love going all-in brawls until death, then Carving Sword and Deathgivers duo composition is perfect for you. This combo offers excellent resistance penetration, burst damage, high mobility, and solid sustain, allowing you to pressure your enemies from start to finish. With Carving's ability to break through defences and Deathgivers' devastating burst potential, this pair makes for a deadly combination in any fight.
Carving:
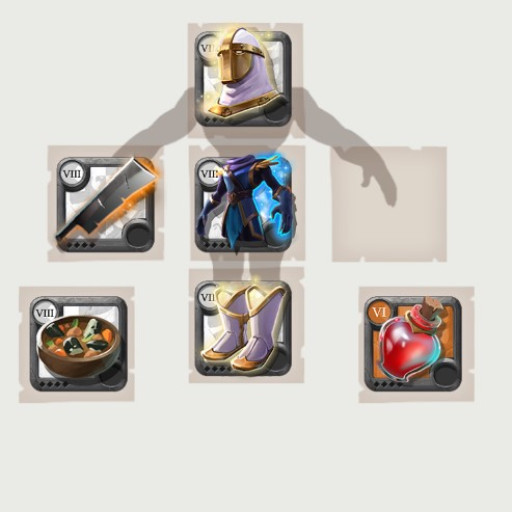
Heroic Strike (Q1) leaps towards an enemy dealing good damage and gives you 1 heroic charge. Each heroic charge gives you attack speed and movement speed.
Splitting Slash (W3) is your root ability, helping you to close the gap and deal a huge amount of damage. You can use this ability to kite or catch the enemy.
Fearless Strike (E) dashes towards the enemy dealing huge damage and reducing their Resistance. This will allow you to deal more damage to the enemy. You can use this ability to run away in case you are low HP.
The Helmet of Valor, Avalonian Cape, and Deadwater Eel Stew are your offensive items.
The Mistwalker Jacket, Sandals of Purity, and Healing Potions are your defensive items.
How to use this build:
Use (W) to catch the enemy→ Then use (Q) till you have 3 heroic charges, at the meanwhile brawl with the enemy→ Wait your friend to have 3 stacks, use (E) and fully brawl against the enemy till death and purge enemy buffs with (D)→ Use (R) when the enemy is going to burst you or your duo. Use Healing potion when you are getting low. If you are losing the fight, you can use (E) to go out of the fight and reset.
What Carving excels in:
- Good catch
- Good Brawl
- High Sustain
- Good mobility
- Resistance penetration
The Carving full details:
- Weapon: Carving
- Head: Helmet of Valor
- Chest: Mistwalker Jacket
- Shoes: any Sandals
- Cape: Avalonian Cape
- Food: Deadwater Eel Stew
- Potion: Healing Potion
Deathgivers:
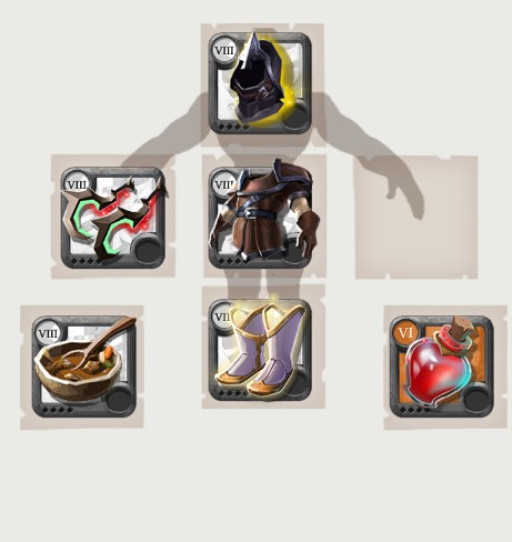
Deadly Swipe (Q2) leaps forward dealing a good amount of damage. Each enemy hit grants you with 1 assassin spirit charge which increases your damage (max 3 stacks). Try to hit both of the enemies in order to get to max stacks as fast as possible.
Chain Slash (W5) charges towards the enemies, hitting up to a maximum of 4 different targets. It deals more damage with each hit. During this, you are invisible and immune to damage
Ghost Strike (E) deals a huge burst damage to a single target. If you have 3 assassin charges, you can use the ability without it going into a cooldown. This ability also turns you invisible for 1 second. Use this ability on the guy which got penetrated by the Carving (E).
The Stalker Hood, Avalonian Cape and Beef Stew are your offensive items.
The Mercenary Jacket, Sandals of Purity, and Healing Potion are your defensive items.
How to use this build:
Use (Q) to gather assassin charges and deal damage, try to hit both of the enemies→ when you have 3 charges wait for your Carving’s (E) and then use (E)--> Brawl till the enemy has 50% HP, after that use (D) and then use (E) twice to execute→ use your (R) and use heal pot when you are getting low HP.
What Deathgivers excels in:
- Huge single target damage
- Huge burst damage
- Huge mobility
- Good Sustain
The Deathgivers full details:
- Weapon: Deathgivers
- Head: Stalker Hood
- Chest: Mercenary Jacket
- Shoes: any Sandals
- Cape: Avalonian Cape
- Food: Beef Stew
- Potion: Healing Potion
4. Dual Sword & Holy Staff
If you're not confident with double DPS and prefer a more balanced approach with a reliable healer by your side, the Dual Sword and Holy Staff composition is ideal for you. This duo offers huge sustain, allowing for longer brawls, while still maintaining good mobility. With the Holy Staff keeping you alive and the Dual Swords dealing consistent damage, you can outlast your opponents.
Dual Sword:
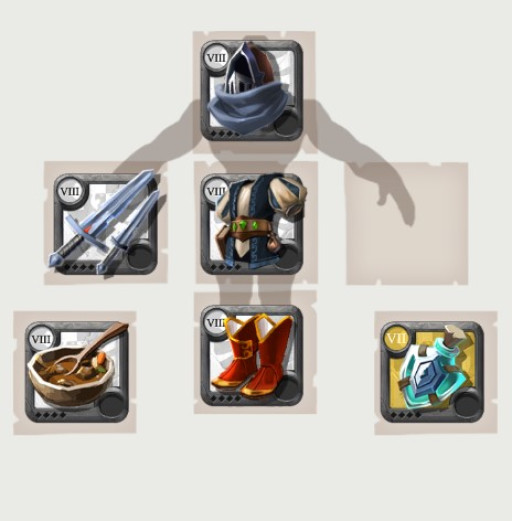
Heroic Strike (Q1) leaps towards an enemy dealing good damage and gives you 1 heroic charge. Each heroic charge gives you attack speed and movement speed.
Splitting Slash (W3) is your root ability, helping you to close the gap and deal a huge amount of damage. You can use this ability to kite or catch the enemy.
Spinning Blades (E) leaps towards the targeted position. It has a big range. If you hit an enemy, you get additional auto-attack damage and attack speed.
The Mercenary Hood, Royal Sandals, Avalonian Cape, and Beef Stew are your offensive items.
The Mage Robe and Resistance Potion are your defensive items.
How to use this build:
Use (E) to close the gap and get additional damage and attacks speed→ Use (W) to root the enemy and auto-attack the enemy → Use (Q) off-cooldown while brawling with the enemy→ Use (D) to interrupt spell casting or to slow the enemy→ Use (R) to purge the enemies’ buffs and use resistance potion when you feel like the enemy will do a burst damage. Don’t forget to check your healer’s position during the fights.
What Dual Swords excels in:
- High mobility
- Good burst damage
- Very good Brawling
- Good catch
- Good crowd control
The Dual Swords full details:
- Weapon: Dual Swords
- Head: Mercenary Hood
- Chest: Mage Robe
- Shoes: Royal Sandals
- Cape: Avalonian Cape
- Food: Beef Stew
- Potion: Resistance Potion
Holy Staff:
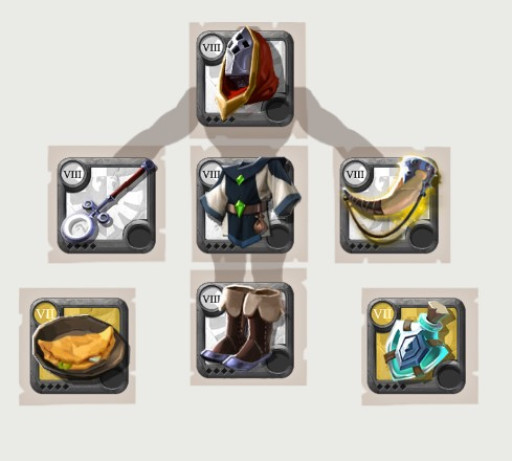
Generous Heal (Q1) Heals targeted ally for a good amount.
Holy Blessing (W3) increases the healing received of the targeted ally and increases his armor. On top of that, it grants immunity to forced movements.
Desperate Prayer (E) heals the targeted ally for a good amount if the target is above 40% HP and gives additional healing cast to you (max 3 stacks). If the targeted ally is below 40% HP, it heals him massively.
The Royal Cowl, Cleric Robe, Mercenary Shoes, and Resistance Potion are your defensive items.
How to use this build:
Use (Q) on yourself or your duo depending who has lost HP→ Use (E) on target who took burst damage→ Use (F) to get out of stuns and roots→ Use (R) if you are getting concentrated a lot and have lost a lot of HP→ Use resistance if you get low. Be aware of your position, you need to be near your Duo.
What Holy Staff Excels in:
- Huge Sustain
- Huge burst heal
- Low Cooldowns
The Holy Staff full details:
- Weapon: Holy Staff
- Off-Hand: Mistcaller
- Head: Royal Cowl
- Chest: Cleric Robe
- Shoes: Mercenary Shoes
- Cape: Caerleon Cape
- Food: Pork Omelette
- Potion: Resistance Potion
3. Carving & Holy Staff
If you love having a healer by your side, brawling to the bitter end, and exploiting broken weapon combos, the Carving Sword and Holy Staff composition is the way to go. This duo is disgustingly broken in the Duo Mists. With massive damage output from the Carving Sword and huge sustain from the Holy Staff, you can persistently pressure your enemies and outlast them in prolonged fights. It's a deadly mix of offence and defence that’s hard to counter.
Carving:
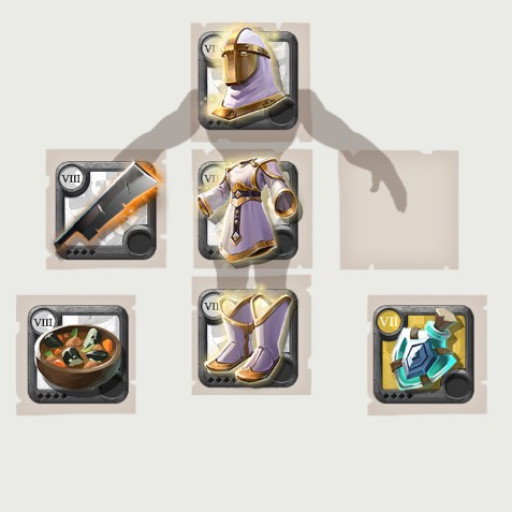
Heroic Strike (Q1) leaps towards an enemy dealing good damage and gives you 1 heroic charge. Each heroic charge gives you attack speed and movement speed.
Splitting Slash (W3) is your catch ability, stunning enemies from far away and dealing a huge amount of damage. You can use this ability to kite or catch the enemy.
Fearless Strike (E) dashes towards the enemy dealing huge damage and reducing their Resistance. This will allow you to deal more damage to the enemy.
The Helmet of Valor, Avalonian Cape, and Deadwater Eel Stew are your offensive items.
The Robe of Purity and Resistance Potion are your defensive items.
How to use this build:
Use (W) to catch the enemy→ Then use (Q) till you have 3 heroic charges, at the meanwhile brawl with the enemy→ Use (E) and fully brawl against the enemy till death and purge enemy buffs with (D)→ Use (R) when you or your duo gets low so that you can open the distance between you and the enemy, this will give time to heal. Use Resistance potion when you are getting concentrated and taking burst damage.
What Carving excels in:
- Good catch
- Good Brawl
- Good mobility
- Resistance penetration
The Carving full details:
- Weapon: Carving
- Head: Helmet of Valor
- Chest: Robe of Purity
- Shoes: any Sandals
- Cape: Avalonian Cape
- Food: Deadwater Eel Stew
- Potion: Resistance Potion
Holy Staff:
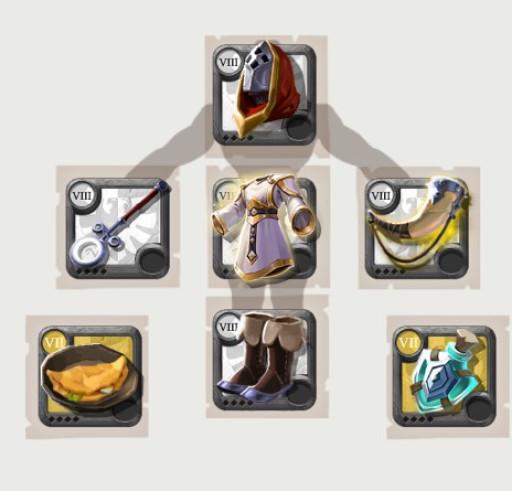
Generous Heal (Q1) Heals targeted ally for a good amount.
Holy Blessing (W3) increases the healing received of the targeted ally and increases his armor. On top of that, it grants immunity to forced movements.
Desperate Prayer (E) heals the targeted ally for a good amount if the target is above 40% HP and gives additional healing cast to you (max 3 stacks). If the targeted ally is below 40% HP, it heals him massively.
The Royal Cowl, Robe of Purity, Mercenary Shoes, and Resistance Potion are your defensive items.
How to use this build:
Use (Q) on yourself or your duo depending who has lost HP→ Use (E) on target who took burst damage→ Use (F) to get out of stuns and roots→ Use (R) when you or your duo gets low so that you can open distance between you and the enemy, this will give time to heal.→ Use resistance if you get low. Be aware of your position, you need to be near your Duo.
What Holy Staff Excels in:
- Huge sustain
- Huge burst heal
- Low Cooldowns
The Holy Staff full details:
- Weapon: Holy Staff
- Off-Hand: Mistcaller
- Head: Royal Cowl
- Chest: Robe of Purity
- Shoes: Mercenary Shoes
- Cape: Caerleon Cape
- Food: Pork OMelette
- Potion: Resistance Potion
2. Grailseeker & Dagger
Seeing this comp charging at you is the ultimate nightmare in Duo Mists. You know exactly what's coming, but there's nothing you can do to escape your fate if they catch you off-guard. The Grailseeker and Dagger 1-shot combo is feared for its overwhelming power. With perma-stuns from the Grailseeker locking down your movements, the Dagger delivers a lethal burst of damage that melts opponents instantly—even if they're mounted. This comp is merciless and leaves little room for counterplay, capable of ending fights before they even begin.
Grailseeker:
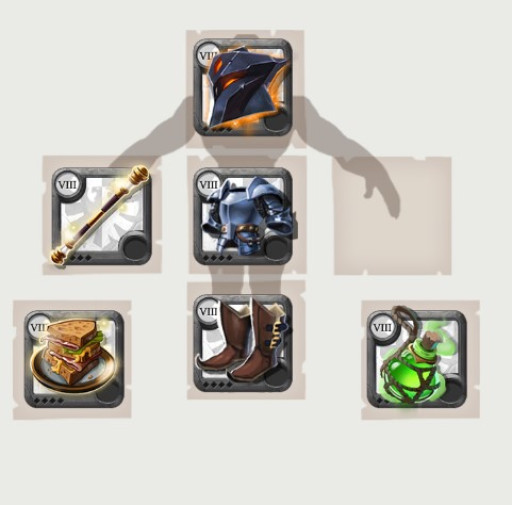
Cartwheel (Q3) does a literal cartwheel towards the targeted position. It deals a small amount of damage and knocks back the enemies that are hit. If you take damage while doing it, you will gain additional damage resistance and movement speed.
Stun Run (W2) increases your movement speed and stuns the first target that is auto-attacked after using the ability. This is your engage ability.
Soul Shaker (E), like the name says, your soul will be shaken and leave your body if you get hit by this ability. You hit the ground with your staff, rooting the enemies that are on the way and deal good damage. This can be recast once which will further increase the cooldown of the ability.
The Demon Helmet, Hunter Boots, Avalonian Beef Sandwich, and Poison Potion are your offensive items.
The Knight Armor, and Fort Sterling Cape are your defensive items.
How to use this build:
Use (F) and (W) to catch the enemy→ after stunning the enemy, use (D) on him and then use (E) to permanently stun him→ Throw poison to secure the kill→ Use (R) to help your Dagger reset and save him.
What Grailseeker excels in:
- Huge crowd control
- Good save
- High mobility
- 1-shot
The Grailseeker full details:
- Weapon: Grailseeker
- Head: Demon Helmet
- Chest: Knight Armor
- Shoes: Hunter Shoes
- Cape: Fort Sterling Cape
- Food: Avalonian Beef Sandwich
- Potion: Poison Potion
Dagger:
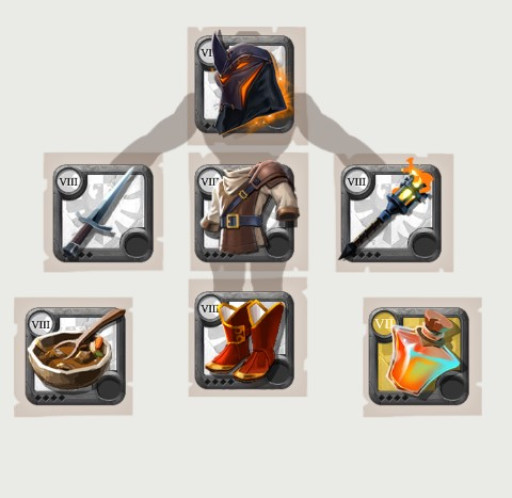
Deadly Swipe (Q2) leaps forward dealing a good amount of damage. Each enemy hit grants you with 1 assassin spirit charge which increases your damage (max 3 stacks).
Shadow Edge (W4) is your gap close ability. You throw a dagger which stuns the enemy on hit and drags you to the enemy. This ability could also be used to escape bad situations. You use this after Grailseeker stuns the enemy.
Bloodthirsty Blade (E) gives you additional auto-attack damage, lifesteal and movement speed when activated. But you lose 4% of your max HP when it’s activated.
The Demon Hood, Torch, Hunter Jacket, Royal Sandals, Demon Cape , and Beef Stew are your offensive items.
The Gigantify Potion is your defensive item.
How to use this build:
Start with using (F) which will give you movement speed and additional damage→ use (R) and (E)--> When Grailseeker stuns the enemy, use (W) and then (D)--> Auto-attack the enemy till he dies. Use Gigantify Potion if the enemy will hit you with a burst damage.
What Dagger excels in:
- Huge crowd control
- Huge burst damage
- High mobility
- 1-shot
The Dagger full details:
- Weapon: Dagger
- Off-Hand: Torch
- Head: Hellion Hood
- Chest: Hunter Jacket
- Shoes: Royal Sandals
- Cape: Demon Cape
- Food: Beef Stew
- Potion: Gigantify Potion
1. Grailseeker & Blazing Staff
Encountering this comp in the Duo Mists feels like a death sentence. The moment you see them charging, you know exactly how it's going to end—you’re going to burn in hell. The Grailseeker and Blazing 1-shot combo is devastating, using perma-stuns from the Grailseeker to trap you while the Blazing staff burns you down in seconds, even if you're mounted.
Grailseeker:

Cartwheel (Q3) does a literal cartwheel towards the targeted position. It deals a small amount of damage and knocks back the enemies that are hit. If you take damage while doing it, you will gain additional damage resistance and movement speed.
Stun Run (W2) increases your movement speed and stuns the first target that is auto-attacked after using the ability. This is your engage ability.
Soul Shaker (E), like the name says, your soul will be shaken and leave your body if you get hit by this ability. You hit the ground with your staff, rooting the enemies that are on the way and deal good damage. This can be recast once which will further increase the cooldown of the ability.
The Demon Helmet, Hunter Boots, Avalonian Beef Sandwich, and Poison Potion are your offensive items.
The Knight Armor, and Fort Sterling Cape are your defensive items.
How to use this build:
Use (F) and (W) to catch the enemy→ after stunning the enemy, use (D) on him and then use (E) to permanently stun him→ Use (Q) to knock the enemies and keep them in the Blazing’s fire→ Throw poison to secure the kill→ Use (R) to defend your Blazing after you hit the combo, if the enemy is chasing you or trying to fight.
What Grailseeker excels in:
- Huge crowd control
- Good save
- High mobility
- 1-shot
The Grailseeker full details:
- Weapon: Grailseeker
- Head: Demon Helmet
- Chest: Knight Armor
- Shoes: Hunter Shoes
- Cape: Fort Sterling Cape
- Food: Avalonian Beef Sandwich
- Potion: Poison Potion
Blazing Staff:
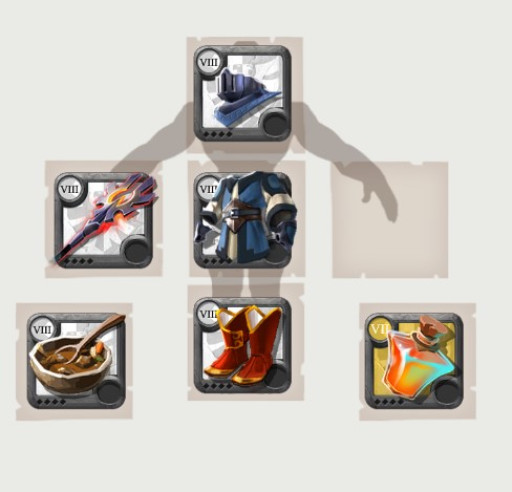
Burning Field (Q2) throws a fire orb that puts the ground on fire. It instantly deals massive AOE damage and additionally deals good AOE damage over time.
Fire Artillery (W5) targets an enemy and starts throwing fiery orbs on them dealing good instant AOE damage and sets the ground on fire dealing AOE DOT if the enemy remains on the AOE.
Flame Tornado (E), like the name says, you create a flaming tornado which deals good AOE damage on impact and deals massive AOE damage to the enemies that remain in the tornado and continues to deal damage to the enemies that are already leaving the AOE.
The Scholar Robe, Royal Sandals, and Beef Stew are your offensive items.
The Soldier Helmet, Fort Sterling Cape, and Gigantify Potion are your defensive items.
How to use this build:
Use (F) when you spot an enemy→ Use (R) and (E) on the enemy that the Grailseeker has stunned→ Use (Q) and then start casting (W)--> Use (D) and Gigantify Potion if the enemy is concentrating on you. After hitting your combo, you need to start kiting alongside your Grailseeker.
What Blazing Staff excels in:
- High burst damage
- High AOE damage
- 1-shot
The Blazing Staff full details:
- Weapon: Blazing Staff
- Head: Soldier Helmet
- Chest: Scholar Robe
- Shoes: Royal Sandals
- Cape: Fort Sterling Cape
- Food: Beef Stew
- Potion: Gigantify Potion


