Home
Home PC Game Trailers
 News
News Menu
Menu[Top 10] Warframe: Best AMP Combinations That Are Powerful
Updated: 28 Apr 2024 2:31 pm

Is that skin or a suit? Guess you could call it a skin-suit.
 BY: Mark D.
Custom Operator and Drifter Amps are often overlooked but very powerful additions to every Tenno’s arsenal. They’re a little complicated to get your hands on and are all but required to have a good time while running lucrative “endgame” activities like the Zariman missions and Eidolon hunting. So, need a little help getting your head around what Amps are good and how to get them? Well, here’s a comprehensive guide and top 10 list of my recommendations for powerful Amps!
First off, what are Amp combinations?
These are Modular weapons created for, and exclusively used by, Tenno Operators and their Drifter counterparts for taking out special enemies like Void Angels and Eidolons that have mechanics that allow them to be invulnerable to other damage sources. Each custom Amp is composed of three different segments that each govern the primary fire, secondary fire, and overall stats of the Amp you want to create. Each of these parts are farmed and built separately and are assembled by Onkko in Cetus or Little Duck in Fortuna.
Amp combinations are identified by the Warframe community with a sequence of three numbers corresponding to the order the parts are unlocked and what place they go in order of assembly. For example:
A 435 (Prism, Scaffold, Brace) Amp is an Amp assembled with the fourth unlocked Prism, the third unlocked Scaffold, and the fifth unlocked Brace.
How do Amp combinations work?
As stated before, all custom built Amps are made up of a combination of three separate parts. Each part installed will cause your amp to function differently with different stats, primary fire modes, and secondary fire modes. Each Amp is composed of three modular segments with currently 21 available Amp parts in total with seven parts for each segment. Amp parts are unlocked at, assembled, and sold by The Quills and Vox Solaris on Cetus and Fortuna respectively.
Once an Amp is assembled it comes in an un-gilded form that has reduced stats and gives no Mastery points. You have to then level your Amp up to level 30 then present it again to either Amp builder and have it gilded, wherein your Amp is reset to level 0 but also receives its full stats, it’s custom name (set by you), and the ability to reward Mastery points as you level it up back to 30.
List of all available Amp parts by segment, their functions, and where they are sold:
Prism, primary fire (Xxx):
- Raplak Prism (1xx), Semi-auto, long range, and hit-scan beam, Cetus.
- Shwaak Prism (2xx), Semi-auto, medium range, punch through projectile, Cetus.
- Granmu Prism (3xx), Three-shot grenade burst, Cetus.
- Rahn Prism (4xx), Full-auto, long range shots, Cetus.
- Cantic Prism (5xx), Fast and accurate three-shot burst, Fortuna.
- Lega Prism (6xx), Continuous, medium range widespread jet of Void fire, Fortuna.
- Klamora Prism (7xx), Wide, short-ranged beam, Fortuna.
Scaffold, secondary fire (xXx):
- Pencha Scaffold (x1x), Charged beam, Cetus.
- Shraksun Scaffold (x2x), Short-range flak grenade, Cetus.
- Klebrik Scaffold (x3x), Continuous homing beam, Cetus.
- Phahd Scaffold (x4x), Powerful shots that bounce between targets, Cetus.
- Exard Scaffold (x5x), Automatic grenade launcher that shoots until out of ammo, Fortuna.
- Dissic Scaffold (x6x), Cluster-Bomb launcher, Fortuna.
- Propa Scaffold (x7x), Timed explosive launcher that also detonates on impact with objects, Fortuna.
Brace, governs stat buffs / maluses (xxX)
- Clapkra Brace (xx1), +40 Amp energy pool, Cetus.
- Juttni Brace (xx2), -1 second Amp recharge delay, Cetus.
- Lohrin Brace (xx3), +12% Amp Critical/Status chance, Cetus.
- Anspatha Brace (xx4), +20 Amp energy pool, +15/s Energy recharge rate, Cetus.
- Suo Brace (xx5), +100 Amp energy pool, +2 second Amp recharge delay, Fortuna.
- Plaga Brace (xx6), -20 Amp energy pool, -1.5s Amp recharge delay, Fortuna.
- Certus Brace (xx7), +20% Amp Critical chance, Fortuna.
There are also two available pre-built amps, the Sirocco and the Mote Amp. I won’t be getting into these Amps on this list as they are not counted as custom amps. Just know that you acquire these Amps as you progress through the main Warframe story-line.
10. 111 Amp (Earliest accessible upgrade to the pre-built Amps)
Looks a bit like a shrimp.
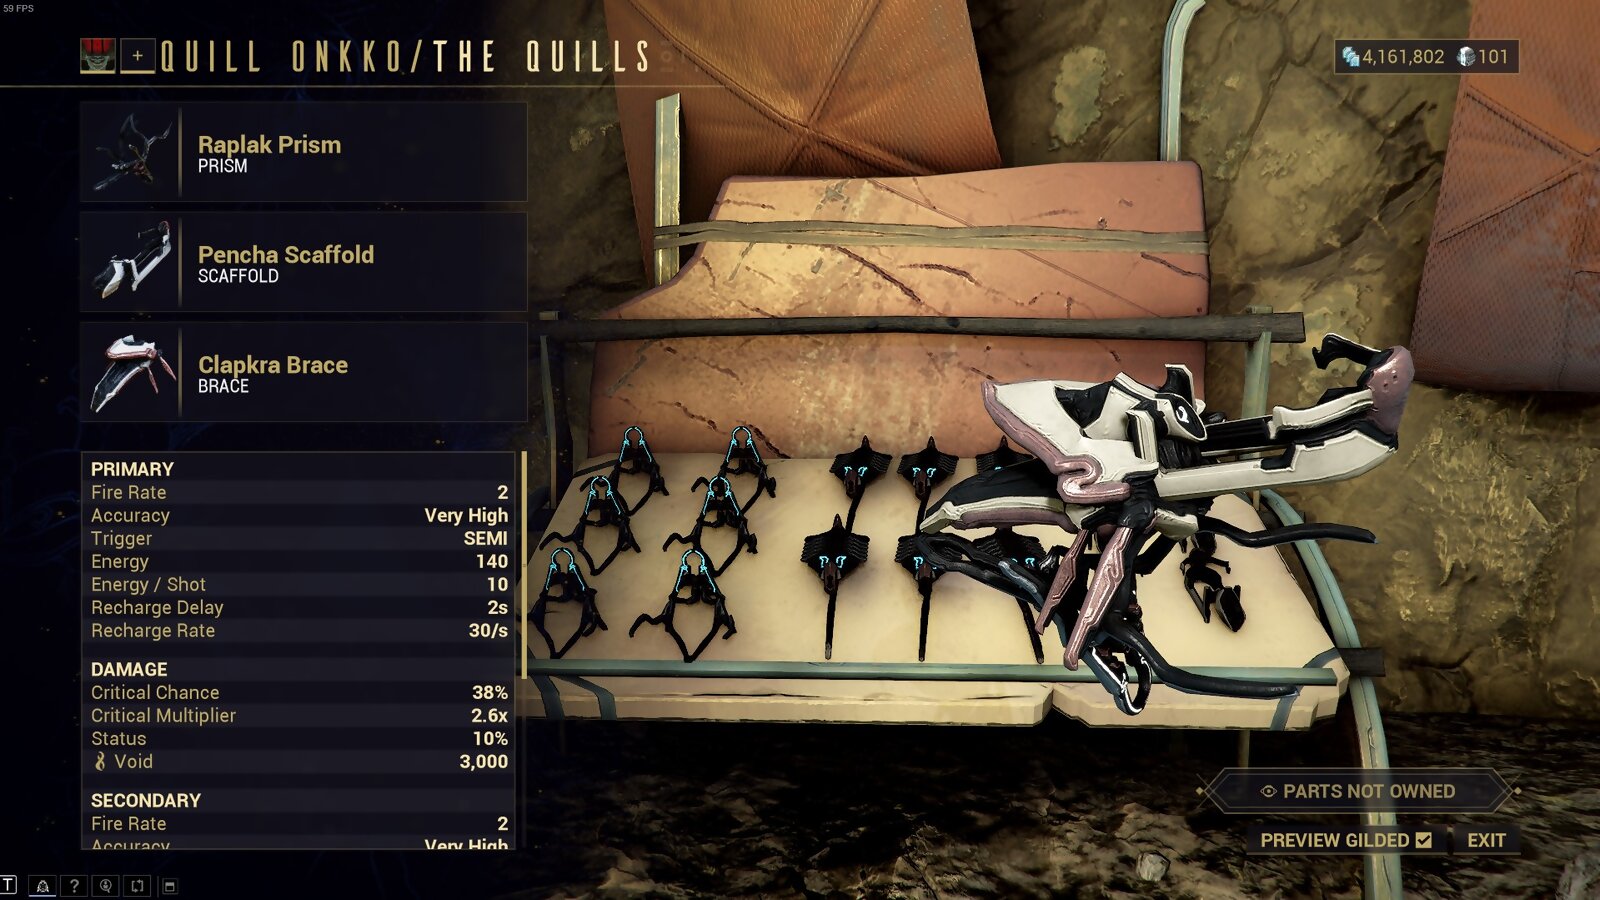
The classic 111 Amp. This Amp is probably most Tenno’s first ever custom built Amp (it was my first amp too). The 111 is composed purely of the earliest and easiest accessible Amp parts sold by Onkko in Cetus. This doesn’t mean the Amp is weak by any means, it’s stronger than the Mote Amp at least, but it definitely isn’t strong enough to allow you to solo later game activities.
The 111 primary fire is a basic semi-auto beam with a long range that's great for plinking at far away targets. The secondary fire is a powerful, charged beam that actually has the highest base damage of all Amp Scaffolds tied with the Pencha Scaffold, this is great for chunking at meatier targets and for disabling Eidolon shields. The 111 also sports a +40 to its energy pool, meaning you can fire more consecutive shots, this is useful in the early game while you still don’t have access to things like Void Strike from the Madurai focus tree or Amp and Operator Arcanes.
Overall the 111 is a great start to building custom Amps. It’s not the strongest and actually is matched in power by the Sirocco, but it’s cheap, doesn’t need to be reloaded for powerful shots like the Sirocco, and can be acquired earlier than the Sirocco.
111 Amp strengths:
- Long range
- High damage
- Larger energy pool
- Cheap and easy to make
111 Amp details:
Primary fire:
- Damage: 3,000 Void
- Critical chance: 38%
- Critical damage: 2.60x
- Status chance: 10%
- Fire rate: 2.000 attacks per/sec
- Range: 300m
- Energy cost: 10
Secondary fire:
- Damage: 9,000 Void
- Critical chance: 14%
- Critical damage: 1.60x
- Status chance: 18%
- Fire rate: 2.000 attacks per/sec
- Range: 40m
- Energy cost: 10
Brace stat effect:
- +40 Amp energy pool
111 energy stats:
- Total energy: 140
- Recharge delay: 2s
- Recharge rate: 30/s
9. 212 Amp (High base damage short-range crowd clear)
Now that looks like a wrist-cannon!
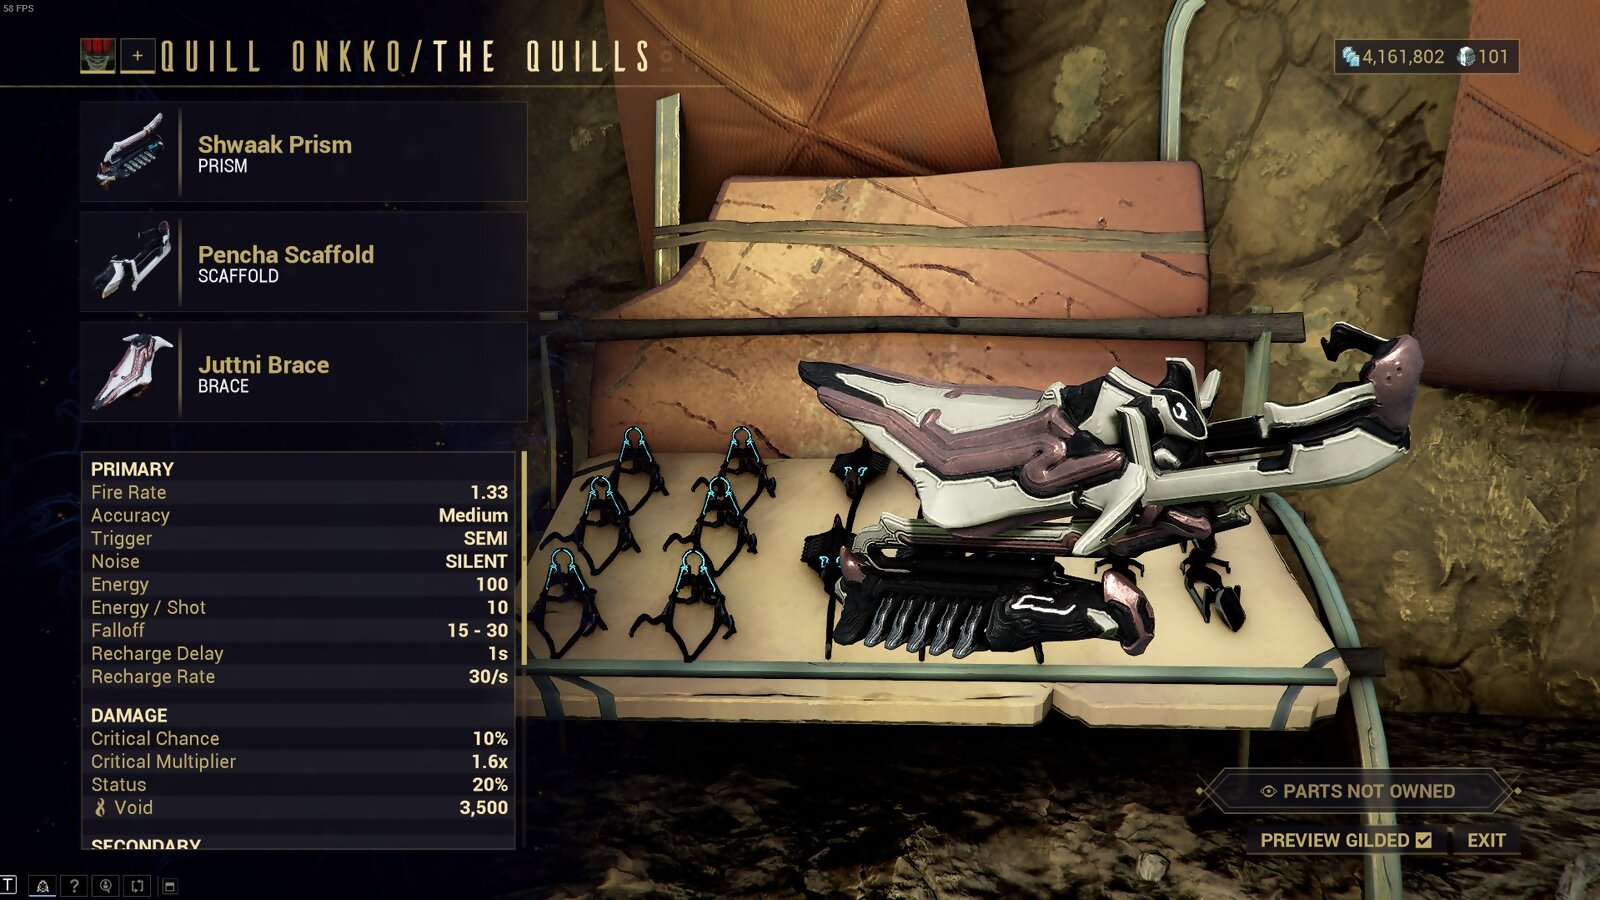
The 212 Amp is a fairly reliable early Eidolon shield breaker and Vomvalyst clearer. This Amp is a great option to bring to either public or solo Teralyst hunts as it is one of the first custom Amps that deals noticeable damage to the Teralyst’s shields and can clear Vomvalysts with some speed.
The 212 primary fire is a slow firing Arca Plasmor like projectile that has infinite punch-through and can actually hit oversized targets like Eidolons multiple times allowing for higher than average DPS and faster shield breaks despite the slow fire rate (provided you aren’t in a squad that can just one-shot the shield anyway). The 212 shares the same secondary fire as the 111. In this configuration the secondary fire is a great fallback option or damage supplement while your primary fire is on cooldown. This Amp also sports a lower energy recharge rate that pairs better with the slower fire rate primary fire as you won’t find yourself out of energy as much as you would with faster firing Amps.
I find that the 212 is a great stepping-stone Amp as it allows newer Tenno to comfortably go out and start farming Eidolons for Quill standing or Focus points. You don’t really want to stick to this Amp (or even the 111) for too long as there are way stronger options down the line.
212 Amp strengths:
- High base damage
- Punch through projectiles
- Faster energy generation
- Decent early Vomvalyst clear
212 Amp details:
Primary fire:
- Damage: 3,500 Void
- Critical chance: 10%
- Critical damage: 1.60x
- Status chance: 20%
- Fire rate: 1.330 attacks per/sec
- Range: 32.5m
- Energy cost: 10
Secondary fire:
- Damage: 9,000 Void
- Critical chance: 14%
- Critical damage: 1.60x
- Status chance: 18%
- Fire rate: 2.000 attacks per/sec
- Range: 40m
- Energy cost: 10
Brace stat effect:
- -1 second Amp energy recharge delay
212 energy stats:
- Total energy: 100
- Recharge delay: 1s
- Recharge rate: 30/s
8. 123 Amp (Versatile single-target and AOE)
It's like the head of a jumping spider.
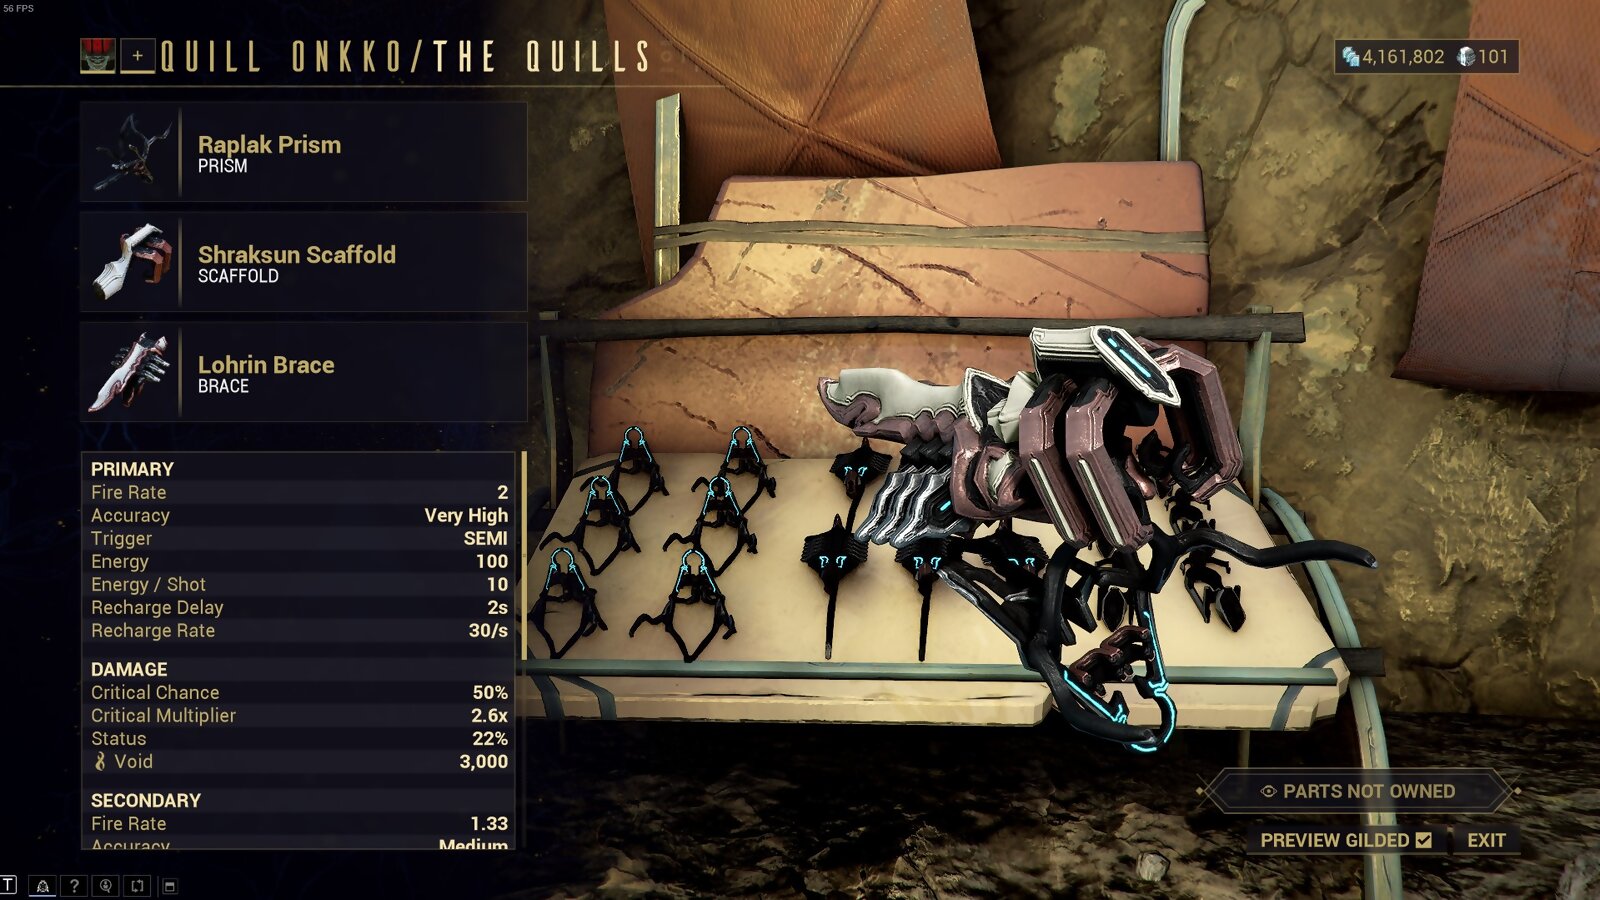
We’re comfortably heading towards the late early-game to mid-game Amps here, starting with the 123 Amp. This is a really versatile Amp with good single target and AOE capability. The 123 can pretty easily pull its weight in general use cases or even Eidolon hunts as I’m assuming at this point with your Quills standing you at least have some levels into the Madurai focus tree.
We’re sporting the Raplak prism once again for its very reliable primary fire, decent fire rate and above average crit stats. The 123’s secondary fire is a short range grenade that’s great for clearing mass amounts of Vomvalysts or, at this point in Warframe, even two or three Thrax specters. Do keep in mind however, that the 123’s secondary fire can inflict self-stagger One of the key points to the 123’s versatility is the innate, additive critical and status chance buffs that synergize well with the primary and secondary fire with their strong crit multipliers.
The 123 Amp is a great entry to the mid-game and is one of the Amps i would recommend newer Tenno to set their sights on once they’ve reached a high enough rank with the Quills. This Amp is also still fairly easy to get as there are no parts included from Vox Solaris.
123 Amp strengths:
- High critical chance
- High critical damage
- Versatility with both single target and AOE
- Still fairly easy to get
123 Amp details:
Primary fire:
- Damage: 3,000 Void
- Critical chance: 50%
- Critical damage: 2.60x
- Status chance: 22%
- Fire rate: 2.000 attacks per/sec
- Range: 300m
- Energy cost: 10
Secondary fire:
- Damage: 3,000 Void
- Critical chance: 32%
- Critical damage: 2.00x
- Status chance: 32%
- Fire rate: 1.330 attacks per/sec
- Range: 10m
- Energy cost: 10
Brace stat effect:
- Flat 12% increase to Amp critical and status chance
123 energy stats:
- Total energy: 100
- Recharge delay: 2s
- Recharge rate: 30/s
7. 143 Amp (an upgraded version of the 123)
Look! It has eyes!
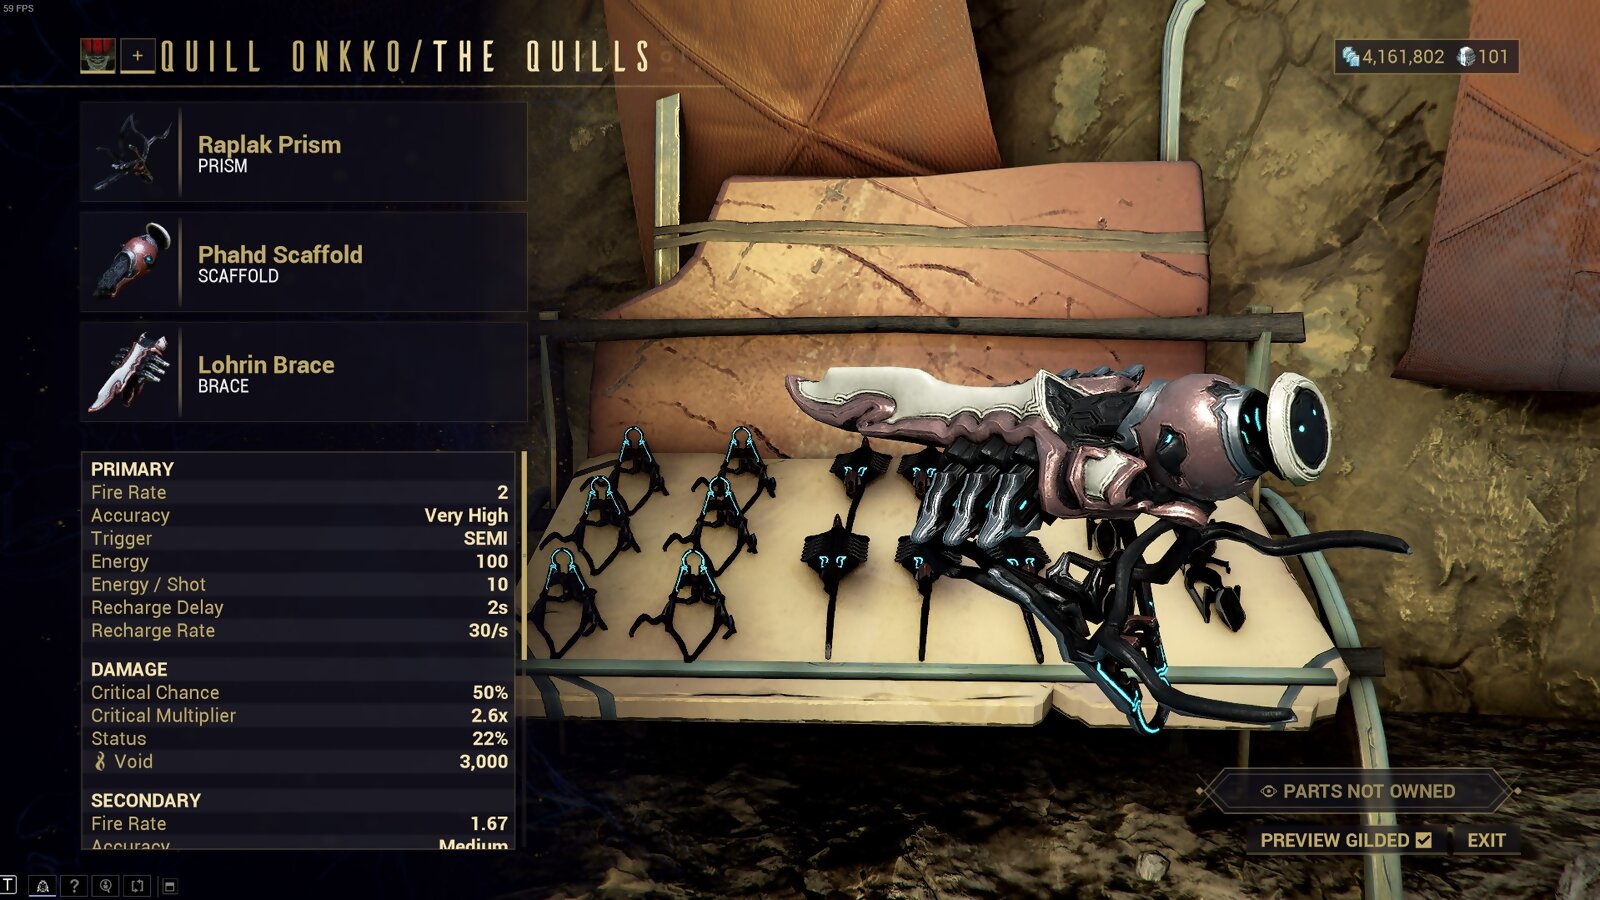
Right, think of the 123 with all its strengths but without the self-stagger. The 143 is basically that. This Amp, in my opinion, is the definitive mid-game Amp for general use. It’s got pretty much everything you want out of an Amp that is accessible at this stage of the game and is, again, a Cetus exclusive, so no Toroid farming for now.
The Prism and Brace of the 143 is identical to the 123 so I won’t talk about those. The secondary fire however, fires a glaive-like projectile that homes in on targets within range and ricochets off of them towards other targets up to four times. This secondary fire is much more comfortable to use as it does not inflict self-stagger and is a homing projectile. The secondary fire also boasts an above average crit chance and multiplier, further boosted by the Brace.
All the Amps past the 143 in this list will be using Fortuna, Vox Solaris parts so I will be considering them as late mid-game to late-game Amps. I will also be assuming the Tenno has at least a maxed Void Strike skill from the Madurai focus tree.
143 Amp strengths:
- High critical chance and damage
- Great AOE without self-stagger
- Cetus exclusive parts
- Long range with both primary and secondary fire
143 Amp details:
Primary fire:
- Damage: 3,000 Void
- Critical chance: 50%
- Critical damage: 2.60x
- Status chance: 22%
- Fire rate: 2.000 attacks per/sec
- Range: 300m
- Energy cost: 10
Secondary fire:
- Damage: 3,000 Void
- Critical chance: 46%
- Critical damage: 2.60x
- Status chance: 24%
- Fire rate: 1.670 attacks per/sec
- Range: 300m
- Energy cost: 20
Brace stat effect:
- Flat 12% increase to Amp critical and status chance
143 energy stats:
- Total energy: 100
- Recharge delay: 2s
- Recharge rate: 30/sec
6. 147 Amp (143’s final form)
Fun fact: Amps made with Fortuna parts get a blue and gray base color instead of red and white.
Right, our first amp with a Fortuna part. The 147 is a late-game amp that I consider a jack-of-all-trades Amp that is quite good in most content you want to run. It’s a fairly comfortable pick and is strong enough, when paired with Void Strike and Amp Arcanes from the Zariman like Eternal Eradicate, to reliably destroy Eidolon shields solo.
The 147 Amp functions identically to the 143 but boasts higher crit stats thanks to the buff from the Certus Brace. The same synergies that apply to the 143 also apply to the 147 but to a greater effect thanks to the higher base stats. The 147 Amp is a good Amp to get if you hate farming Vox Solaris or Fortuna standing but still want a strong custom Amp with Vox Solaris parts.
147 Amp strengths:
- Very high crit stats
- Flexibility with single target and AOE options
- Long range attacks
147 Amp details:
Primary fire:
- Damage: 3,000 Void
- Critical chance: 58%
- Critical damage: 2.60x
- Status chance: 10%
- Fire rate: 2.000 attacks per/sec
- Range: 300m
- Energy cost: 10
Secondary fire:
- Damage: 3,000 Void
- Critical chance: 54%
- Critical damage: 2.60x
- Status chance: 12%
- Fire rate: 1.670 attacks per/sec
- Range: 300m
- Energy cost: 20
Brace stat effect:
- Flat +20% critical chance
147 energy stats:
- Total energy: 100
- Recharge delay: 2s
- Recharge rate: 30/sec
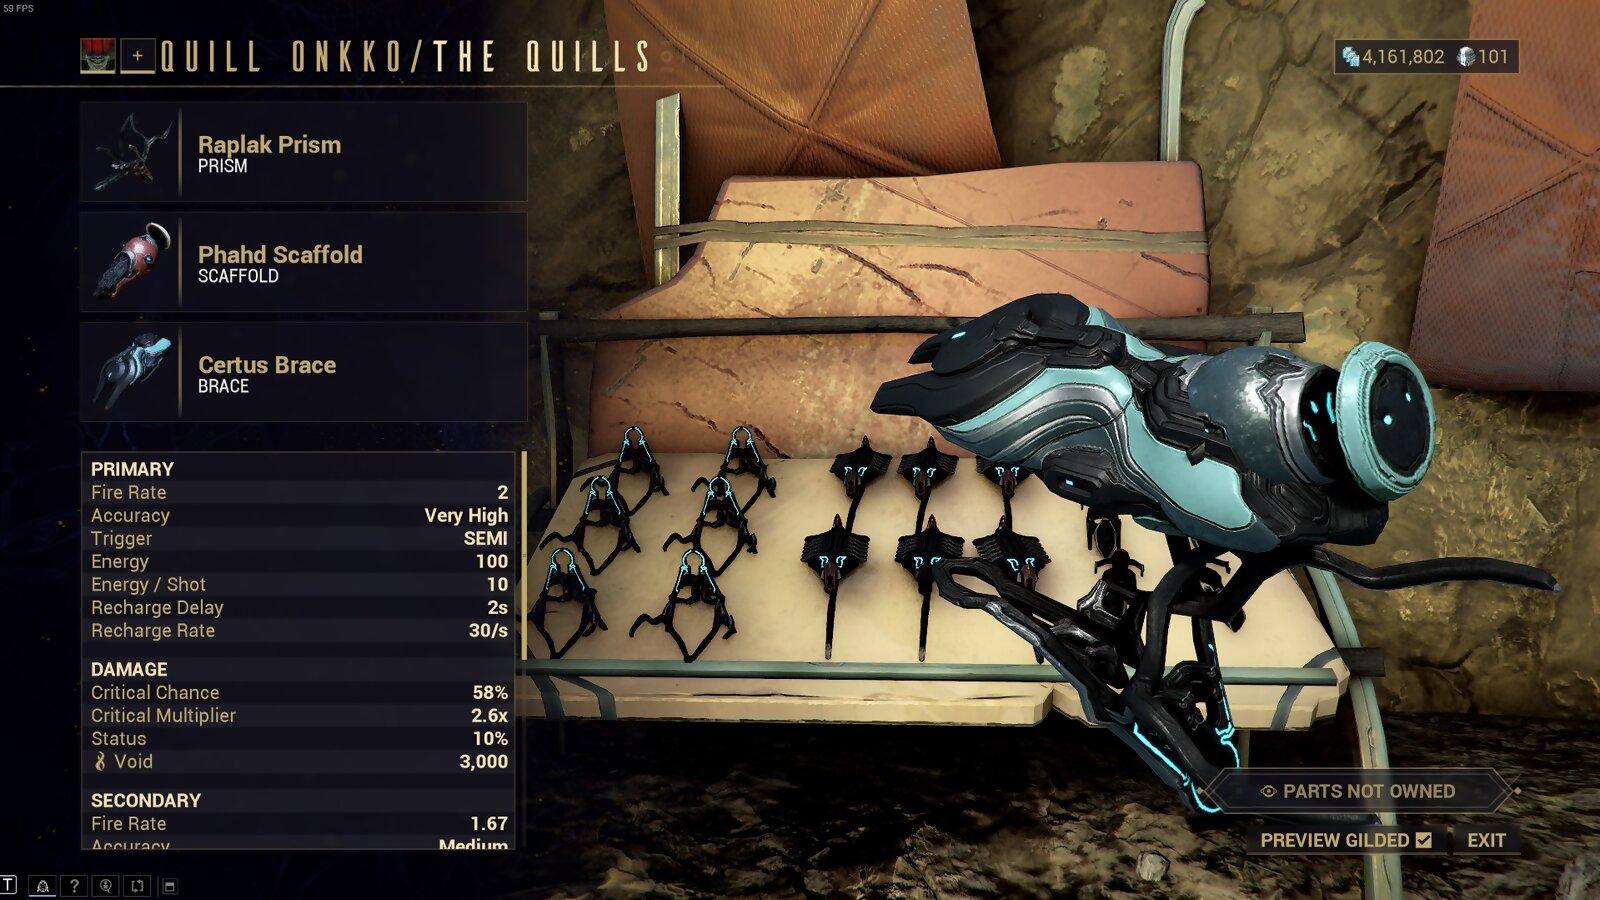
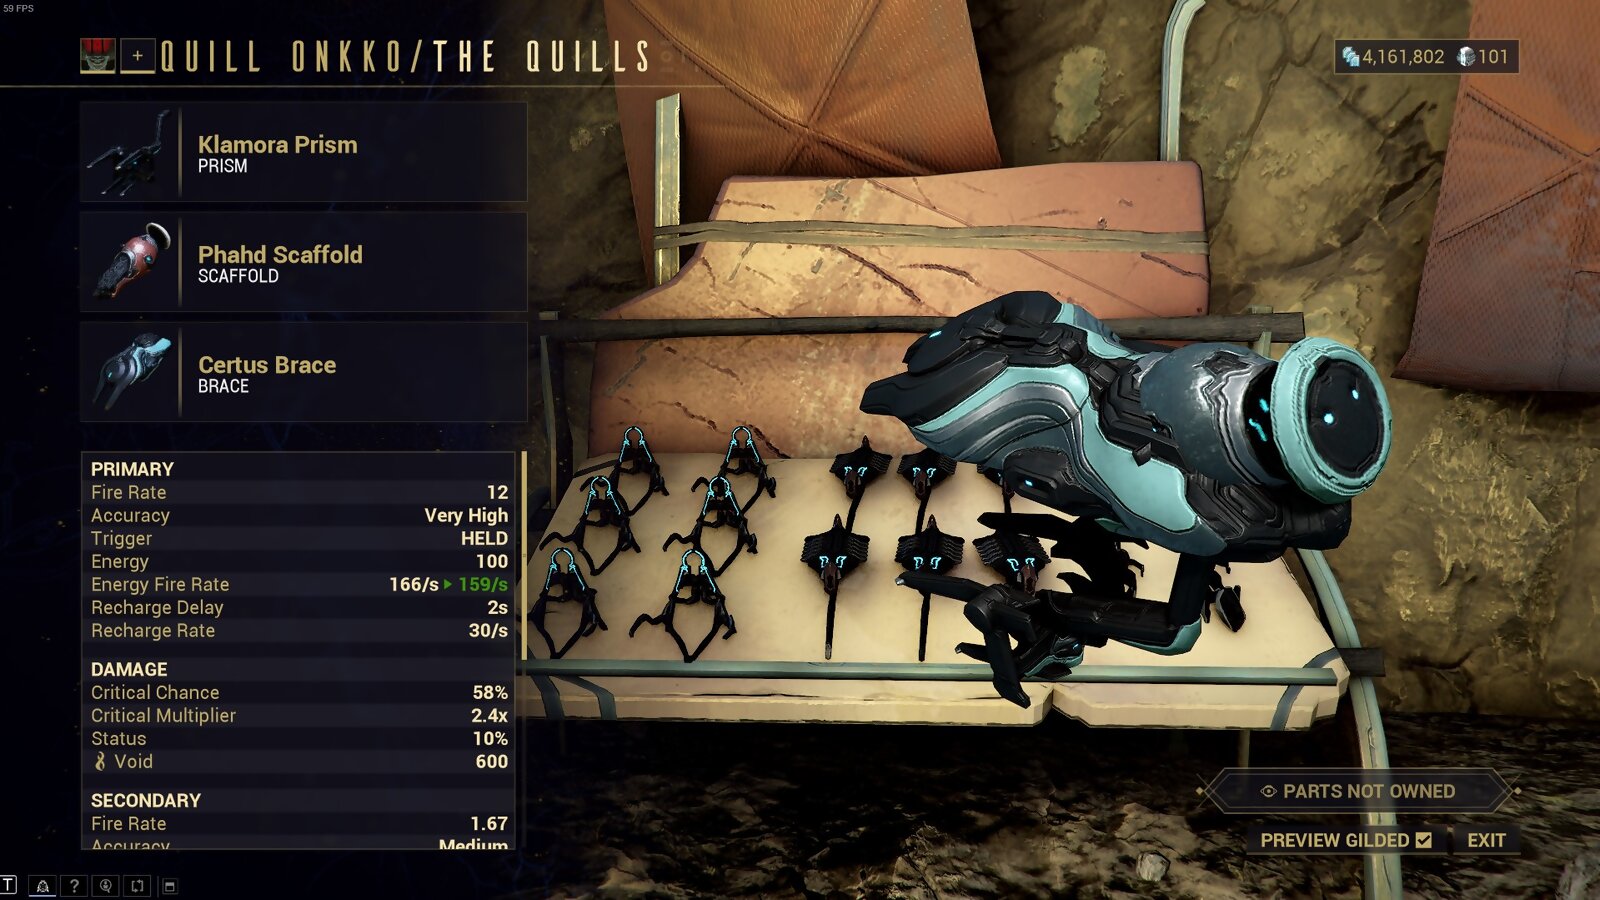
5. 747 Amp (AOE monster)
This little piggy burned the house down!
Switching it up this time around with a different Prism, the 747 Amp is another powerful combination that focuses on broader AOE damage while all but forgoing any notable purely single-target capability. You can still do Eidolons with this Amp, despite its diminished single target capability thanks to its crit stats and fast fire rate, however; I find that the 747 shines the brightest in Zariman missions fighting Void Angels and even multiple Thrax units as the AOE and very high DPS is better suited for that mission type.
The Phahd Scaffold and Certus Brace make a return in this Amp playing the same roles in the combo as they did before. The key difference that sets this Amp apart from Amps like the 147 is its primary fire. The Klamora Prism allows you to fire a very wide but short-ranged flamethrower-like beam of Void energy with very high DPS and comparable crit stats to the Raplak prism. The Klamora Prism pairs very well with Amp Arcanes like Eternal Eradicate or Eternal Onslaught and Void Strike from the Madurai focus tree for even more DPS.
747 Amp strengths:
- Exceptional crowd-clear capability
- Great crit stats
- Very high DPS and fire-rate with the Klamora Prism
747 Amp details:
Primary fire:
- Damage: 600 Void
- Critical chance: 58%
- Critical damage 2.40x
- Status chance: 10%
- Fire rate: 12.000 attacks per/sec
- Range: 14m
- Energy cost: 2.5
Secondary fire:
- Damage: 3,000 Void
- Critical chance: 54%
- Critical damage: 2.60x
- Status chance: 12%
- Fire rate: 1.670 attacks per/sec
- Range: 300m
- Energy cost: 20
Brace stat buff:
- Flat +20% critical chance
747 energy stats:
- Total energy: 100
- Recharge delay: 2s
- Recharge rate: 30/sec
4. 547 Amp (the 147 in a different flavor)

And this little piggy blew up the town!
Imagine the 147 but burst-fire, That’s basically the 547 Amp. What’s the main advantage of burst-fire against semi-auto? Well, the 547’s burst-fire actually beats out the raw DPS of the Raplak Prism by 1,124.8 provided your entire burst hits the target. With the current iteration of Void Strike you will get more out of a fully buffed burst than a single shot.
The Certus Brace and Phahd Scaffold make another return with the 547, again functioning identically as a reliable buff and AOE option. The Cantic Prism fires a pin-point accurate three-shot burst and has comparable crit stats to the Raplak Prism but has a lower range. The Certus Brace also spends very little energy per burst. This is another versatile and comfortable pick that is honestly very interchangeable with the 147 in cases where you won’t be very far away from your target.
547 Amp strengths:
- High damage burst-fire
- Great crit stats
- Very versatile with AOE and single-target options
547 Amp details:
Primary fire:
- Damage: 1,460 Void
- Critical chance: 54%
- Critical damage: 2.20x
- Status chance: 10%
- Fire rate: 4.880 attacks per/sec
- Range: 100m
- Energy cost: 3
Secondary fire:
- Damage: 3,000 Void
- Critical chance: 54%
- Critical damage: 2.60x
- Status chance: 12%
- Fire rate: 1.670 attacks per/sec
- Range: 300m
- Energy cost: 20
Brace stat buffs:
- Flat +20% critical chance
547 energy stats:
- Total energy: 100
- Recharge delay: 2s
- Recharge rate: 30/sec
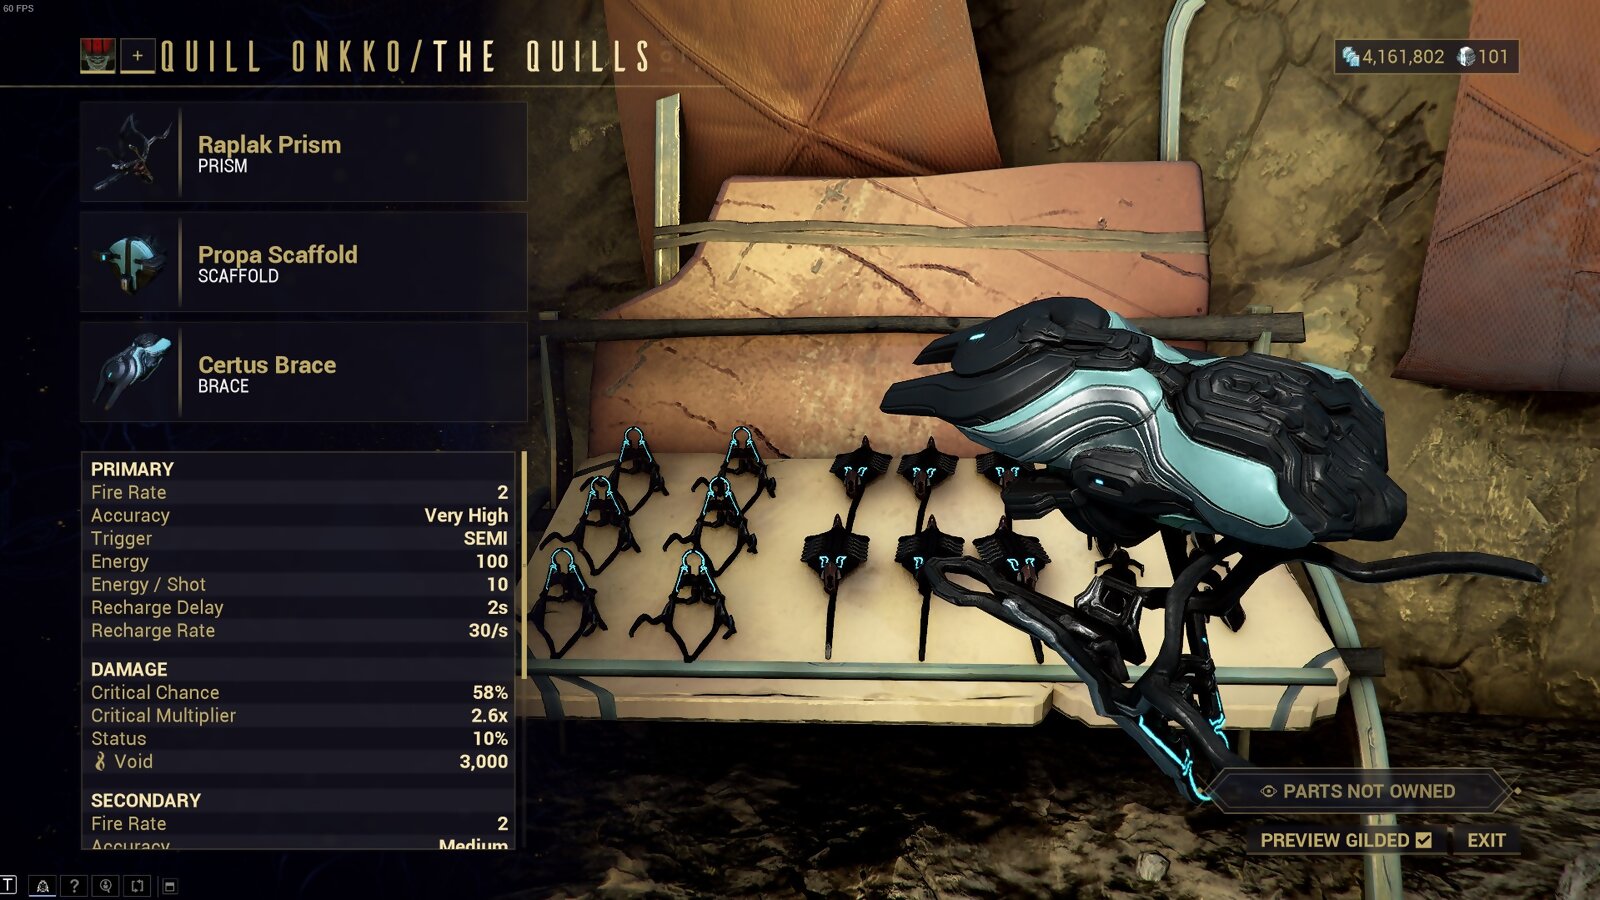
3. 577 Amp (The first of the big three “end-game” Amps)

Looks like a little ship, you know, like a kids toy.
The 577 Amp, one of the three most powerful custom Amps in the game. This Amp is the medium range version of the top three meta Amps currently in Warframe. The 577 Amp is composed of a few familiar parts, namely the Certus Brace and Cantic Prism but sports a new color in the combo, the Propa Scaffold.
The Propa Scaffold, of which we will be using for the remainder of this list, fires a short range, very high damage, explosive projectile. The Propa Scaffold is great for either taking out many enemies at once like the Thrax or heavily chunking larger enemies like Eidolon Teralysts, Gantulysts, and Hydrolysts. The 577 Amp is the middle ground between the niches covered by the rest of the x77 series Amps on this list.
577 Amp strengths:
- Good sustained DPS from the Cantic Prism
- Heavy burst-damage from the Propa Scaffold
- Great crit stats
577 Amp details:
Primary fire:
- Damage: 1,460 Void
- Critical chance: 54%
- Critical damage: 2.20x
- Status chance: 10%
- Fire rate: 4.880 attacks per/sec
- Range: 100m
- Energy cost: 3
Secondary fire:
- Damage: 9,000 Void
- Critical chance: 50%
- Critical damage: 2x
- Status chance: 0%
- Fire rate: 2.000 attacks per/sec
- Range: 14m
- Energy cost: 40
Brace stat buff:
- Flat +20% critical chance
577 energy stats:
- Total energy: 100
- Recharge delay: 2s
- Recharge rate: 30/sec
2. 177 Amp (the bane of all Eidolons)
Okay, now it still looks like a ship, but with like… little arms.
Meta Amps in Warframe lie on either end of one spectrum in my opinion. They’re either great at Eidolon hunting or great in general. Now, if the previous 577 stays in the middle of this spectrum, the 177 is all the way over towards the Eidolon hunting end. The majority of the Warframe community and even multiple Eidolon speedrunners have testified over the years that the 177 is the meta amp for one-shotting Eidolon shields, enabling a select few dedicated solo players to easily do three full eidolon captures six times in one night, referred to as a 6x3.
So, what goes into a 6x3? A lot. Everything from your Warframe of choice to the Weapons and even Archwing that you bring. Now, don’t get me wrong, the 177 is a significant part of many Eidolon hunters’ loadout and that isn’t just because of the big numbers on the base stat screen. It's also because of a specific technique utilizing the mechanics of the Propa Scaffold to simultaneously one-shot both the Eidolons shield and limb in less than 4 seconds (if you wanna see this technique in action it is widely utilized in many Tridolon speedruns on YouTube).
Okay great, it cuts through Eidolons like how fish swim in water but how about Zariman missions and general use? Well, the 177 still performs pretty good, in-fact the 177 is actually my daily driver for any activity I wanna run. That being said however, it’s like using a scalpel to dice carrots, it works but there is always a better tool for the job.
177 Amp strengths:
- Incredibly high burst-damage for killing Void Angels and taking out Eidolon shields
- High crit stats
- Long range primary fire
177 Amp details:
Primary fire:
- Damage: 3,000 Void
- Critical chance: 58%
- Critical damage: 2.60x
- Status chance: 10%
- Fire rate: 2.000 attacks per/sec
- Range: 300m
- Energy cost: 10
Secondary fire:
- Damage: 9,000 Void
- Critical chance: 50%
- Critical damage: 2x
- Status chance: 0%
- Fire rate: 2.000 attacks per/sec
- Range: 14m
- Energy cost: 40
Brace stat buff:
- Flat +20% critical chance
577 energy stats:
- Total energy: 100
- Recharge delay: 2s
- Recharge rate: 30/sec
1. 777 Amp (when one Amp can do it all)
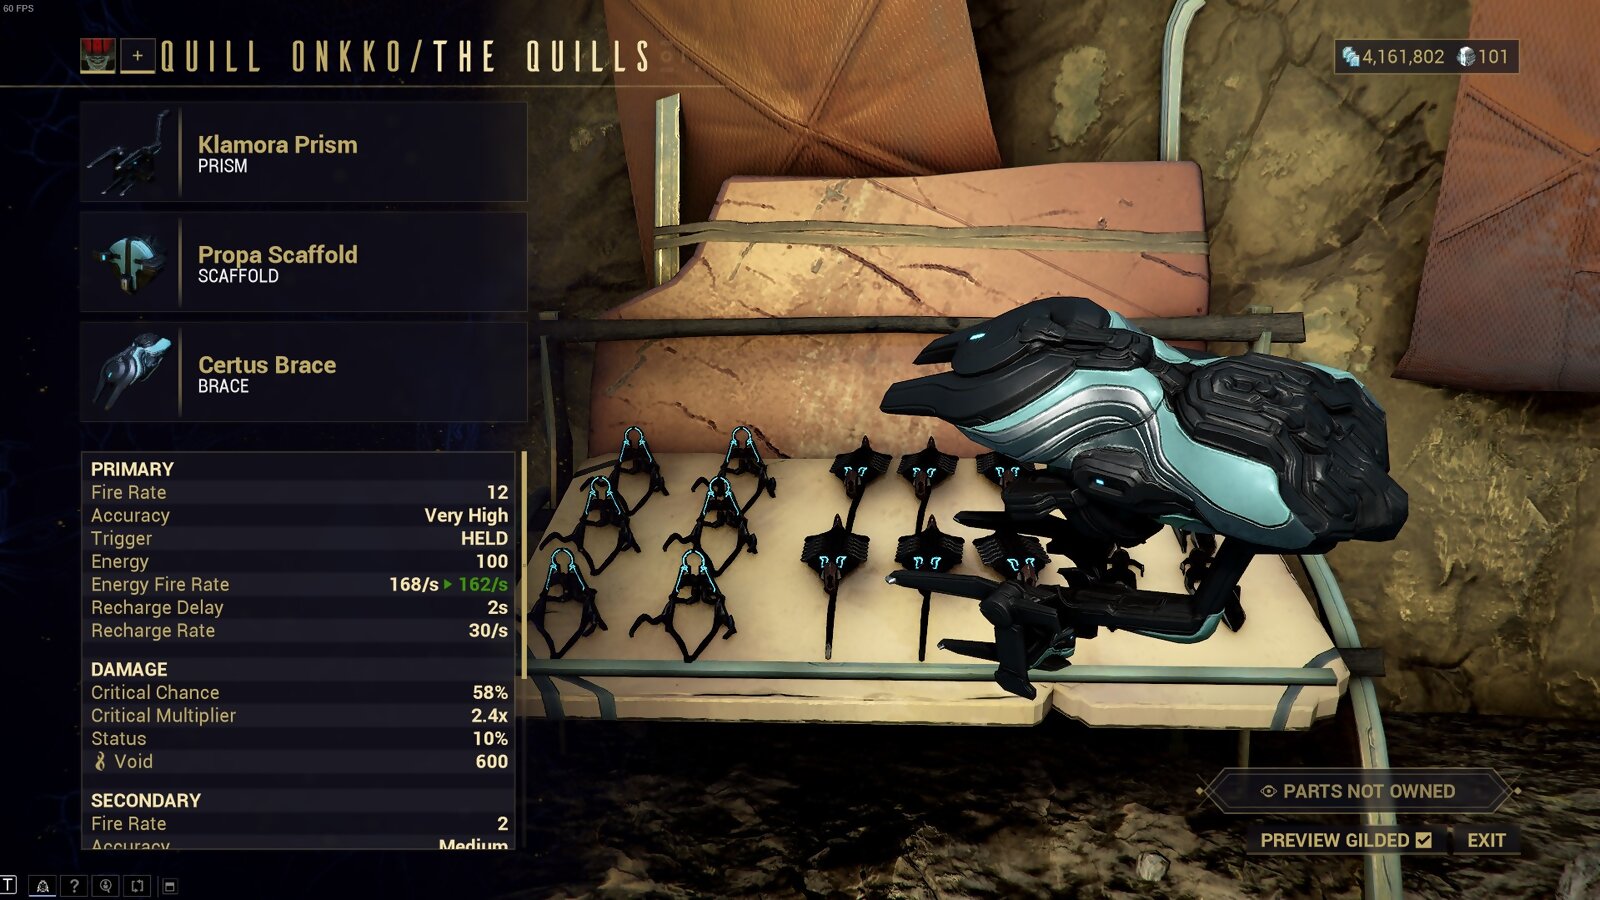
Sometimes I seriously wonder about the tech that goes into these weapons.
I get it, sometimes we just can’t be asked to keep swapping between multiple Amps just to run a mission. I mean it really is a hassle, memorizing what Amps you got, their capabilities, and how they work. Sometimes you just want one “end-game” Amp that can do pretty much anything comfortably. Well, it’s a good thing that the 777 exists huh?
The 777 Amp is the short-range, AOE and single target, generalist King of Amps. With the DPS and burst-damage of the Klamora Prism and the Pencha Scaffold paired with the crit buff from the Certus Brace this thing can pull its weight anywhere. Eidolon hunting? Cast Void Strike and hold mouse 1 until the shield breaks. Lots of Thrax messing up the objective? Fire a Pencha shot and watch them evaporate. Too far from your target? Good thing Operators and Drifters can Void Sling and turn invisible. If you dread the entire Amp grind and can only tolerate farming one custom Amp, the 777 is for you.
777 Amp strengths:
- Very high DPS from Klamora Prism
- Burst damage from the Pencha Scaffold
- Great crit stats
- Incredible versatility
777 Amp details:
Primary fire:
- Damage: 600 Void
- Critical chance: 58%
- Critical damage 2.40x
- Status chance: 10%
- Fire rate: 12.000 attacks per/sec
- Range: 14m
- Energy cost: 2.5
Secondary fire:
- Damage: 9,000 Void
- Critical chance: 50%
- Critical damage: 2x
- Status chance: 0%
- Fire rate: 2.000 attacks per/sec
- Range: 14m
- Energy cost: 40
Brace stat buff:
- Flat +20% critical chance
777 energy stats:
- Total energy: 100
- Recharge delay: 2s
- Recharge rate: 30/sec
You may also be interested in:
Share this Article:

- Log in or register to post comments

![[Top 10] Warframe Best Bosses To Kill For Rewards-01](https://www.gamersdecide.com/sites/default/files/styles/308x185-scale-crop--more-top-stories/public/top_10_warframe_best_bosses_to_kill_for_rewards-01.jpg "Warframe Bosses Main Photo")


![Warframe Best Focus Schools [Best And Worst Schools Revealed]-1](https://www.gamersdecide.com/sites/default/files/styles/308x185-scale-crop--more-top-stories/public/warframe_best_focus_schools_best_and_worst_schools_revealed-1.jpg "Warframe Focus Schools Main Photo")
![[Top 5] Warframe Best Offensive Companions (And How To Get Them)-1](https://www.gamersdecide.com/sites/default/files/styles/308x185-scale-crop--more-top-stories/public/top_5_warframe_best_offensive_companions_and_how_to_get_them-1.jpg "Warframe Companions Main Photo")


![[Top 5] Warframe Best Intrinsics That Are Most Useful (Latest Patch Echoes Of The Zariman)-1](https://www.gamersdecide.com/sites/default/files/styles/308x185-scale-crop--more-top-stories/public/top_5_warframe_best_intrinsics_that_are_most_useful_latest_patch_echoes_of_the_zariman-1.jpg "Intrinsics Main Photo")


![[Top 5] Warframe Best Beast Companions (And How To Get Them)-1](https://www.gamersdecide.com/sites/default/files/styles/308x185-scale-crop--more-top-stories/public/top_5_warframe_best_beast_companions_and_how_to_get_them-1.jpg "Warframe Beast Companions Main Photo")


![[Top 5] Warframe Best Braces That Are Powerful (Latest Patch Echoes Of The Zariman)-1](https://www.gamersdecide.com/sites/default/files/styles/308x185-scale-crop--more-top-stories/public/top_5_warframe_best_braces_that_are_powerful_latest_patch_echoes_of_the_zariman-1.jpg "Warframe Amp Braces Main Photo")
![[Top 15] Warframe Best Animation Sets That Look Freakin' Awesome-01](https://www.gamersdecide.com/sites/default/files/styles/308x185-scale-crop--more-top-stories/public/top_15_warframe_best_animation_sets_that_look_freakin_awesome-01.jpg "Warframe Animation Sets Main Photo")


![[Top 5] Warframe Best Sentinel Companions (And How To Get Them)-1](https://www.gamersdecide.com/sites/default/files/styles/308x185-scale-crop--more-top-stories/public/top_5_warframe_best_sentinel_companions_and_how_to_get_them-1.jpg "Warframe Sentinel Companions")


![[Top 10] Warframe Beam Weapons That Are Powerful-01](https://www.gamersdecide.com/sites/default/files/styles/308x185-scale-crop--more-top-stories/public/top_10_warframe_beam_weapons_that_are_powerful-1.jpg "Beam Weapons Main Photo")
![[Top 5] Warframe Best Farming Warframes (As Of Veilbreaker)-1](https://www.gamersdecide.com/sites/default/files/styles/308x185-scale-crop--more-top-stories/public/top_5_warframe_best_farming_warframes_as_of_veilbreaker-1.jpg "Farming Warframes Main Photo")